User Interface
User Interface
From adding your own default Enter button to the real secret behind user controls, this section deals in all the ASP.NET tips and techniques concerning things your surfer actually sees: the user interface. And we open with the
Five-Step Checklist for the Validation Controls
In the olden days of ASP, one big developer nightmare was trying to validate information coming from the users. What if they entered the word sixty-three instead of the numeral 63 in the age field? You can hardly put that into a numeric SQL Server field. What if they entered not@home as their email address? Don t think so, user.
So, developers had to figure out validation, and it was a long and arduous battle.
Thankfully, ASP.NET includes a whole bundle of server controls specially designed to handle this task and save a mound of time in the process. The controls are as follows :
-
RequiredFieldValidator: Use this when you have a field that needs a value entered, such as a password box on a login screen.
-
CompareValidator: Use this to compare two items, such as ensuring that the values of two boxes contain the same information (that is, for a double email check) or that a box contains a number above a defined value.
-
RangeValidator: Use this to check that an item is within a particular range, such as a box containing an income value between $20,000 and $30,000.
-
RegularExpressionValidator: Use this to check an item against a regular expression, such as checking a box containing an email address against the regular expression \w+([-+.]\w+)*@\w+([-.]\w+)*\.\w+([-.]\w+)* (which describes a valid email address. I know: it s confusing).
-
CustomValidator: Use this when you want to run your own custom clientside JavaScript or VBScript functions.
How do you use these controls? Well, they re all actually incredibly simple. Here s my five-step checklist to using any of these controls on your Web page.
-
Drag the validation control that most suits your function onto your Web page, perhaps next to the control you wish to validate.
-
Change the Display property of your control to Dynamic. By default, the Web page leaves room for the error message, even before it s displayed, and having an invisible block of white on your page doesn t always look very good. Changing this property to Dynamic means the space is allocated as and when required.
-
Change the ControlToValidate property, using the dropdown list to select a control on your Web Form. This is the input control you wish to check (validate), such as a TextBox or ListBox.
-
Change the ErrorMessage property to something a little more English than its current value (for example, Please enter an email address!).
-
That s it, if you re using the RequiredFieldValidator. However, for all other validation controls:
-
CompareValidator: If you re wanting to compare the value of two controls, change the ControlToCompare, Operator, and Type properties as appropriate. If you re wanting to compare the control to a value, change the ValueToCompare, Operator, and Type properties.
-
RangeValidator: Select the minimum and maximum values in the MinimumValue and MaximumValue properties, respectively. You may also need to change the Type property to Currency, or Integer, for example.
-
RegularExpression: Select a fresh regular expression from the list, through the ValidationExpression property, such as Internet URL or U.S. ZIP Code. Alternatively, you can specify your own: Chapter 8 Unveiled: The Hidden .NET Language discusses nothing but regular expressions. Oh, the laughs.
-
CustomValidator: This is a little trickier. Firstly, you need to write a function behind your Web page in either JavaScript or VBScript, which passes back a value, depending on whether your own custom data check has passed or not. Secondly, you need to set the ClientValidationFunction to the name of your function. If you want to try this, your best bet is to click on the ClientValidationFunction property and press F1: the help displays a highly useful sample you ll be able to adopt for your own use.
-
And that s it. Every time your user tries to click on a button on your Web page that has its CausesValidation property set to True , the validation routines kick in. These run on the client side in JavaScript, validating information and displaying error messages as appropriate. If validation isn t successful, the form isn t allowed to be submitted.
But what happens if the users browser does not support JavaScript, or JavaScript is disabled? As a double-check , validation also occurs on the server. But let s imagine your user has clicked an important button to add information to your database. Although the validation may have run on the server, your button code still runs ”and could potentially add a load of bad information to your database. As such, all code that relies on good data needs to check that validation has passed, like this:
If Page.IsValid = True Then ' No problems, continue End If
This checks to see whether the page IsValid property equals True . This means that validation has passed and there were no problems, so you can merrily continue, rather than processing all that potentially dodgy data.
One last point: the ValidationSummary control provides an overview of errors raised on your page. Simply add it at a convenient location on your page, and it ll summarize any errors on your behalf . It can also display the errors in a message box to ensure that your user gets the idea. Key properties to change here are HeaderText , DisplayMode , ShowMessageBox , and ShowSummary .
Displaying Web Warning Messages: Technique 1
Download supporting files at www.apress.com .
The files for this tip are in the Ch3 ” Warning 1 folder.
One of the problems in trying to dish out warnings on a Web page is that it s all very passive. Not awfully in-your-face. You can t always force a reaction, as you can with a Windows application.
That s why I like this little tip. It s a simple five-step method of raising a JavaScript alert warning (a message box on a Web page) that you can call with just one line of code from anywhere on your ASP.NET Web page. Here s how to set it up.
-
Switch to the HTML view of your Web form and add the following immediately after the close of the < body > tag:
<script> <asp:Literal id="ltlAlert" runat="server" EnableViewState="False"> </asp:Literal> </script>
-
Switch back to Design view and save your Web form. This has set up your Literal server control manually. You couldn t have done this visually, due to the < script > tags we needed to add.
-
Enter the code window behind your Web form and add the following line beneath the Public Class and Inherits lines, which allows us to manipulate this control in code:
Protected WithEvents ltlAlert As System.Web.UI.WebControls.Literal
-
Add the following code snippet behind your Web form. This takes a string and incorporates it into a JavaScript alert command, which is then placed on the Web page as pure HTML:
Private Sub Say(ByVal Message As String) ' Format string properly Message = Message.Replace("'", "\'") Message = Message.Replace(Convert.ToChar(10), "\n") Message = Message.Replace(Convert.ToChar(13), "") ' Display as JavaScript alert ltlAlert.Text = "alert('" & Message & "')" End Sub -
Whenever you want to display an in-your-face message, simply call this Say function in your code, as the following snippet demonstrates (see Figure 3-1 to see it in action.):
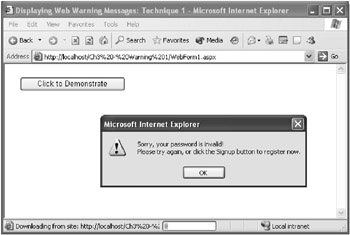
Figure 3-1: An in-your-face Web error messages with just one line of code!
Say("Sorry, your password is invalid! " & _ Microsoft.VisualBasic.vbNewLine & _ "Please try again, or click Signup to register now.") Displaying Web Warning Messages: Technique 2
Download supporting files at www.apress.com .
The files for this tip are in the Ch3 ” Warning 2 folder.
At times you may want to draw attention to an important message but without being overly loud. Sometimes, all you want to say is Thank you! Your information has been stored or Finished: All your outstanding reviews have been completed.
In these situations, a message box is a little bit of overkill. Slightly more placid is the technique of displaying a whole Web page with just your core message at its center. I also prefer to add automatic redirects on such pages, so that, after a few seconds, the user gets taken back to the previous page, or through to the next.
You can achieve this goal in two different ways. The first is to create a separate page that perhaps accepts a message in the query string, displays that message, and then redirects your user to the new page.
Alternatively, you can do it wholly in code, which is just what we re going to do here. I ve created a small method holding the HTML for a simple Web page (although you could perhaps load the text from a file). Inside that page, you ll find numerous variables (such as %message-title% ) that get replaced by the method. When ready, we push the modified HTML down the wire as a response to our client.
The HTML also contains a HTTP Refresh command, which by default takes the user back to the previous page. So, in brief, when you call the function, it displays your message for a number of seconds and then returns to the issuing page. (See Figure 3-2.)
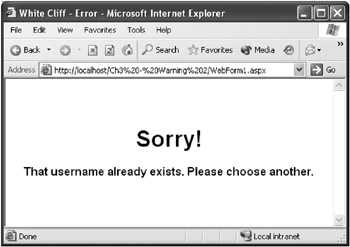
Figure 3-2: Another way to display messages, albeit somewhat quieter than the last
Here s the function you ll need:
Public Sub DisplayMessage(ByVal MessageTitle As String, _ ByVal MessageDetails As String, _ Optional ByVal PageTitle As String = "Attention!", _ Optional ByVal DelayInSeconds As Integer = 2) ' Core HTML, with refresh Dim strResponse As String = "<html><head><title> & _ %page-title%</title><META HTTP-EQUIV=""Refresh"" " & _ "CONTENT=""%delay%; url=javascript:history.back();"">" & _ "</head><body><div align=""center""><center>" & _ "<table border=""0"" cellpadding=""0"" cellspacing=""0"" " & _ "width=""100%"" height=""100%""><tr><td width=""100%"">" & _ "<p align=""center""><b><font face=""Arial"" size=""6"">" & _ "%message-title%</font></b></p><p align=""center"">" & _ "<font face=""Arial"" size=""3""><b>%message-details%</b>" & _ "</font></td></tr></table></center></div></body></html>" ' Replace defaults strResponse = strResponse.Replace("%page-title%", PageTitle) strResponse = strResponse.Replace("%message-title%", MessageTitle) strResponse = strResponse.Replace("%message-details%", _ MessageDetails) strResponse = strResponse.Replace("%delay%", _ DelayInSeconds.ToString) ' Display response Response.Clear() Response.Write(strResponse) Response.End() End Sub Go try it out. It s neat, it s simple, and it s suitable for the majority of regular user messages.
Don t forget: this is the raw version. You can very easily modify it to take your user to another page, just by adding an extra parameter. Maybe you want to make the whole error page template driven. Either way, this snippet is at least a good step in the right direction.
Unveiled: How to Create a Default Enter Button
This is one of those little code snippets you can pull your hair out trying to find. And no help file nor book I ve come across actually makes a reference to it. So, surely it can t be that important?
Imagine you ve created an ASP.NET Web page with a search button. The user taps a phrase into a textbox and presses Enter. On most regular Web pages (think Google), the form would be submitted and the results returned. In other words, the search button is automatically clicked for you.
However, on an ASP.NET Web page, pressing the Enter key resubmits the form to the server, but doesn t actually do anything... which is pretty useless, really.
So, how do you set a default button to be clicked when the user presses Enter? Simply add the following line to your page Load event, replacing btnSearch with the name of your button:
Page.RegisterHiddenField("__EVENTTARGET", "btnSearch") This line of code uses a hidden Page method called RegisterHiddenField , which adds a hidden field to your form associating __EVENTTARGET with the name of your button. When you press Enter on a control, such as a TextBox, the browser recognizes this standard hidden field and clicks on the button for you.
Wonders of the Little-Known SmartNavigation Property
Smart navigation is a little-known Internet Explorer feature that enables the individual controls on your Web forms to maintain focus between postbacks, as well as allows you to suppress that flicker that occurs as you load the new page.
To turn on this little-known feature, simply set the smartNavigation property of your ASPX page to True. You can also apply the property to all project pages, by adding the <pages> tag to the following location within your Web.config file:
<configuration> <system.web> <pages smartNavigation="true"/> </system.web> </configuration>
Note that smart navigation works on only Internet Explorer 5 and above; however, ASP.NET will automatically detect this and serve up the smart code only if the target browser supports it.
Also, I d personally advise that you test it against any third-party menu controls or scripts you may have running: it is prone to falling over on particularly advanced pages.
The Secret Behind User Controls
User controls are an often misunderstood arrow in your ASP.NET quiver. They re not difficult, and they re not exclusively reserved for large Web sites, but they could save you hours in development time.
So, what exactly are they? Well, if you ve used ASP before, a Web user control is essentially an include file with frills. For everyone else, they re a method of creating a piece of a page once, and then including it on numerous other Web pages.
For example, you may have a green menu with pretty icons, each linking to a different part of your site. You really don t want to go designing that manually for every single page. Rather, create the menu once as a user control, then go slot it onto your other pages where necessary. You could do the same with a Subscribe to our newsletter box. Or the header logo on your site. Or the copyright notice.
Here s how you can get started with user controls in four easy steps.
-
In your Web application project, select Project
 Add Web User Control from the menu. Choose a name and click on Open.
 -
Start designing your user control. Don t forget: this shouldn t be a complete Web page but rather a small subset, such as a login box or copyright notice. Add code just as you would with a regular ASP.NET Web form.
-
When finished, close and save your user control.
-
On the page you want to use or test your user control, drag and drop the ASCX file from the Solution Explorer onto your page. You may drop it directly onto a raw page or position it within a table cell .
That s it! Admittedly, the gray glyph may look a little drab now, but, as soon as you run your application, it ll be replaced with whatever functionality you ve built into your user control. And you can use this same user control again and again, on as many pages as you wish. When you need to make changes, however, you have to edit only one file.
What a perfect way to save time and duplication of efforts!
Don t forget the real secret here: you can t overuse user controls. They re useful everywhere . If you think something is going to occur more than two or three times on your site, turn it into a user control.
| TOP TIP | Many developers are discouraged from getting to grips with user controls due to the way they re shown in VS .NET at design time: as that small gray glyph. You can t change this, but you can make the situation easier by setting aside areas in which to put controls. For example, you may create a table and place your header control inside a specifically sized cell at the top of the page. Or you may draw out a Panel control and put the user control inside that. Using these techniques, you can at least reserve areas of the page for your controls to fill. For more clever ways of utilizing Web user controls, including through "template" pages, download the book source code from www.apress.com and check out ReadMe.txt. |
Why the Panel Control Is Super Useful
The Panel control is often overlooked as being one of those features that ASP.NET threw into the pack for completeness, despite the fact that no one would ever really use it. Incorrect!
One really amazing use for the Panel control is partitioning bits of HTML off from the rest. As an example, you may have a page that displays information about an employee. The page may have different sections depending on what information it has about the individual: background, education, references, photograph, and so on.
The problem is that not all of that information may be available, and displaying a whole section when no data is present seems pretty pointless. This is an instance where we d be able to use the Panel control to hold the individual sections on your page, then choose to make the appropriate sections visible or invisible in code, as appropriate.
You could do something similar with a logon panel: one panel could display a username and password box while the other provides links for those who have already had their credentials validated . You could then make either one or the other invisible, depending on the logon status.
How can you do all this? It s simple. Just add the Panel control to your form, perhaps setting its Width property to 100% if you wish to spread it across the available width. Next, start designing and coding within the panel, adding server controls, text, images, and anything you want. Do this for each section you want to create.
Then, to make the HTML behind a panel visible or invisible to the client, simply set its Visible property in code. No problem! (See Figure 3-3.)
Figure 3-3: It s difficult to see, but the New Forum Posts section is contained inside a Panel control. If there are no posts or there s a problem connecting to the server, it isn t displayed. Another excellent use.
One quick tip: if you have already designed your page in a designer such as FrontPage and want to create these panel regions yourself, simply move the < asp:Panel > opening and closing tags, placing them around the HTML you want to appear or disappear, then get manipulating in code.
Moving List Items Up and Down, Easily
Download supporting files at www.apress.com .
The files for this tip are in the Ch3 ” Move List Items folder.
It s common practice to have a bundle of items in a list and have the user sort them, using Up and Down buttons . However, the code for such a simple-sounding operation is, alas, a little more difficult.
Your best bet is to encapsulate such logic into a neatly wrapped function to save time and help debugging. Or, even better, just copy my own ready-to-run snippets, functions to easily move entries up and down for you:
Public Sub MoveSelectedItemUp(ByVal List As _ System.Web.UI.WebControls.ListControl) ' Move the selected item in the passed ListBox ' up one, if possible. Sample usage: ' - MoveSelectedItemUp(ListBox1) If Not List.SelectedItem Is Nothing Then Dim objListItem As System.Web.UI.WebControls.ListItem, _ intPosition As Integer objListItem = List.SelectedItem intPosition = List.Items.IndexOf(objListItem) List.Items.Remove(objListItem) List.Items.Insert(IIf(intPosition = 0, 0, _ intPosition - 1), objListItem) End If End Sub Public Sub MoveSelectedItemDown(ByVal List As _ System.Web.UI.WebControls.ListControl) ' Move the selected item in the passed ListBox ' down one, if possible If Not List.SelectedItem Is Nothing Then Dim objListItem As System.Web.UI.WebControls.ListItem, _ intPosition As Integer objListItem = List.SelectedItem intPosition = List.Items.IndexOf(objListItem) If intPosition = List.Items.Count - 1 Then Exit Sub List.Items.Remove(objListItem) List.Items.Insert(intPosition + 1, objListItem) End If End Sub
Simply call either MoveSelectedItemUp or MoveSelectedItemDown as relevant, passing in your list control, like so:
MoveSelectedItemDown(ListBox1)
A lot of code for a simple operation, yes ”but at least you didn t have to write it!
Resizing in Web Applications
Windows applications now have amazingly powerful methods for automatically resizing the controls on your forms. Web applications, however, have no official method to control sizing.
So the trick is to learn how to use percentages. For example, imagine that you have a TextBox server control inside a table. If you want that textbox to take up the entire table width, no matter how the page or table is resized, change its Width property to 100% .
Strangely, this is a little-known ASP.NET developer technique. Most tend to know that you can use percentages when it comes to tables and frames , but few know that controls can be sized this way also.
So, where possible, use percentages. They ll allow your entire application to look smart at any size.
Stopping Your User from Right-Clicking
Want to prevent your user from performing any of the other commands available by right-clicking on a Web page in Internet Explorer? It s not foolproof, but this neat little HTML edit usually does the trick.
Just alter the opening < body > tag of your HTML to the following:
< BODY oncontextmenu="return false" > When the menu is requested , the oncontextmenu event runs, and we instantly cancel it using JavaScript. This is especially potent as a method for stopping the user from viewing your source, when used in conjunction with a menu-less browser window. Great stuff!
Creating Scrollable Micro Windows
Imagine that you re displaying a large table of results on your page. Wouldn t it be nice to show the table inside a neat scrollable micro window, rather than serving up one big messy page?
It s completely possible, and it requires only the smallest of changes.
Here s a quick sample that demonstrates the technique. It uses a div tag and relevant sizing and overflow attributes to define the micro window. Nested between the opening and closing < div > tags is the content we want to encapsulate (in this case, the HTML from our data grid).
<div style="width:100%; height:200; overflow:auto;"> <asp:datagrid id=MyDataGrid runat=server /> </div>
To add this effect, open your project in Visual Studio .NET and enter HTML view in the ASPX page that you want to change. Make your alterations, using this sample as a template, then switch back to Design view. You ll notice the designer automatically recognizes the tags and displays your DataGrid (or other controls) inside a micro window of the size you specified. It s perfect! (See Figure 3-4.)
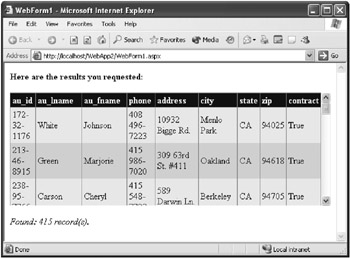
Figure 3-4: An example of the easy micro window in play Web Sites in Seconds!
Why You Should Learn CSS
This book was not written as a learn this, learn that guide. It was designed to unveil quick, fast, and furiously fantastic tricks and techniques to rocket your programming skills. This tip however is a little different: it merely recommends .
I d like to suggest that you spend a few minutes of your day learning cascading style sheets (CSS).
What are they? Cascading style sheets, typically abbreviated to just style sheets , are a method of designing a set of styles that affect how a page looks. You may, for example, create a style that tells all table cells to have a blue background with bold, ten-point Arial text and links that turn purple as you hover over them. Or you could have a style that tells the body of the page to display a particular background image and change the color of the scrollbar.
Why use style sheets? Well, they can offer you the ability to do things that you can t using regular HTML (changing that scrollbar color, for example). However, more importantly, they offer you a method of centrally controlling the visual style of your site.
For example, you could put all your styles into a CSS file (indeed, by default, all Web application projects contain the Styles.css template) and then link the file to your pages, so that they all inherit the styles in your one file. It allows for maintainability .
Both Visual Studio .NET and FrontPage include excellent CSS editors, but before you get started, you ll need to learn a little more.
If you have FrontPage installed on your machine, launch the help file and navigate through the contents tab to Designing Web Pages ![]() Styles and Designing Web Pages
Styles and Designing Web Pages ![]() Cascading Style Sheets. Alternatively, follow the CSS tutorials online at www.htmlgoodies.com. Both sources provide an excellent introduction to the topic.
Cascading Style Sheets. Alternatively, follow the CSS tutorials online at www.htmlgoodies.com. Both sources provide an excellent introduction to the topic.
If you want to use Visual Studio .NET to add style sheets, select Project ![]() Add New Item
Add New Item ![]() Style Sheet, then right-click to add and edit the existing styles. You can also read more by looking up CSS in the VS .NET help index.
Style Sheet, then right-click to add and edit the existing styles. You can also read more by looking up CSS in the VS .NET help index.
Of course, while I m recommending methods to simplify maintenance of your Web pages, I might also suggest you look into separating your content layer from your presentation layer, through the use of XML and XSLT. But that s a separate topic and all for another book!
EAN: 2147483647
Pages: 76
- Command Reference
- Any Transport over MPLS (AToM)
- Introduction to QoS-Classification and Marking
- MPLS QoS Operating Modes
- Case Study 2: Implementing Multi-VRF CE, VRF Selection Using Source IP Address, VRF Selection Using Policy-Based Routing, NAT and HSRP Support in MPLS VPN, and Multicast VPN Support over Multi-VRF CE