Hack 69. Create a Credit Flag
| < Day Day Up > |
|
Most digital video software enables you to easily create text on screen. Some are even quite advanced and can create really cool titles. But sometimes, a more rudimentary approach can yield equally impressive results. Most movies begin with an opening scene and a list of people's names and titles superimposed over it. This is known as the Title Sequence. Taking a simplistic method to creating credits (I call the method credit flags) will cause people to wonder, "How'd they do that?" 6.10.1. Preparing Your FlagsFirst, you will need to gather a few supplies: a large swatch of lightweight white fabric, a black marker, a wooden or metal pole, and a fan. You will also want a pair of scissors and way to attach the fabric to the pole, such as a stapler, push pins, or even tape. Figure 6-31 shows a sample set of the required materials. Figure 6-31. Tools to create your credits After you obtain the necessary materials, cut the cloth into squares large enough to write on using the marker. For example, when creating your personal credit flag, you will need a square of cloth large enough to write "Written and Directed by: Me!" in big, black letters. How you write and layout the letters is a matter of personal taste. You should create a flag for each person, or group of people, you would like to provide an on-screen credit. 6.10.2. Recording Your FlagsAfter you have created your flags, you are ready to assemble a credit flag and record your video. To create the flag, attach the square of cloth to your pole. Then stand the pole upright, with the fan aimed at the side of the flag. You will need to set and focus your camera on the flag. Make sure that the flag fills the screen, even when being blown about by the fan. If you notice there are dark shadows on the flag while it is blowing around, you should provide additional light on it in order to reduce their appearance.
After you have set your camera, begin recording. Capturing around 30 seconds per flag should provide more than enough footage. Repeat the process until all of the people important to your movie have had their flags recorded. Your final video will then need to be imported into your editing system. Figure 6-32 shows a credit flag, as imported into Adobe Premiere Pro. Figure 6-32. A flag, soon to become a credit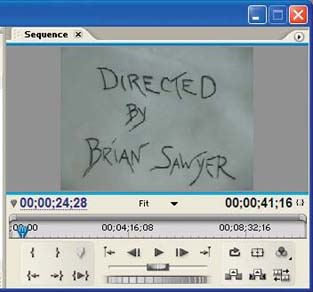 6.10.3. Matting Your FlagsAfter you have digitized all of your footage, open the footage in your Editor and apply an Inverse effect, making the letters white and the cloth black, as shown in Figure 6-33. Figure 6-33. Not a chalkboard, just an inverted flag Here's how to digititize the footage in various editing systems:
After applying the inverse effect to your footage, place the footage over your opening scene and apply a Matte or Key effect to it:
Figure 6-34. The Directed By opening credit, as created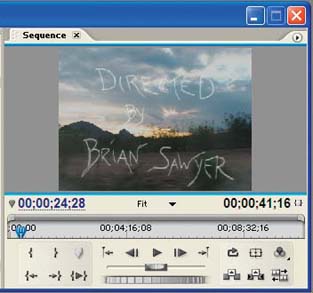 Once you have placed your credits in your timeline, render it and play. Your credits should now have an airy "feel" to them. 6.10.4. Hacking the HackFor an additional "wow," apply some movement to the credits by making them move around the screen. Apply movement to have them bounce, fly on and off screen, and so forth. By matching the movement of your credits to the beat of some music, you will create a very organic feeling title sequence. A variety of options can be applied to this method. Experiment, discover and, most of all, have fun. |

 Effects Palette
 | < Day Day Up > |
EAN: 2147483647
Pages: 158