Hack 11. Monitor Your Camera
| < Day Day Up > |
|
Knowing what you are recording while you shoot can save you hours, and even days, of frustration and money during the editing process . Practically every video camera has audio and video outputs, but most people use them only when transferring video after it's been shot. By using these outputs while you shoot, you can monitor what is being recorded. Not only does this allow you to take care of troubles immediately, such as fixing a bad audio connection, but it also enables you to take field notes that you can refer to when editing. 1.12.1. Determining Your Cable NeedsThere are a variety of connections for carrying an audio and/or video signal. If you plan on monitoring your camera while you're recording, you should run out to your local Radio Shack and grab the necessary cables and adaptors for your camera ASAP. While you're there, pick up a couple of spares, since you'll lose or break one at the most inopportune time. 1.12.1.1. Video.Monitoring your video requires you to send your camera's signal to a television or professional monitor. Some cameras have simple RCA jacks for audio and video, while others have either a combined A/V/Phones jack or something proprietary. Whatever your situation is, you will need to transmit the signal from your camera to your monitor. Although the image of what's being recorded is important, you should also turn on the camera's display so that the current timecode appears superimposed over the image. By displaying the timecode, you will be able to reference it in your notes. Without it, your notes will be less useful. Figure 1-15 shows a Canon XL-1 and a JVC 3-inch LCD monitor connected together via an RCA cable, which allows for great mobility. Figure 1-15. Connecting to a small monitor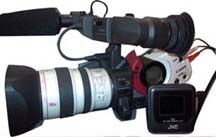 Unless you're setting up in a location for a long period of time, portability is key. A small, 13- to 15-inch television works well in most situations. However, if you plan on following a cameraman around to shoot a documentary, for example you should use a smaller, portable LCD monitor in the 3- to 7-inch range. 1.12.1.2. Audio.When you are monitoring your audio, you will want to use headphones. The obvious reason for this is so that your microphone doesn't pick up what's being recorded, because your microphone will probably pick-up the audio emitting from your headphones. That would result in an echo and possibly even feedback. The less obvious reason is that headphones allow you to hear what's being recorded, as opposed to what's being heard. The two are not the same; your microphone might pick up sounds you either can't hear or wouldn't normally pick up on. Your camera will most likely have a jack that will allow you to plug in a pair of headphones. The most common connections for your audio will be a standard headphone jack (1/4") or a mini-headphone jack (3.5 mm), and adaptors are available to go from one to the other. Because adaptors are available, you are not limited to the type or style of headphone you choose. Figure 1-16 shows the male end of a 1/4" microphone adaptor and a 3.5 mm mini-adaptor, respectively. Figure 1-16. Microphone adaptors in 1/4"and 3.5 mm sizes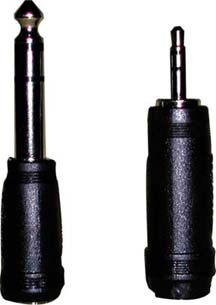 If you are not personally working with the camera if you've hired a cameraman, for example you should run an audio line to where you are located. If you are shooting with multiple cameras, you should at least monitor the camera (or deck) where your primary audio, such as a boom microphone, is being routed. 1.12.2. Setting UpGetting your equipment gathered is only half of the equation. The other half involves putting the equipment to use. To do so, you need to know about the location you will be shooting. Knowing about your location will help you determine how you will power your equipment and how to run the signal from the cameras, among other factors. A good practice is to set up a rolling cart with your equipment on it. Using a three-shelf cart, you can use the top shelf to hold your monitor, place your cup of coffee and other supplies on the middle shelf, and a bin with a variety of cables on the bottom shelf along with a surge protector. This basic setup allows you to move from one location to another quickly. If you want to be resourceful, you can even add a VCR to the mix and record a reference copy of your footage while you're shooting. 1.12.2.1. Wired.The easiest setup is to run power and the audio/video signal via cabling. If you are near a power outlet, you'll just plop your equipment down, plug it in, and go. Depending on how far you are from the camera or power outlet, you might need a long AV cable or extension cord, respectively. 1.12.2.2. Wireless.If you can't run cable from your camera to your monitor, you can still send the signal using a wireless transmitter and either display it on a television set or a compatible video receiver. There are many wireless transmitters on the market. Here are a few places to look:
Going wireless has its advantages, but there are disadvantages as well. The most obvious is the fact that some wireless frequencies can interfere with your audio/video signal. In the extreme case, I have seen cell phones with built-in walkie-talkies, such as those from Nextel, tear a video signal, rendering the video useless. Studio 1 Productions is up front about how the ShotWatcher causes problems with Canon's XL-1. Whatever choice you make, you should run tests before you go into production. 1.12.3. Taking NotesBeing able to see and hear what's being recorded on tape will help you fix troubles before they become problems. But it also enables you to take notes while action is occurring, which you can use when editing to refresh your memory or communicate with your editor (kind of a "message in a bottle"). In addition to the current timecode, you want to be aware of what tape is in the camera. If you have prelabeled your tapes[Hack #3], you should note the tape number along with the timecode displayed in your monitor. If you have not prelabeled your tapes, you should be diligent about noting at least the date shot somewhere on the tape as soon as possible (such as when removing the tape from the camera). You can take notes however you choose, but if you have a script to follow, you can use the same approach professional Script Supervisor's use: create a lined script . If you are shooting a documentary or unscripted video, you can write down the date and time of an occurrence in an ad hoc fashion. Both approaches will enable you to create a reminder of when something occurred that you found significant to your project. 1.12.3.1. Creating a lined script.To create a lined script, you need a physical copy of the script you are shooting. You also need a pencil, a sharpener, a three-ring binder (to hold the script), and a ruler. When shooting a scene, mark the starting timecode just above the first line of dialogue being spoken. During the scene, follow along by drawing a line down the script, until the scene ends. At that point, write down the ending timecode. You can also write notes in the margins or on the back of the page. Such notes might include continuity notes, such as how full a glass of water is, or production notes of unexpected events, such as actors improvising. Figure 1-17 shows a lined script after a few takes have taken place. You continue the process of noting timecodes for every take, for the entire script. If you decide that a certain take is good, simply circle the timecode, as shown in Figure 1-17 This is known as a circle take and is usually an indicator of a director's preference. When you go to edit your project, you can refer to your lined script and immediately know where your good takes occur on tape. 1.12.3.2. Taking ad hoc notes.Even if you don't have a script, you can (and should) still take notes while shooting. The simple fact is, you won't remember everything that happens. This is especially true if you're shooting over a period of days or months. Figure 1-17. A lined script, identifying that a good take for this scene occurred at 01:29:03 For example, you might make a mental note that Bob and Sarah kissed for the first time at 3:15 p.m. on Tuesday. But when you start editing, their kiss will be one of probably hundreds of mental notes floating around your head. Taking notes early and often will free you to concentrate on other aspects of your project. 1.12.4. Using Your NotesIf you are under a serious time crunch, you might not have time to log your footage[Hack #5]. In such a circumstance, your field notes will prove to be invaluable. Their worth is compounded by each hour of footage you have. With a lined script, you can log your footage quite quickly, because you have both in and out points for your takes. Moreover, you can enter a quick note in your log comments about which takes were deemed good when they were recorded. You can even try editing together your scene using your circle takes first and finesse it from there. Using ad hoc notes isn't as straightforward as using a lined script, but they could prove even more valuable. Unscripted projects often amass much more footage than those that are scripted. In fact, some reality television shows acquire thousands of hours of footage. Imagine sifting through 10 hours of footage with and without notes. Which would you prefer to do? Now, compound that to 20, 200, or even 2,000 hours, and I'm sure you can begin to appreciate the value of field notes. No matter how small your project is, you should take the to time to set up and monitor what your camera is recording. |

| < Day Day Up > |
EAN: 2147483647
Pages: 158