Hack 12. Protect Outdoor Cameras
| < Day Day Up > |
|
Build an inexpensive enclosure to protect your outdoor security cameras from the weather . A few years ago, my home burned down while I was out of town. As a longtime home automation enthusiast, I used the opportunity to rebuild my home with as much automation equipment and provisions for future expansion as I could. One of the additions was to have security video cameras scattered all around the property and outside the home. With that in mind, I installed more than two miles of RG-6 cable and Category 5 wire, one length of each to every potential camera location so that I can expand my system simply by adding cameras. My current video setup consists of eight cameras connected to a 16-camera video controller, a 960-hour time-lapse VHS recorder, and a video-to-TV modulator for each camera. With this system, I can view the video from the cameras on my television sets, as shown in Figure 1-18. Figure 1-18. The video command center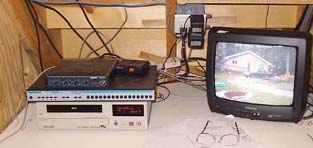 Each camera is connected to an input on the video controller, and each output from the controller is connected to a TV channel modulator. Each modulator rebroadcasts the camera picture on a different TV channel, so to view a camera I simply turn on a TV and tune in. The modulators are programmable and can broadcast on any channel from 14 through 64, so it's easy to set them to use unused channels on your cable system.
The cameras I use don't have microphones, but the Category 5 wire that runs to each camera could carry sound back to the modulator if I decide to buy cameras that do have microphones. Currently, I use two wire pairs, of the four available in the Category 5 cable, to run electrical power to the cameras. The camera power supplies are plugged in near the video command center, as described earlier. So far, everything I've described is standard equipment for video monitoring. The biggest challenge was the outside enclosures for the cameras. Instead of spending $50 to $100 each for commercial enclosures, I decided to build my own. These enclosures cost about $5 each and work just as well. Here's what you'll need for this hack:
I use 4-inch diameter pipe, which should be big enough for almost any camera, but check to make sure your cameras will fit inside the pipe you select, as shown in Figure 1-19. You can cut the PVC pipe with just about any saw, but it might require two passes with the blade, given its size. Be careful, and make the cuts nice and even. Go slowly and make sure the pipe doesn't bind and shatter. Figure 1-19. Appropriately sized PVC pipe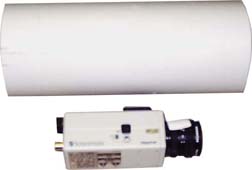 Carefully measure the location of the camera's mounting hole, and then drill a corresponding hole in the pipe that will result in the camera's lens being set about 1 inch inside one end of the pipe. You'll use this mounting hole with a bolt to securely mount the camera inside the pipe, during final assembly. Drill another hole, just slightly larger than the coax cable you are using, 1 inch from the back end of the pipe. Add just one more hole, for the Category 5 wire that carries power to the camera. Mount the camera inside the pipe and connect all the wires before you cap the end of the pipe. For the front cap, use a drill hole saw to cut a 2-inch hole in the center of the cap. Put a small bead of tub caulk around the test cap, place the glass inside, and press tightly. The caulk should spread around so that it is waterproof. Remove any caulk that has leaked onto the glass. While the caulk is setting, which takes about an hour, connect the camera and adjust its iris and focus. A small piece of duct tape will hold the settings in place. After the lens cap has dried, slide it onto the end of the pipe. It helps to coat the edge of the cap with petroleum jelly so that it slides more easily. Mount the case on an L-bracket, and you are in business, as shown in Figure 1-20. Figure 1-20. The finished enclosure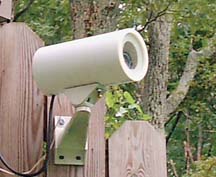 Don Marquardt |

| < Day Day Up > |
EAN: 2147483647
Pages: 158