Project
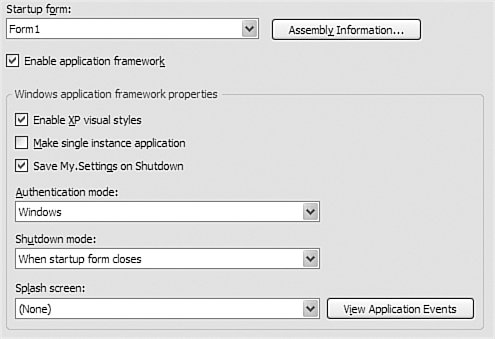
| This chapter's project code implements the Library Project's basic "Main" form, as well as the "Splash" form that appears when the project first starts. Microsoft, knowing that this was a common need, included support for both main and splash forms in its new Application Framework system. By default, this system is enabled through the project properties' Application panel (see Figure 7-11). Figure 7-11. Main and splash fields identified through the project properties The Startup form and Splash screen fields indicate the main and splash forms, respectively. It's quick, it's easy, and it's just the thing for us. So let's get to work. Now would be a great time to load the starter project for Chapter 7. Project Access Load the "Chapter 7 (Before) Code" project, either through the New Project templates, or by accessing the project directly from the installation directory. To see the code in its final form, load "Chapter 7 (After) Code" instead. Configuring the Splash ScreenI've already added a new form file to the project named Splash.vb (the form itself is named Splash), including some simple display elements to gussy it up somewhat. Check out the graphic on the form. It's presented through a PictureBox control, but it's stored in the application as a resource, a collection of strings and images attached to your source code. The Resources folder in the Solution Explorer includes this graphic file. It's linked into the picture box through that control's Image property. And it sure makes the form look pretty. Your job will be to attach this form into the startup sequence of the application. Access the project properties' Application panel (which you just saw in Figure 7-11), and set the Splash screen field to "Splash." This has the side effect of setting My.Application.SplashScreen to the Splash form. Now run the program. You should see the splash screen appear for about 1/100 of a second, quickly replaced by the Main form. Hey, what was that? Altering the Splash screen field does cause the splash screen to briefly appear, but the application will only keep it up until it thinks the program has done enough preparation for the main form. Because we aren't doing any preparation, it shows the main form right away. Eventually we will add a bunch of database-related startup code that will consume a little more time. But for now we'll have to fake it. In the Application Framework model, any code you want to process when the program first begins appears in the application's Startup event. This event, new with Visual Basic 2005, is one of a small collection of events included with the My hierarchy. The source code for these events appears in the ApplicationEvents.vb file, a file that Visual Studio automatically adds to your project when needed. Use the View Application Events button on the project properties' Application panel to open that file's source code. Namespace My Class MyApplication End Class End Namespace Let's pretend that the initialization required for the Library Project takes about three seconds. .NET includes a Sleep method that delays the code for a specific number of milliseconds. Code snippet 1 adds the Startup event handler for the application. Add it between MyApplication's Class and End Class keywords. Insert Snippet Insert Chapter 7, Snippet Item 1. Private Sub MyApplication_Startup(ByVal sender As Object, _ ByVal e As Microsoft.VisualBasic.ApplicationServices. _ StartupEventArgs) Handles Me.Startup ' ----- Take a three-second nap. System.Threading.Thread.Sleep(3000) End Sub Now run the program, and you will see the splash screen stick around for about three seconds (3,000 milliseconds). Eventually, we'll replace the Sleep statement with the actual database and application initialization code, but there's a good chance that it will take much less than three seconds. I mean, we're talking about SQL Server here. It's supposed to be blazing fast. So it's clear that we still need to delay the removal of the splash screen. The My.Application object just happens to include the very property we need to enforce a delay. The MinimumSplashScreenDisplayTime property indicates the minimum number of milliseconds that the splash screen must be displayed. Setting this property in the Startup event is sufficient to postpone the delay of the main form for as long as we wish. Delete the line containing the Sleep function call in the Startup event handler, and replace it with the following statement. Insert Snippet Insert Chapter 7, Snippet Item 2. ' ----- Display the splash form for at least 3 seconds. My.Application.MinimumSplashScreenDisplayTime = 3000 The last thing to do for the splash screen is to include some code that displays the version number. We already did this for the About form back in Chapter 5, ".NET Assemblies," so we'll just add similar code to the Splash form's Load event. We'll update the copyright message, too. Open the source code for the Splash form and add the following code. Insert Snippet Insert Chapter 7, Snippet Item 3. Private Sub Splash_Load(ByVal sender As Object, _ ByVal e As System.EventArgs) Handles Me.Load ' ----- Update the version number. With My.Application.Info.Version ProgramVersion.Text = "Version " & .Major & "." & _ .Minor & " Revision " & .Revision End With ProgramCopyright.Text = My.Application.Info.Copyright End Sub Run the program again and sit in awe as you witness a fully functional splash screen. Configuring the Main FormAlthough we designed a main form in an earlier chapter, it was pretty sparse, including only an About button. This chapter's project adds all of the user interface elements to the form. In fact, I've already added that form's controls to its surface for you (see Figure 7-12). But you can add some of the event handlers that will give some of its display pizzazz. Figure 7-12. The basic look of the main form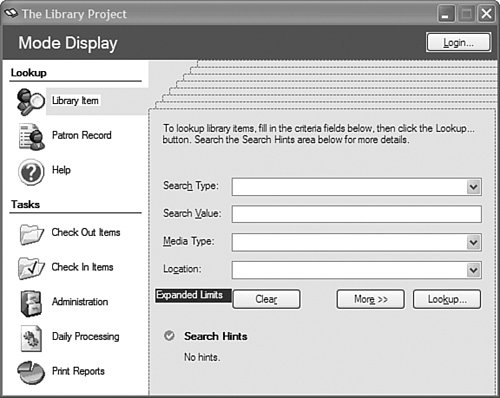 All of the general event code for the form appears as code snippet number 4. Insert Snippet Insert Chapter 7, Snippet Item 4. Most of this code exists to move things around on the display. For example, different features of the form can be accessed by the user by clicking on the icons or related text labels along the left side of the form. Each of these icons and labels triggers one of seven common routines that exist to rearrange the furniture. The upper-left icon, PicLibraryItem, calls the common TaskLibraryItem routine when clicked. Private Sub PicLibraryItem_Click( _ ByVal sender As System.Object, _ ByVal e As System.EventArgs) _ Handles PicLibraryItem.Click ' ----- Library Item mode. TaskLibraryItem() End Sub The TaskLibraryItem procedure adjusts the various panels and fields on the display so that the user sees those fields needed to look up library items. Private Sub TaskLibraryItem() ' ----- Update the display. AllPanelsInvisible() PanelLibraryItem.Visible = True ActLibraryItem.BackColor = SystemColors.Control LabelSelected.Location = New System.Drawing.Point( _ LabelSelected.Left, PicLibraryItem.Top) Me.AcceptButton = ActSearch End Sub The AllPanelsInvisible routine also does some on-screen adjustment. I like to have the existing text in a TextBox field selected when it becomes the active control. Each text control includes a SelectAll method that accomplishes this feat. We'll call that method during each TextBox control's Enter event, an event that occurs when a control receives the keyboard input focus. Private Sub SearchText_Enter(ByVal sender As Object, _ ByVal e As System.EventArgs) Handles SearchText.Enter ' ----- Highlight the entire text. SearchText.SelectAll() End Sub Using the mouse to access the different features of the form is good, but I'm a keyboard person. To support keyboard users like me, the code adds support for feature access using the F2 through F9 keys. Private Sub MainForm_KeyDown(ByVal sender As Object, _ ByVal e As System.Windows.Forms.KeyEventArgs) _ Handles MyBase.KeyDown ' ----- The keys F2 through F9 access the different ' sections of the form. Select Case (e.KeyCode) Case Keys.F2 TaskLibraryItem() e.Handled = True Case Keys.F3 TaskPatronRecord() e.Handled = True Case Keys.F4 ' ----- Allow form to handle Alt+F4. If (e.Alt = True) Then Me.Close() Else TaskHelp() End If e.Handled = True Case Keys.F5 TaskCheckOut() e.Handled = True Case Keys.F6 TaskCheckIn() e.Handled = True Case Keys.F7 TaskAdmin() e.Handled = True Case Keys.F8 TaskProcess() e.Handled = True Case Keys.F9 TaskReports() e.Handled = True End Select End Sub As each keystroke comes into the KeyDown event handler, the Select Case statement examines it. When a matching Case entry is found, the code within the Case block executes. Pressing the F2 key triggers the code in the Case Keys.F2 block. Keys is one of the many built-in enumerations that you can use in your .NET applications. Notice the special code for the F4 key. It allows the Alt+F4 key combination to exit the application, which is common among Windows programs. Normally, all keystrokes go to the active control, not the form. To enable the MainForm.KeyDown event handler, the form's KeyPreview property must be set to True. Set this property back in the form designer. Making the Program Single-InstanceThe Library Project is designed for use only within a small library; it will run on only a few workstations at a time, perhaps up to ten at the most. And there's no need to run more than one copy on a single workstation, because each copy includes all of the available application features. One of the cool features included with Visual Basic 2005 is the ability to create a "single-instance application," one that enforces the one-at-a-time run policy on each workstation. Although you could create such applications before, it is now enabled with a single mouse click. To make the Library Project a single-instance application, display the project properties' Application panel, and then select the Make single-instance application field. When the user tries to start up a second instance, .NET will refuse to carry out the request. Instead, it will trigger the application's StartupNextInstance event. Any special handling you wish to perform on a second instance startup will be done in this handler. Like the Startup event handler, the StartupNextInstance handler appears in the ApplicationEvents.vb file. For the Library Project, the only thing we really need to do when the user tries to start a second instance is to make sure the application is displayed front and center, where the user can readily view it. Open the ApplicationEvents.vb file, and add the StartupNextInstance event handler. Insert Snippet Insert Chapter 7, Snippet Item 5. Private Sub MyApplication_StartupNextInstance( _ ByVal sender As Object, _ ByVal e As Microsoft.VisualBasic.ApplicationServices. _ StartupNextInstanceEventArgs) _ Handles Me.StartupNextInstance ' ----- Force the main form to the front. My.Application.MainForm.Activate() End Sub That's all the changes for this chapter. See you on the next page. |
EAN: 2147483647
Pages: 247
- Chapter I e-Search: A Conceptual Framework of Online Consumer Behavior
- Chapter IV How Consumers Think About Interactive Aspects of Web Advertising
- Chapter V Consumer Complaint Behavior in the Online Environment
- Chapter IX Extrinsic Plus Intrinsic Human Factors Influencing the Web Usage
- Chapter X Converting Browsers to Buyers: Key Considerations in Designing Business-to-Consumer Web Sites