Project
| Of course we will add settings to the Library Project in this chapter, but we'll also go back and start using some of those settings in code that we previously entered as hard-coded values. I really struggled over whether to use application-scoped or user-scoped configuration values for some of the rarely changing settings, such as the database connection string. I finally decided on the user area so that they could be modified through the features of the program. Application-scoped settings are read-only and can only be updated outside of the program, so that idea is out. The expectation with application-scoped settings is that the system administrator will manage them, either by using Notepad on the XML file, or through some custom administrative tool. Because we aren't going to take the time in this book's project to write a separate administration tool, we'll keep everything at the user level and allow modification through the main Library Program. Project Access Load the "Chapter 14 (Before) Code" project, either through the New Project templates, or by accessing the project directly from the installation directory. To see the code in its final form, load "Chapter 14 (After) Code" instead. Update Technical DocumentationLet's document the settings used by the application in the project's Resource Kit. Add the following content to the Resource Kit word processing file.
This technical description appears in the Technical Resource Kit document, originally developed in Chapter 4, "Designing the Database," and updated in subsequent chapters. Some of the content added here refers to features and technical content that won't be added until later chapters, so don't spend too much time thinking about features that you thought you already forgot. Add the SettingsBecause we know all of the settings we will add to the application, let's add them now. Open the project properties window and select the Settings tab. Add each setting to the application using Table 14-1 as a guide. If a setting in Table 14-1 has no listed value, leave the Value field blank in the settings editor as well.
Make sure you type the settings names as listed. The application will not be able to match up incorrectly spelled names. Positioning the Main FormI showed you how to link a form's or control's property value to one of the settings earlier in this chapter, so let's do it for real in the project. We'll link the main form's Location property to the MainFormPosition setting. Just to refresh your memory, follow these steps to enable the link.
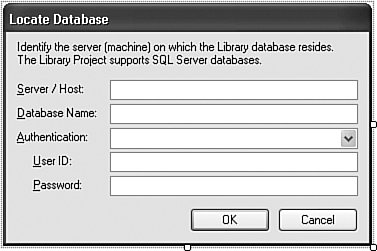
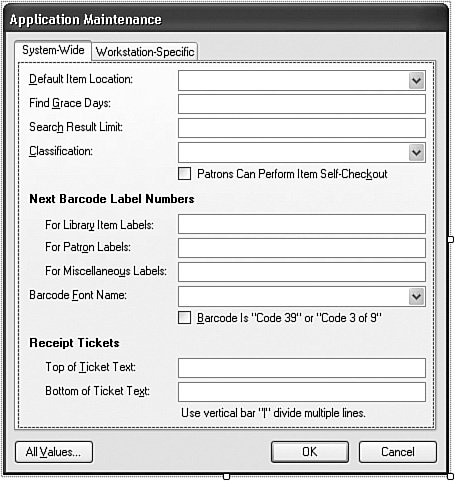
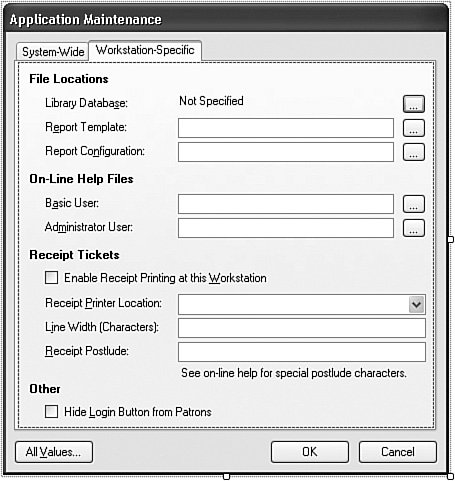
Caching and Using SettingsAlthough all the settings are as close as typing "My.Settings.something" in the code, some settings may initially be undefined, and using them could involve a lot of repetitive code that checks for valid settings. In order to reduce overall code and CPU cycles, we will cache some of the settings for easy use throughout the application. Let's add three more global variables to cache some of the settings. Open the General.vb module, and add these three new class members. Insert Snippet Insert Chapter 14, Snippet Item 1. Public MainHelpFile As String Public MainAdminHelpFile As String Public FineGraceDays As Integer Let's give these variables initial values in the InitializeSystem method, where the code already initializes some other values. Add the following statements to that routine in the General module. Insert Snippet Insert Chapter 14, Snippet Item 2. FineGraceDays = -1 ' ----- Locate the online help files. MainHelpFile = My.Settings.HelpFile & "" MainAdminHelpFile = My.Settings.HelpFileAdmin & "" In an earlier chapter, we stored some settings in the SystemValue table that apply to all workstations that connect to the database. Because we're caching settings anyway, we should add some code to cache these database-stored values so that we don't have to keep opening and closing the database. Add the LoadDatabaseSettings method to the General module. Insert Snippet Insert Chapter 14, Snippet Item 3. Public Sub LoadDatabaseSettings() ' ----- Get some system-level values from ' database storage. Dim holdText As String On Error Resume Next ' ----- Get the default location. holdText = GetSystemValue("DefaultLocation") If (holdText = "") Then holdText = "-1" DefaultItemLocation = CInt(holdText) ' ----- Get the maximum number of search maches. holdText = GetSystemValue("SearchLimit") If (holdText = "") Then holdText = "-1" SearchMatchLimit = CInt(holdText) ' ----- Get the number of days to wait before ' charging fines. holdText = GetSystemValue("FineGrace") If (holdText = "") Then holdText = "-1" FineGraceDays = CInt(holdText) End Sub We will call this routine during application startup, just after we open and confirm the database. Add the following code to the end of the MyApplication_Startup event handler. If it's been a while, remember that this handler is in the ApplicationEvents.vb file, one of the files normally hidden from view in the Solution Explorer. Insert Snippet Insert Chapter 14, Snippet Item 4. ' ----- Load some settings that reside in the database. LoadDatabaseSettings() It's time to actually use a setting. The My.Settings.HideLogin setting indicates whether the "Login" button (ActLogin) on the main Library application form should appear when running in non-administrator (non-librarian) mode. The administrator can still bring up the login form through the F12 key, even if the button is hidden. In an environment where the patrons may be unknown, the system will be slightly more secure if the temptation of a "Login" button is removed. The UpdateDisplayForUser routine in the MainForm class includes code for user mode (LoggedInUserID = -1) and administrator mode (LoggedInUserID <> -1). In the user mode block (the first block), replace this line: ActLogin.Visible = True with the following code. Insert Snippet Insert Chapter 14, Snippet Item 5. ' ----- Show or hide the Login button per the settings. ActLogin.Visible = Not My.Settings.HideLogin Adding Configuration FormsIt's time to add the forms that will manage all of the various application settings, both those stored locally in the user-focused settings file, and the system-wide settings stored in the database. Most of the settings are pretty simplejust basic strings, numbers, and Boolean flagsso it shouldn't overwhelm the administrator to have them all appear on a single form. But before we get to that form, we'll add a form that lets us manage the database connection. I thought about calling up the connection properties dialog that Visual Studio uses to establish connection strings. I'm sure it's possible, but it provides way more flexibility than we need in this project. For instance, it supports the configuration of non-SQL Server databases, which is of no interest to the Library Project. Instead, we'll design a simpler form that collects only those data values that we need to build the Library connection string. The LocateDatabase form appears in Figure 14-5. Figure 14-5. The new "Locate Database" form I've already added the form and its controls to the project. Open the LocateDatabase.vb file to see the form. Four of the fields on this form are basic text entry fields (one with a password mask character). The third entry field, Authentication, lets the user select between Microsoft Windows authentication and SQL Server authentication. Most of the form's code parallels what we've seen in many of the other forms already in the application. Go ahead and add in all of the form's code now. Insert Snippet Insert Chapter 14, Snippet Item 6. The significant work in this form occurs in the Load event when the existing connection string is parsed out into distinct data entry fields, and in the PromptUser routine where the parts are put back together. There are many different ways you could chop up the connection string into its base parts. I took the basic divide-and-conquer approach, extracting out each semicolon- and equals-sign-separated component. Here's the main block of code from the Load event handler that does the chopping and extracting. ' ----- Load in the existing data. connectionString = My.Settings.DBConnection & "" For counter = 1 To CountSubStr(connectionString, ";") + 1 ' ----- Each comma-delimited part has the format ' "key=value". oneKey = GetSubStr(connectionString, ";", counter) oneValue = Trim(GetSubStr(oneKey, "=", 2)) oneKey = Replace(UCase(Trim(GetSubStr( _ oneKey, "=", 1))), " ", "") ' ----- Process each part. Select Case oneKey Case "DATASOURCE" ' ----- Show the server host. RecordServer.Text = oneValue Case "INITIALCATALOG" ' ----- Show the default database name. RecordDatabase.Text = oneValue Case "INTEGRATEDSECURITY" ' ----- Only check for "true". False is assumed. If (UCase(oneValue) = "TRUE") Then _ RecordAuthentication.SelectedIndex = _ RecordAuthentication.Items.IndexOf( _ AuthenticationTypeWindows) Case "USERID" ' ----- A user ID forces SQL authentication. RecordAuthentication.SelectedIndex = _ RecordAuthentication.Items.IndexOf( _ AuthenticationTypeSQL) RecordUser.Text = oneValue Case "PASSWORD" ' ----- A password forces SQL authentication. RecordAuthentication.SelectedIndex = _ RecordAuthentication.Items.IndexOf( _ AuthenticationTypeSQL) RecordPassword.Text = oneValue End Select Next counter Putting the parts together is less complicated. Here's the needed string concatenation code found in the PromptUser routine. newConnection = "Data Source=" & Trim(RecordServer.Text) & _ ";Initial Catalog=" & Trim(RecordDatabase.Text) If (CInt(CType(RecordAuthentication.SelectedItem, _ ListItemData)) = AuthenticationTypeWindows) Then ' ----- Use Windows security. newConnection &= ";Integrated Security=true" Else ' ----- Use SQL Server security. newConnection &= ";User ;Password=" & Trim(RecordPassword.Text) End If Although the LocateDatabase form does the difficult work of parsing and building the connection string, it doesn't actually update the saved setting. Instead, it returns the newly built connection string, and depends on the calling code to save it. Now, back to our single-form configuration editor, Maintenance.vb. This form does all of the direct modification of the values in both the database and the local My.Settings items. Figure 14-6 and Figure 14-7 show the two main panels of the Maintenance form. The centralized settings stored in the database are "system-wide," and the "workstation-specific" values are those accessed through My.Settings. Figure 14-6. The new "Maintenance" form showing the "System-Wide" panel Figure 14-7. The new "Maintenance" form showing the "Workstation-Specific" panel This form begins its work in its Load event handler, Maintenance_Load. This routine sets up the choices in some drop-down fields, including a list of fonts. The code loops through the collection of installed fonts made available through the GDI+ object System.Drawing.Text.InstalledFontCollection. Dim allFonts As New _ System.Drawing.Text.InstalledFontCollection RecordFontName.Items.Add(New ListItemData( _ "<Not Selected>", -1)) For counter = 0 To allFonts.Families.Length - 1 RecordFontName.Items.Add(New ListItemData( _ allFonts.Families(counter).Name, counter)) Next counter The routine also includes similar code to load a list of installed printers. For Each installedPrinter As String In _ PrinterSettings.InstalledPrinters RecordPrinterLocation.Items.Add(installedPrinter) Next installedPrinter Once everything is set up, the PopulateCurrentValues procedure completes the initialization. Its code retrieves all the current values from both the database and the My.Settings object, and stores those values in the various on-screen data entry fields. I've already added the database-specific code. Go ahead and add in the settings-specific code. Insert Snippet Insert Chapter 14, Snippet Item 7. LibraryConnection = My.Settings.DBConnection & "" RecordDBLocation.Text = GetDBDisplayText(LibraryConnection) RecordConfigLocation.Text = My.Settings.ReportConfig & "" RecordBasicHelp.Text = My.Settings.HelpFile & "" RecordAdminHelp.Text = My.Settings.HelpFileAdmin & "" EnableReceipts.Checked = My.Settings.UseReceipts RecordPrinterLocation.Text = My.Settings.ReceiptPrinter & "" RecordPrinterWidth.Text = CStr(My.Settings.ReceiptWidth) RecordPostlude.Text = My.Settings.ReceiptPostlude & "" HideLogin.Checked = My.Settings.HideLogin Most of the code in this form deals with basic user interaction while the form is in use. For example, the ActDBLocation_Click event handler displays the LocateDatabase form we added earlier. Add the relevant source code to that event handler template. Insert Snippet Insert Chapter 14, Snippet Item 8. ' ----- Prompt for the database connection details. Dim newConnection As String ' ----- Prompt the user for the new setting. newConnection = LocateDatabase.PromptUser() If (newConnection = "") Then Return ' ----- Store the new value. LibraryConnection = newConnection RecordDBLocation.Text = GetDBDisplayText(LibraryConnection) Several of the settings specify the locations of files used by the application, such as the online help files. The user can type in the path to the file directly, or use the Open File Dialog to locate the file visually. To display this dialog, I've added an OpenFileDialog control named LocateFile. Using it is a matter of setting the various file-specific properties and calling the ShowDialog method. Here's some of the code already included in the ActBasicHelp_Click event handler used to locate the non-administrative online help file. ' ----- Set up the file structure. LocateFile.DefaultExt = "chm" LocateFile.FileName = RecordBasicHelp.Text LocateFile.Filter = "Help Files (*.chm)|*.chm|" & _ "All Files (*.*)|*.*" LocateFile.FilterIndex = 1 LocateFile.Title = "Locate Help" ' ----- Prompt the user. If (LocateFile.ShowDialog() <> _ Windows.Forms.DialogResult.OK) Then Return ' ----- Save the file path. RecordBasicHelp.Text = LocateFile.FileName Once the user has made the various setting changes, a click on the OK button saves each new setting to its storage area. I've included the database-focused saving code in the SaveFormData routine. I'll let you add the settings-focused code, near the end of that routine. Insert Snippet Insert Chapter 14, Snippet Item 9. My.Settings.DBConnection = LibraryConnection My.Settings.ReportConfig = Trim(RecordConfigLocation.Text) My.Settings.HelpFile = Trim(RecordBasicHelp.Text) My.Settings.HelpFileAdmin = Trim(RecordAdminHelp.Text) My.Settings.HideLogin = HideLogin.Checked My.Settings.UseReceipts = EnableReceipts.Checked My.Settings.ReceiptPrinter = Trim(RecordPrinterLocation.Text) My.Settings.ReceiptPostlude = RecordPostlude.Text ' ----- Save the receipt printer width. If (Trim(RecordPrinterWidth.Text) = "") Then My.Settings.ReceiptWidth = DefaultReceiptPrinterWidth Else My.Settings.ReceiptWidth = CInt(RecordPrinterWidth.Text) End If Although the Maintenance form provides a user-friendly interface to the database-stored settings, you probably remember that we already wrote code to update SystemValue table records through the SystemValue.vb file. In Chapter 12, "Operator Overloading," we connected that form to the main form, but we're going to alter that logic. First, we'll add the call to the SystemValue form to the Maintenance form's ActAllValues_Click event handler. Insert Snippet Insert Chapter 14, Snippet Item 10. ' ----- Let the user edit the list of system values. Dim RecordsForm As Library.ListEditRecords ' ----- Edit the records. RecordsForm = New Library.ListEditRecords RecordsForm.ManageRecords(New Library.SystemValue) RecordsForm = Nothing ' ----- Refresh the display elements. PopulateCurrentValues() Then we'll change the AdminLinkValues_LinkClicked event handler back in MainForm.vb. Currently, it calls the SystemValue editor directly. Replace that part of the LinkClicked handler's code with code that calls the Maintenance form instead. Insert Snippet Insert Chapter 14, Snippet Item 11. ' ----- Access the maintenance portion of the program. Maintenance.ShowDialog() Connecting to the Configured DatabaseThe last change in this chapter uses the configured connection string to establish the connection to the database. When we originally wrote the ConnectDatabase routine in the General module, we added a hard-coded connection string just to get the program working. ' ----- Build the connection string. ' !!! WARNING: Hardcoded for now. connectionString = "Data Source=MYSYSTEM\SQLEXPRESS;" & _ "Initial Catalog=Library;Integrated Security=true" Now that we have a user-configured connection string available, we will use that instead. The changes we must make to this routine are somewhat extensive, so just replace the function's existing content with the updated code. Insert Snippet Insert Chapter 14, Snippet Item 12. ' ----- Connect to the database. Return True on success. Dim connectionString As String Dim configChanged As Boolean ' ----- Initialize. HoldTransaction = Nothing configChanged = False ' ----- Obtain the connection string. If (Trim(My.Settings.DBConnection & "") = "") Then ' ----- Inform the user about the need to configure ' the database. If (MsgBox("This copy of the application has not " & _ "been configured to connect to the library " & _ "database. If you know the database settings, " & _ "you can configure it now. Would you like to " & _ "proceed?", MsgBoxStyle.YesNo Or _ MsgBoxStyle.Question, ProgramTitle) _ <> MsgBoxResult.Yes) Then Return False ' ----- Prompt for the new connection details. connectionString = LocateDatabase.PromptUser() If (connectionString = "") Then Return False configChanged = True Else connectionString = My.Settings.DBConnection End If TryConnectingAgain: ' ----- Attempt to open the database. Try LibraryDB = New SqlClient.SqlConnection(connectionString) LibraryDB.Open() Catch ex As Exception ' ----- Some database failure. GeneralError("ConnectDatabase", ex) ' ----- Perhaps it is just a configuration issue. If (MsgBox("The connection to the database may " & _ "have failed due to invalid configuration " & _ "settings. Would you like to change the " & _ "database configuration at this time?", _ MsgBoxStyle.YesNo Or MsgBoxStyle.Question, _ ProgramTitle) <> MsgBoxResult.Yes) Then Return False ' ----- Prompt for new details. connectionString = LocateDatabase.PromptUser() If (connectionString = "") Then Return False configChanged = True GoTo TryConnectingAgain End Try ' ----- Save the udpated configuration if needed. If (configChanged = True) Then _ My.Settings.DBConnection = connectionString ' ----- Success. Return True The basic gist of the code involves setting the connectionString variable to the persisted connection string, and using that to open the LibraryDB object. The new code obtains the connection string from My.Settings.DBConnection. If for any reason the connection string is missing or fails to generate an open database connection, the user is prompted to supply or correct the connection string through our new LocateDatabase form. The program is back to a condition where you can run it. The first time you run the program, it will prompt you to supply the database connection information. The values you supply will match the hard-coded version that used to be in the ConnectDatabase routine.
In the next chapter, we'll focus on file manipulation techniques. Although we did update the settings file in this chapter, it was done indirectly through features provided by the Framework. Chapter 15, "Files and Directories," will discuss more direct approaches to file manipulation. |
EAN: 2147483647
Pages: 247
- An Emerging Strategy for E-Business IT Governance
- Linking the IT Balanced Scorecard to the Business Objectives at a Major Canadian Financial Group
- Measuring and Managing E-Business Initiatives Through the Balanced Scorecard
- The Evolution of IT Governance at NB Power
- Governance Structures for IT in the Health Care Industry