Building the Application Prototype
| This chapter focuses on prototyping only the basic features of the application. These include the events, event triggered subscriptions, and notifications. You should already have a basic understanding of the concepts behind these features; the main purpose of this section is to learn incremental development and testing techniques used in the prototyping stage. After you've learned these techniques, we'll prototype some more advanced application features in Chapter 6. These include scheduled subscriptions and the event and subscription state required to support them (as described in the initial design). The prototype consists of the application's ADF and the supporting files required to run it. This section looks at a number of ADF elements that you already saw in Chapter 3, but we'll cover them in more detail. I'll describe each ADF element in general terms and show how it is used in the music store application. As always, this information is intended to supplement, not replace, the SQL-NS Books Online. Although I will cover most of the useful ADF elements here and in Chapter 6, I may omit some optional elements. The SQL-NS Books Online contains a complete reference to all ADF elements, and I encourage you to refer to that as you work through this book. Building the ADF IncrementallyIn the "Stages in the Application Development Process" section (p. 119), I said that a complete notification application can be quite complex and that it's a good idea to implement it in stages. The same is true for the ADF prototype itself. Instead of starting from a blank page and trying to write the whole ADF from start to finish, you can build it up incrementally, testing and refining each piece that you add as you go along. This is good development practice because it allows you to easily find and fix problems in isolation. We'll begin with a skeleton ADF, described in the next section. We'll compile this skeleton ADF (along with a skeleton ICF) to create a new SQL-NS instance containing the outline of our application. The compilation will result in instance and application database objects that the SQL-NS engine can run against, although there won't be any real application code to execute. Then we'll add pieces of code to the ADF and use the SQL-NS tools to compile the added code and apply the changes to the application database. At various stages, we'll start the instance and supply sample data to test its operation. The Skeleton ADFListing 5.1 shows the skeleton ADF from which we'll start building our application. Although there isn't much in it, SQL-NS does consider this ADF a valid application definition and will compile it. Listing 5.1. The Skeleton ADF for the Music Store Application
In this skeleton form, the application has no event, subscription, nor notification classes. It simply specifies the database and schema into which the application's database objects should be installed and defines a single generator and distributor. We'll add the event, subscription, and notification classes to the ADF in the following sections. Note There is a syntactical inconsistency in the ADF rules for defining event classes, subscription classes, and notification classes. An application that has no event classes must omit the <EventClasses> element entirely; an ADF that has an <EventClasses> element but no <EventClass> declarations within it is considered invalid. However, an ADF may not omit the <SubscriptionClasses> or <NotificationClasses> elements, even if it has no subscription classes or notification classes. These must be present, but they can be empty. An ADF that omits these elements is considered invalid. Notice that the <Database> element in this ADF indicates that the application's database objects should be placed in the MusicStore database. This is the database we created and examined in the "Creating the Music Store Database" section (p. 121) earlier in this chapter. The MusicStore database already contains the tables required to store the music store's catalog and will be augmented with the SQL-NS application's database objects when we compile the ADF. If you look at the music store instance's ICF (described in the next section), you'll see that its <Database> element also specifies MusicStore as the database name. Thus, the instance, application, and music store catalog database objects will all end up in the same database, isolated from one another in separate schemas. Though all the samples in this book place the instance and application database objects in the same database (along with other, preexisting tables and stored procedures, in this chapter's example), this doesn't have to be the case. You may deploy the instance and application database objects into any configuration of separate databases you choose, simply by specifying the appropriate database names in the <Database> element in the ICF and ADFs. Compiling the Skeleton ADFAs you may recall from Chapter 4, all applications must be created within some instance. In this chapter, we'll create an instance called MusicStore. This instance has just a single application (the one we've been designing) that we'll build up incrementally from our skeleton ADF. The ICF used to define the MusicStore instance is similar to the one examined in Chapter 4. If you're curious, you can take a look at it: It's called InstanceConfiguration.xml and is located in the C:\SQL-NS\Samples\MusicStore directory. Tip I've grouped all the files associated with the MusicStore sample into a Management Studio solution. You can find the solution file at C:\SQL-NS\Samples\MusicStore\MusicStore.ssmssln. I suggest you open this solution in Management Studio now so that you can have easy access to the various files as you work through this chapter. Let's go through the steps necessary to create and run the instance with the skeleton ADF. These steps use the SQL-NS command-line tools to create and configure the instance and should look familiar to you after reading Chapter 4: Caution You must complete the steps described in the earlier section "Creating the Music Store Database" (p. 121) before proceeding with these instructions.
If the preceding steps succeeded, the MusicStore instance should be created with our application (called SongAlerts) in it. The SQL-NS Windows service for the instance should be running, although it won't do much because we haven't implemented any of the code for our application yet. The instance and application database objects will have been added to the existing MusicStore database by the SQL-NS compiler. To see these objects, refresh the database node in the Object Explorer tree in Management Studio. In addition to the objects in the Catalog schema that were there before, you'll see several new objects added under the Tables, Views, and Stored Procedures folders beneath the MusicStore database node. The instance objects are prefaced with the schema name NSInstance, and the application objects with the schema name SongAlerts. Adding Code to the ADFThe ADF for the music store application is called ApplicationDefinition.xml and is located in the C:\SQL-NS\Samples\MusicStore\SongAlerts directory. Initially, ApplicationDefinition.xml contains the skeleton ADF from Listing 5.1 that we just compiled. As we build the prototype in this chapter, we'll add pieces of code that provide parts of the application functionality to this ADF. You have two options for how you can add code to the ADF:
If you look in the C:\SQL-NS\Chapters\05\SupplementaryFiles directory, you'll see a number of files named ApplicationDefinition-0.xml, ApplicationDefinition-1.xml, and so on. The first file, ApplicationDefinition-0.xml, contains the skeleton ADF shown in Listing 5.1 (the starting point for the music store application). Each subsequent file is the same ADF with a new piece of code added to it. Each file is a valid, compilable ADF that represents our application at an intermediate stage of development. Table 5.1 lists these files, the code added in each one, and the section in this chapter that explains that code. These supplementary files are not included in the MusicStore sample's Management Studio solution.
As you work through this chapter, you can use the code in the supplementary ADFs listed in Table 5.1 instead of manually editing the ADF. For example, to use the code in ApplicationDefinition-1.xml, copy it over ApplicationDefinition.xml using the following commands:
Note Although there are several versions of the ADF in the files listed in Table 5.1, the ICF references only ApplicationDefinition.xml (with no numeric suffix) in the C:\SQL-NS\Samples\MusicStore\SongAlerts directory. Therefore, when you compile the instance, this is the only file that the compiler looks at. All changes you make must be made to this file. If you're adding code by typing, make sure that you edit only ApplicationDefinition.xml. If you're using the supplementary ADFs I've provided instead of typing, make sure that you copy the supplementary ADF over ApplicationDefinition.xml. If you edit any of the supplementary ADFs (you shouldn't have to do this), your changes won't be visible to the compiler unless you copy them over to ApplicationDefinition.xml. If you mistype a copy command and accidentally overwrite the wrong file, you can always copy all the ADFs from the CD-ROM again. It's possible, as you make the changes described in this chapter, that you might make a mistake that leaves your instance in an unusable state. If this occurs, you can revert to the skeleton ADF or one of the supplementary, intermediate ADFs provided. To revert, stop the service, run delete.cmd from C:\SQL-NS\Samples\MusicStore\Scripts, overwrite ApplicationDefinition.xml with a known good ADF, and then rerun the create instructions in the "Compiling the Skeleton ADF" section (p. 128). Making Updates to an Instance and Its ApplicationsWhen you first create a SQL-NS instance, you pass the ICF and ADFs to the SQL-NS compiler, which builds the corresponding instance and application database objects. The ICF and ADFs are never used by the running system: The SQL-NS engine runs against the database objects only. If you want to make changes to your instance (or any of the applications within it), you can't just change things in the database. Instead, you must use the SQL-NS tools to update the instance. To make a change, you edit the XML in the relevant ICF or ADFs and then pass the ICF to either the nscontrol update command-line tool or the Update Instance command in Management Studio. These tools compare the modified XML to the instance and application database objects that currently exist. Where they find differences, they recompile the XML and update, remove, or create the corresponding database objects. This section explains the use of the nscontrol update command and the Update Instance command in Management Studio. In keeping with the rest of this chapter, subsequent sections will refer only to the command-line nscontrol update command. Caution Although it sometimes may be tempting to make changes to the instance and application database objects directly (by editing a stored procedure or modifying a table schema, for example), be aware that this is extremely risky. What seems like a simple change may actually require several changes throughout the database objects to keep things consistent. If you make changes directly to SQL-NS database objects, it is easy to mess things up to the point that your instance is no longer operational. Also, if you make manual changes to the database and then use the SQL-NS tools to update the instance later, your changes will be lost. Instead of touching the database objects directly, always make changes through nscontrol update or through the Update Instance command in Management Studio. The SQL-NS update tools can be used to perform maintenance or upgrades to a deployed instance. They can also be used to build an ADF incrementally, as we'll do in this chapter. We already compiled the skeleton ADF and, as we work through this chapter, we'll add new code to that ADF and use the SQL-NS update tools to compile and apply the changes to the database. Caution The SQL-NS update tools are designed to apply any changes to your databases atomically. In other words, either all the changes are made or none of the changes are made. This ensures that your instance is always left in a consistent state, even if an error occurs during the update process. Therefore, when using the SQL-NS update tools to make changes to a production application, it's recommended that you make a backup of your databases, just in case the changes don't turn out as you intended. We won't perform those backup steps in this chapter because we're simply using the update tools to make simple additions to our application in development. If something went wrong, we could easily start over from a known good point. Chapter 13, "Deploying a SQL-NS Instance," provides more information about how to use the SQL-NS update tools safely in production environments. Using nscontrol updateIn subsequent sections in this chapter, I'll describe pieces of code that you should add to the ADF. You can add these manually or by using the supplementary ADFs I've provided, as described in the "Adding Code to the ADF" section (p. 130). At certain points, when we've added enough code to run a new piece of the application, I'll tell you to update the instance to apply the changes. To perform an update, you must first stop the instance's Windows service (NS$MusicStore) and disable the instance, then invoke nscontrol update. The following instructions describe the exact steps you will need to perform. Do not run these instructions now; I'm including them here for reference because they'll be used in many sections later in this chapter. I'll refer you back to these instructions when you need to run them. I've provided a batch file that wraps the call to nscontrol update. This batch file is located in the C:\SQL-NS\Samples\MusicStore\Scripts directory and is called update.cmd. Take a look at the contents of this file to see how nscontrol update is called. Notice that the syntax is almost identical to nscontrol create.
If the preceding instructions succeeded, your instance should be running with the new changes. If you had errors in the changes you made to your instance and application, you would have seen compile errors at step 4. If this happens, fix the errors and run the update.cmd batch file again. Using the Update Instance Command in Management StudioTo update an instance using Management Studio, you use the Update Instance command. Like nscontrol update, the Update Instance command requires you to disable the instance and stop the SQL-NS engine before it can operate. This section describes the use of the Update Instance command. Do not run the instructions described here now. Whenever you need to make updates to the instance as you work through this chapter, you can refer back to these instructions if you want to use Management Studio, instead of nscontrol update, to apply source code changes you make to the music store ADF. The Update Instance command is launched from the context menu that appears when you right-click a Notification Services instance in the Object Explorer tree in Management Studio. The user interface of the Update Instance command is almost the same as that of the New Notification Services Instance command we looked at in the "Compiling the ICF with the Management Studio Tools" section (p. 87) in Chapter 4. The Update Instance dialog box lets you select an ICF to compile, allows you to supply values for the ICF's parameters through a parameters grid, and lets you select whether to enable the instance after the update process is complete. Follow these instructions to update the music store instance after making changes to the ADF:
After completing these steps, your instance will be running with the changes you just made. Implementing the Initial DesignIn the initial design stage, we described the music store application in terms of its events, subscriptions, notifications, and application state. In the previous section, we created the basic skeleton of the application and looked at the development techniques we'll use to enhance that skeleton. In this section, we're going to add the code to the ADF that implements the design and test it with sample data. At the end of this section, we'll have completed the basic features in the application prototype. EventsConceptually, an event in our notification application is the addition of a new song to the music store. As you may recall from the discussion of the SQL-NS application model in Chapter 3, events in SQL-NS applications are modeled as data. In other words, each event is represented by a piece of data that fully describes its properties. The event data is used to determine whether the event matches any subscriptions, and, for those subscriptions that it does match, to generate meaningful notifications. Thus, the event data must contain sufficient information to fulfill both of these functions. Because our application supports two ways of subscribing (by artist and by genre), the event data for a given song should contain the song's artist name and genre so that we can determine which subscriptions it matches. The notification we generate for matched subscriptions describes the song added, so the event data also needs to contain other information about the song, such as the song title and the title of the album in which it belongs. At minimum, our event data would contain the following properties:
We could easily define an event class for our application that had fields corresponding to the preceding song properties. This would certainly be a valid way to build the application, but it may not be the most efficient. Think about the answer to question 5 ("Where do the events come from?") in the section "Initial Design: Seven Important Questions About Your Application" (p. 124). We said that the events come from the music store catalog. The catalog tables in the music store database (described in the "Supporting the Sample Application" section, p. 120) already store all the properties of the songs that the music store knows about. If we were to make our events contain all the properties just listed, we'd just be duplicating the data that's already in the music store catalog tables. A much more efficient design would be to have our event data contain just a reference to the song data already in the music store catalog tables. In the music store catalog, each song has a unique ID. When we looked at the SongDetails view in the music store database earlier, you may have noticed the SongId column that provides the ID for each song listed in the view. The event data needs to contain this ID because we can reference all the other properties of the song by joining with the SongDetails view, as shown in Figure 5.4. Figure 5.4. Event data references the song properties in the music store catalog.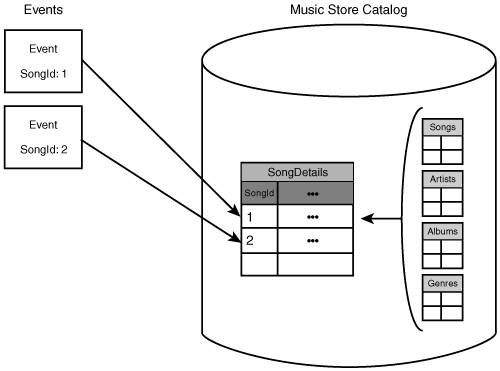 In our application, we'll define a single event class called SongAdded. This event class will have a single field, SongId, an integer that represents the ID in the music store catalog of the song added. In this section, we'll add the code to the ADF that defines the SongAdded event class and declares the test event provider that submits events of this event class. After adding this code, we'll update the instance and then test event submission. The event class and event provider code is similar to what you saw in Chapter 3; there's not much new in this part of the application. Declaring the Event ClassTo define our application's event class, we'll add an <EventClasses> element to the ADF and insert a single <EventClass> element within it, as shown in Listing 5.2. Note Starting with Listing 5.2 and continuing through the rest of the listings in this chapter, I show abbreviated ADF code. My purpose in these listings is to highlight a single element or set of elements within the ADF. These parts will appear in boldface font. I show the outer enclosing <Application> element (without the XML namespace attributes) and some of the other elements in the ADF to illustrate the placement and context of the elements I'm highlighting. However, I will omit other parts of the ADF that are not relevant to the immediate discussion. Missing code will be indicated by an ellipsis (...). This abbreviation technique is for simplicity and readability of the code listings. Most of the time, these abbreviated code listings will not compile by themselves. However, all the source files copied from the CD-ROM contain complete ADFs that will compile. Listing 5.2. Declaration of the SongAdded Event Class
This event class declaration is similar to the one we saw in Chapter 3 for the stock application. The <EventClassName> element provides the name of the event class, and the <Schema> element provides the list of fields. The field declarations (here we have just one, the SongId) provide the names, data types, and type modifiers for the fields. Declaring the Event ProviderApplications can have one or more event providers that submit events from the outside world. When prototyping an application, the easiest way to submit events for testing is through a T-SQL script. In the prototyping phase, you'll often want to submit a specific pattern of events into your application to test the logic that processes events. When doing this, you want to focus on the logic itself, not on the event submission mechanism, so using a T-SQL script makes sense: All you have to do to get a specific set of events into your application is insert the appropriate data into the event class view. Although this method is useful for testing during the prototyping phase, it is rarely used in practice as a real event provider. When you're certain that the event processing logic works, you usually replace the T-SQL script with another event provider that submits events from the real event source of your application. Chapter 8, "Events Providers," describes the built-in SQL-NS event providers you can use, as well as the mechanisms for building custom event providers. Listing 5.3 shows the event provider declaration for our music store application's ADF. A single, nonhosted event provider is declared. When using a T-SQL script to submit events, you don't actually reference any information provided in the event provider declaration. However, the declaration is required to tell SQL-NS that events will come from a source not hosted in the SQL-NS engine. Think of this event provider declaration as a placeholder for a real event provider declaration that would provide additional configuration information. Listing 5.3. The Event Providers Declaration in the ADF
The declaration just provides a name for the event provider. The fact that it is declared within a <NonHostedProvider> element tells SQL-NS that it will run external to the SQL-NS engine. In Chapter 8, you'll see an example of <HostedProvider> declarations, which configure event providers that run within the SQL-NS engine. Testing EventsWith the addition of the event class and event provider to the skeleton application, you can compile it and test event submission. You can either manually add the code described in this section to the ADF (C:\SQL-NS\Samples\MusicStore\SongAlerts\ApplicationDefinition.xml), or you can use the supplementary ADF I've provided, with the code already added. If you want to use the supplementary ADF, copy ApplicationDefinition-1.xml over ApplicationDefinition.xml as described in the "Adding Code to the ADF" section (p. 130).
When you've added the code in Listings 5.2 and 5.3 to your ADF, run the update instructions listed in the "Using nscontrol update" section (p. 132). This will compile the changes you just made and update your instance. Alternatively, if you want to use the Management Studio tools to update the instance, follow the instructions in the "Using the Update Instance Command in Management Studio" section (p. 133). After the update completes, you can use the following steps to submit some test events:
The NSSongAddedEvents table that you just queried was created by SQL-NS when it compiled the event class declaration. For each event class, SQL-NS creates a table named NS<EventClass>Events, where <EventClass> is the name of the event class. This table has some columns that are created automatically by SQL-NS for its internal use, but also has a column for each field in the event class schema. The values for the fields declared in the event class were provided in the INSERT statement that submitted events into the events view. The values of the internal columns were generated by an insert trigger on the events view that SQL-NS created. You can explore the structure of the NSSongAddedEvents table in Management Studio to see exactly what SQL-NS produced from your event class declaration. Event-Triggered SubscriptionsIn the initial design, we said that the application allows users to subscribe for new song notifications by artist or by genre. The subscriptions by artist will be event triggered, and the subscriptions by genre will be scheduled. Each type of subscription is represented by its own subscription class. Recall from Chapter 3 that a subscription class represents a particular type of subscription that the application supports. The subscription class definition provides a schema for the data that the application needs to keep for each subscription of that type, as well as a set of match rules used to match the subscription data with event data to form notifications. This section focuses on the schema for the subscriptions by artist, but we'll leave design of the match rules to the "Matching Logic for Event-Triggered Subscriptions" section (p. 130). Schema for the Subscriptions by ArtistThe schema of a subscription class is just a description of the data fields required to capture a subscription. A good way to come up with the schema for a subscription class is to think about how a user would phrase his subscription in words. For example, a subscription for new song notifications by artist could be phrased as
After you have the form of the subscription statement, identify the parts that can vary per subscription, and those parts become fields in your subscription schema. For new song subscriptions by artist, every subscription in the system has the same form as the preceding statement, but each subscriber could have a different value for the artist name "A." Thus, your subscription class has a field for the artist name. Because there are no other variable parts of the subscription statement, this is the only field in the subscription class. We'll create a subscription class for the subscriptions by artists, called NewSongByArtist, with a single string field for the artist name. Declaring the Event-Triggered Subscription ClassTo declare the subscription class for our event-triggered subscriptions, we add a new <SubscriptionClass> element to the currently empty <SubscriptionClasses> element we already have in our ADF. Listing 5.4 shows the NewSongByArtist subscription class declaration. Listing 5.4. Declaration of the NewSongByArtist Subscription Class
As with the event class declaration, the subscription class declaration provides a name and a schema. The schema defines the fields in the subscription data. For the NewSongByArtist subscription class, there is a single string field called ArtistName. Later in this chapter, we'll add match rules to this subscription class declaration. With the addition of this subscription class to the application, you can test the addition of some sample subscriptions. This sets the stage for testing the match rules later in this chapter. Before you can add the subscriptions, you need to compile the ADF with the subscription class declaration added. You can either manually add the code shown in Listing 5.4 to the ADF, or you can use the supplementary ADF I've provided, with the code already added. If you want to use the supplementary ADF, copy ApplicationDefinition-2.xml over ApplicationDefinition.xml, using the steps described in the "Adding Code to the ADF" section (p. 130). When your ADF is ready, run the update instructions listed in the "Using nscontrol update" section (p. 132) or the "Using the Update Instance Command in Management Studio" section (p. 133), as you did before. This compiles the new subscription class and updates your instance accordingly. Adding SubscriptionsThe purpose of the prototype stage is to test the core functionality of the application, before the final input and output interfaces are built. Therefore, we shouldn't focus on building the full subscription management interface right now. Instead, we need to add sample subscription data in a simpler way and use this to test the processing that our application does. As in Chapter 3, we'll use a set of T-SQL scripts that insert subscriber and subscription data. These scripts insert subscriber, subscriber device, and subscription data into the respective views in the MusicStore database. Chapter 7, "The SQL-NS Subscription Management API," covers subscribers, subscriber devices, and subscriptions in more detail and explains how to design and implement a real subscription management interface. To invoke the scripts to add subscriber and subscription data, use the following steps (make sure that you have successfully updated your application with the subscription class code shown in the previous section before running these instructions):
Let's take a look inside the database and observe the changes made by updating the application with the new subscription class and adding the subscription data.
The Output of the Application: NotificationsAt this point, we've prototyped the inputs to the application: events and subscriptions. It's now time to design the application's output: the notifications it generates and sends. Note It might seem logical to design the matching logic at this time because we already have the events and subscriptions implemented. But we must design the notification classes of the application first because the matching logic must create notifications of a particular notification class. Unless the notification classes are defined first, it's not possible to write the matching logic. Just as events are described by event classes, and subscriptions are described by subscription classes, notifications are described by notification classes. Each notification class encapsulates the following three aspects of the notifications it represents:
This section looks at the ADF elements used to specify this information. In our music store application, we have only one type of notification: a message indicating that a new song was added. Thus, we have only one notification class, and we will call it NewSong. In this section, we'll implement the NewSong notification class in the ADF. Notification SchemasThe schema of a notification class defines the data that each notification contains. When defining a notification class schema, it's important to think about what a notification message should look like when presented to the subscriber in its final form. The notification class should be designed so that it contains sufficient data to construct that notification message. The purpose of the NewSong notifications in our application is to inform subscribers of new songs added to the database. To be useful, each notification should include a complete description of the song. As we saw when we examined the music store database earlier in this chapter (see "The Music Store Database Schema," p. 121), the music store keeps the following properties of each song:
To give the subscriber as much information as possible, each NewSong notification should contain all these properties. Each one becomes a string field in the notification class schema. Listing 5.5 shows the first part of the NewSong notification class declaration in the ADF. (Listings 5.6 through 5.8 show the remaining parts of the notification class declaration.) Listing 5.5. Declaration of the NewSong Notification Class
We've added a new <NotificationClass> element in the ADF's <NotificationClasses> element that was previously empty. The declaration provides the name of the notification class in the <NotificationClassName> element and its schema in the <Schema> element. Looking at the declaration, you see that a string field is declared for each of the song properties listed previously. Notification FormattingThe notification schema just provides a description of the raw data that the notification will contain. But before a notification can be delivered to a subscriber, it has to be formatted. In the formatting process, the raw data is manipulated and decorated so as to make it presentable to the final recipient. In this section, we'll look at how the notification formatting options are declared in the notification class. SQL-NS employs components called content formatters to format raw notification data after it is generated. Content formatters are passed the raw notification data as input; they process this data and return a string that represents the formatted notification as output. SQL-NS ships with a built-in content formatter that uses XSL transforms to format notification data (we saw this in use in Chapter 3). You can also build a custom content formatter for your application, as described in Chapter 9, "Content Formatters." Each notification class contains a declaration that tells SQL-NS which content formatter to use when formatting its notifications. Although notification formatting is an important aspect of any application, it doesn't deserve much attention at the prototype stage. As mentioned previously, the prototype stage is about developing the core application functionality; the form of the final input and output should be designed later. Therefore, instead of trying to build a content formatter now, we will use the built-in XsltFormatter to quickly test the notifications aspect of our application. Note Although used here for testing our prototype, the XsltFormatter is actually a powerful component often used to do the real formatting work in production SQL-NS applications. Chapter 9 describes the details of the XsltFormatter and shows you how to customize it for your own applications. Listing 5.6 shows the part of the NewSong notification class declaration that specifies the content formatter. Listing 5.6. Declaration of the Content Formatter in the NewSong Notification Class
The value of the <ClassName> element tells SQL-NS which content formatter to use. In this case, it specifies the XsltFormatter. The remaining elements in the <ContentFormatter> declaration specify arguments for the content formatter components. The number, type, and purpose of the arguments vary for each formatter. The XsltFormatter requires two arguments:
Note If you're curious, you can look at the XSL transform we'll use in the application prototype: C:\SQL-NS\Samples\MusicStore\SongAlerts\XslTransforms\NewSong.xslt. However, I'm not going to explain the format of this file or how it is used by the XsltFormatter here; Chapter 9 covers those topics in detail. Aggregation Options: Digest and MulticastSQL-NS provides two useful delivery features not discussed so far: digest and multicast. The digest feature allows you to group several individual notifications all going to the same subscriber into a single message. Multicast allows you to send the same message to many different subscribers. Digesting is useful when it's likely that a single batch of events will generate more than one notification for a given subscriber. In our music store application, this is certainly the case. Imagine the store adding a whole new album to its inventory. The album would contain several songs by the same artist, and any NewSongByArtist subscription that matched would result in several notifications, one for each song. These notifications can always be sent individually to the subscriber, but doing so would result in a flurry of separate messages that would be difficult (or annoying) for the subscriber to manage. The subscriber probably wants to see the information about all the songs at once anyway, so it makes sense to group these individual notifications into a single message. Digesting allows you to do this. Multicast can be thought of as the inverse of digest: Where digest groups several notifications for one subscriber into a single message, multicast allows you to send a single notification to multiple subscribers. Multicast is really a performance optimization for cases where you have the same notification going to many recipients. Instead of incurring the cost of formatting the same notification data over and over for each individual subscriber, multicast allows you to format the data once and send that single formatted message to each subscriber who requested the notification. Unlike digest, which actually affects the content that the subscriber sees, multicast is not visible to the subscriber. Subscribers receive the same notifications they would have received had multicast delivery not been used. The difference is apparent only as a reduction in the workload on the server that formats and delivers notifications. Caution Multicast delivery is available only on Enterprise Edition of SQL-NS. If you are using Standard Edition, you cannot use multicast delivery. Due to limitations in the SQL-NS engine, digest and multicast cannot be used together in the same notification class. Therefore, you have to choose which is the more appropriate to use in your application. A number of factors affect this decision, but the following general guidelines usually apply:
In some applications (our music store application is an example), both of these conditional guidelines are satisfied. In cases like this, you have to trade off the end-user benefit of digest delivery against the performance gains from multicast delivery. Chapter 12, "Performance Tuning," discusses performance issues and the use of multicast delivery in more detail. In our application, we will use digest delivery. Listing 5.7 shows the code we need to add to our notification class to enable digest delivery. Listing 5.7. Aggregation Options in the NewSong Notification Class
The <DigestDelivery> element is given the value "true," indicating that digest delivery should be used. The <MulticastDelivery> element specifies "false," indicating that multicast delivery should not be used. Omitting one or both of these elements in the notification class is the same as specifying the value "false." If you specify "true" for both <DigestDelivery> and <MulticastDelivery>, you get an error when you compile the ADF. You also get a compile error if you specify "true" for <MulticastDelivery> and you're using the Standard Edition of SQL-NS. Notification DeliveryThus far, the elements of the notification class we've defined have dealt with the structure of the notification data and how that data is transformed into a message suitable for the final recipient. However, we have not described how that message actually gets to its final recipient. As we saw in Chapter 4, a SQL-NS instance defines one or more delivery channels used to send notifications. Each delivery channel represents a delivery endpoint used to route notifications to subscribers. Each delivery channel uses a particular delivery protocol to exchange messages. In the notification class declaration in the ADF, you list the protocols that your notification class supports. SQL-NS ships with a built-in delivery protocol that writes notifications to a file (instead of really delivering them over a network). This delivery protocol is rarely used in production systems but makes for a handy way to test your application in the prototype stage: You can open the file that this protocol writes to and examine the output of your application. Listing 5.8 shows the ADF elements that declare support for the File delivery protocol in the NewSong notification class. Listing 5.8. Declaration of Protocol Support in the NewSong Notification Class
The <Protocols> element contains the list of supported protocols, each of which appears in a <Protocol> element. Here, there is a single <Protocol> element for the File delivery protocol. As you'll see in Chapter 10, "Delivery Protocols," some delivery protocols require additional information in the <Protocol> element (the File delivery protocol just requires you to declare the protocol's name). In Chapter 10, we'll look at other protocols that SQL-NS provides, as well as techniques for building custom delivery protocols for your application. Compiling the Notification ClassTogether, the code fragments in Listings 5.5, 5.6, 5.7, and 5.8 form a complete notification class declaration that you can compile and test. You can either manually add the code shown in these listings to the ADF, or you can use the supplementary ADF with the code already added, ApplicationDefinition-3.xml, as described in the "Adding Code to the ADF" section (p. 130). When your ADF is ready, run the update instructions listed in the "Using nscontrol update" section (p. 132) or the "Using the Update Instance Command in Management Studio" section (p. 133). This compiles the new notification class and updates your instance. When the update is complete, you can take a look inside the database to see the objects the compiler created for the notification class. The following steps highlight some of these database objects:
At this point, no data is in the notification table because no notifications have been generated. When we add the matching logic to the application and test it with sample data, a row will appear in this table for each notification generated. In addition to the notifications table, the other important object created by the SQL-NS compiler is the notifications view. As you saw in Chapter 3, match rules insert data into the notifications view to generate notifications. The view always has the same name as the notification class. Let's take a look at the view for the NewSong notification class in Management Studio:
When the matching logic of the application generates new notifications of the NewSong notification class, instead of inserting rows directly into the notifications table, it should insert into the notifications view. A trigger on the view inserts the notification data into the notification table and sets up all the internal state information required by SQL-NS to process the notifications. We'll see this view used in the section "Matching Logic for Event-Triggered Subscriptions"(p. 152). In addition to the notifications table and view just described, several other views and stored procedures were created as a result of the notification class declaration being compiled. You can explore these in the database if you choose (many will have the name of the notification class NewSong in some part of their names), but be aware that most of these are used internally by SQL-NS, and it's unlikely that you'll ever need to deal with them directly. Matching Logic for Event-Triggered SubscriptionsWith an event, subscription, and notification class defined in our music store application, we can start to implement the matching logic. At this stage, we've only created the event-triggered subscription class, so we will only implement the event-triggered matching logic in this section. When we implement the scheduled subscription class in Chapter 6, we'll implement the corresponding matching logic for its subscriptions. Event-triggered matching logic specifies how to match subscriptions of a particular subscription class with events of a particular event class. The matching logic is always declared as part of the subscription class in the ADF, and its declaration specifies which event class it applies to. As you may recall from Chapter 3, developer-defined matching logic (the only kind of matching logic we use in the music store application) takes the form of SQL statements that join the data in the event and subscription tables to produce a set of rows that end up in the notifications table of some notification class. These SQL statements are called match rules. When designing the matching logic for a subscription class, follow these steps:
Let's use these steps to design the event-triggered matching logic for the NewSongByArtist subscription class in our music store application. First, the triggering event class is SongAdded: the event class that represents new songs added to the music store database. The notification class is NewSong: the one that represents a notification about a new song. Now, let's picture the event and subscription data as rows in tables. According to the event class definition (refer to Listing 5.2, p. 137), the events table will have a single column, SongId. The subscriptions table will also have a single column, ArtistName, according to the subscription class schema defined in Listing 5.4 (p. 141). The result of matching the events and subscriptions will be a set of NewSong notifications. Think of these as rows in a table with the schema of the NewSong notification class, as defined in Listing 5.5 (p. 144). That table will have SongTitle, ArtistName, AlbumTitle, and Genre columns. After we've established the schemas of the tables we're working with, we can easily write the appropriate SQL join. What we're really trying to do is join the events with the subscriptions on the artist name. However, the events don't contain the actual properties of the songs (such as the artist name); the events contain just the song IDs. To get the song properties, we have to join the events table with the SongDetails view in the MusicStore database's Catalog schema that we looked at earlier (see "Creating the Music Store Database," p. 121). Then we can join this with the subscriptions table on artist name. In SQL terms, we could write this join as follows: SELECT songs.SongTitle, songs.ArtistName, songs.AlbumTitle, songs.GenreName FROM [SongAlerts].[SongAdded] events JOIN [Catalog].[SongDetails] songs ON events.SongId = songs.SongId JOIN [SongAlerts].[NewSongByArtist] subscriptions ON subscriptions.ArtistName = songs.ArtistName Caution Do not actually run this query (it won't work because some of the entities it references do not yet exist). It's just here to illustrate the concept of matching the events and subscriptions using a join. Note that this is not the final match rule that we will put in our ADF; this is a simplified version of the join that I'm showing here for illustration. As written, the statement selects the raw data that forms the content of the notification (the song properties). We'll need to select other properties, such as the subscriber ID (so that we know which subscriber should receive the notification), in the final version match rule. As we said earlier, the output of the match rule is a set of notifications of the NewSong notification class. So, the rows returned by the previous join statement need to end up in the notifications table for the NewSong notifications class. When we compiled the notification class in the previous section, we saw that the compiler generated a view into which the rows should be inserted. Triggers on the view insert the appropriate data into the notifications table. We can simply insert the results of the match rule's SELECT clause into the notifications view. Caution Never insert rows directly into the notifications table. Instead, always insert into the notifications view to get the data into the notifications table and the required state set up. If you insert directly into the notifications table instead of using the view, the notifications will not be processed. We can rewrite the match rule using the notifications view as follows: INSERT INTO [SongAlerts].[NewSong] SELECT subscriptions.SubscriberId, N'DefaultDevice', N'en-US', songs.SongTitle, songs.ArtistName, songs.AlbumTitle, songs.GenreName FROM [SongAlerts].[SongAdded] events JOIN [Catalog].[SongDetails] songs ON events.SongId = songs.SongId JOIN [SongAlerts].[NewSongByArtist] subscriptions ON subscriptions.ArtistName = songs.ArtistName Note Although this is the final form of the match rule, you won't be able to run this directly in Management Studio right now because it relies on views of the event and subscription data that SQL-NS populates only at runtime. These views are described later in this section. Chapter 11, "Debugging Notification Generation," describes ways to manually run match rule queries outside the SQL-NS engine. Note that in the final version of the match rule, we've added a few more columns to the select list so that we can supply values for all the columns in the notifications view. As you may recall from Chapter 3, the first three columns in the notifications view are always the subscriber ID of the intended notification recipient, the subscriber device name, and the locale name. Here we've obtained the subscriber ID from the subscriptions and hard-coded values for the subscriber device name and locale. Note We'll look at subscriber devices in more detail in Chapters 7 and 10, and locales in Chapter 9. In the FROM clause, we have the events, joined with the song details from the music store catalog, and the subscriptions. The event and subscription data come from views that SQL-NS populates immediately before running the match rule. SQL-NS creates a view with the same name as the event class, SongAdded in this case, that contains just the events that should be processed by the match rule. Similarly, it creates a view over the subscriptions table (named the same as the subscription class, NewSongByArtist) that contains the subscription data against which the rule should be evaluated. The columns in these views correspond to the schema of the respective event and subscription classes. Additionally, the subscriptions view contains a column for the subscriber ID. Declaring Match Rules in the ADFListing 5.9 shows how the event-triggered match rule is declared in the ADF, as part of the subscription class declaration. Listing 5.9. Declaration of the Event-Triggered Match Rule
The subscription class has an <EventRules> element that contains an <EventRule> element for each match rule. The <EventRule> element specifies a name for the rule, an <Action> element that contains the SQL implementation of the rule, and an <EventClassName> element that specifies which event class should trigger the rule's evaluation. With the matching logic in place, we should also add some configuration options that control the frequency at which SQL-NS engine executes the match rules and the postprocessing that formats and delivers the resulting notifications. These are shown in Listing 5.10: Listing 5.10. Configuring Generator and Distributor Quantum Durations
The <QuantumDuration> element added to the existing <Distributor> element specifies how often the distributor component in the SQL-NS engine (responsible for formatting and delivery operations) should look for new notification batches to process. Here we've set the frequency to once every 15 seconds, using the XSD duration syntax (described in detail in the sidebar, "The XSD duration Data Type", p. 157). The <ApplicationExecutionSettings> element added to the ADF specifies another <QuantumDuration> element that applies to the generator. The value of this element controls how often the generator looks for new event batches that it needs to process using the application's match rules. The value specified here configures the generator to look for new event batches once every 15 seconds. Had we not specified quantum durations for the distributor and generator, the default value of one minute would have been used for both settings. Though using this default would not have affected the functionality of the application, it would have meant we'd have to wait longer for the application to process events that we submit and the notifications that the match rule generates. During testing, it's convenient to use relatively short quantum durations to make the application more responsive. However, in production, longer quantum durations may be appropriate. Chapter 12 describes the performance tradeoffs involved in adjusting generator and distributor quantum durations and offers guidance on choosing the most appropriate values for your applications.
Add the code shown in Listings 5.9 and 5.10 to your ADF, either by typing it in manually or using the supplementary ADF, ApplicationDefinition-4.xml, as described in the "Adding Code to the ADF" section (p. 130). After your ADF is ready, run the update instructions as you've done before. Testing the Event-Triggered Matching LogicAfter the application is updated with the matching logic and configuration settings, we can perform a test to show that it works. Earlier, we tested the events and subscriptions independently; now we can test them together, using the matching logic to produce notifications. Recall that in the "Events" section (p. 135), we tested our event class by inserting event data via a T-SQL script. At the time we did that, no subscriptions were in the application (we did not even have the subscription class defined), so when those events were processed, nothing happened. Now that we have subscriptions (added in the "Event-Triggered Subscriptions" section, p. 140) and match logic, we need to submit another batch of events and see them get processed. The old batch of events we previously submitted will do us no good because they've already been processed: SQL-NS only processes each batch of events once. Caution Before running these instructions, make sure that the instance's Windows service (NS$MusicStore) is running. Also, if for any reason you had to re-create your instance from scratch (instead of doing an update), make sure that you've added the subscribers and subscriptions as described in the "Adding Subscriptions" section (p. 142). If you don't have any subscribers and subscriptions in your instance, you will not see notifications generated.
At some time during the interval that you waited in step 4, the generator populated the events view with the event data you submitted, ran the match rule against it, and generated a set of notifications. If you look in the notifications table (SongAlerts.NSNewSongNotifications) in your application database, you'll see the raw notification data. Compare the data in the notifications table with the event data (in SongAlerts.NSSongAddedEvents) and subscription data (in SongAlerts.NSNewSongByArtistSubscriptions) and verify that the right matches were generated. You should see notifications only for events that referenced songs in which the artist name matched the artist name specified in one or more subscriptions. After the notifications were generated, the distributor formatted them with the XsltFormatter and delivered them through the File delivery protocol. This resulted in the output file contents you examined in step 5. A sample notification in the output file might look like this: Notification Id: 1 Notification Class Name: NewSong Subscriber Id: Alex Device Address: Protocol Fields: Body: New songs are available for download from the music store! Song Title: White Flag Artist Name: Dido Album Title: Life for Rent Genre: Rock The first part of the output lists the notification ID, notification class name, subscriber ID, device address, and protocol fields. (We'll take a look at device addresses and protocol fields in Chapter 10.) The File delivery protocol always writes these values as standard headers for each notification. The next part is the formatted body of the notification (the output from the content formatter). When you look at the output file, notice that some of the notifications contain information about more than one song. This is because of the digesting option set on the notification class: Separate notifications going to the same subscriber were combined into a single digest message. Note Although you probably experienced a noticeable delay in the processing of the events and notifications as you performed the instructions in this section, it's important to understand that the actual work done by the SQL-NS engine consumed only a tiny fraction of the full amount of time that you waited. The delays you saw were because the generator and distributor are configured to poll for new work at specified intervals. As you saw in Listing 5.10, we're using polling intervals of 15 seconds in this chapter. During most of the time in those intervals (the majority of the time you waited), the engine was simply idle. In real applications, the use of the polling intervals allows several event and notification batches to accumulate and be processed together. This results in overall efficiency gains, but it does mean that there is a latency in the SQL-NS pipeline. You can adjust the polling intervals to change this latency as appropriate for your application. We'll look at how to do this in Chapter 12. |
EAN: 2147483647
Pages: 166