Section 12.3. Customizing Components
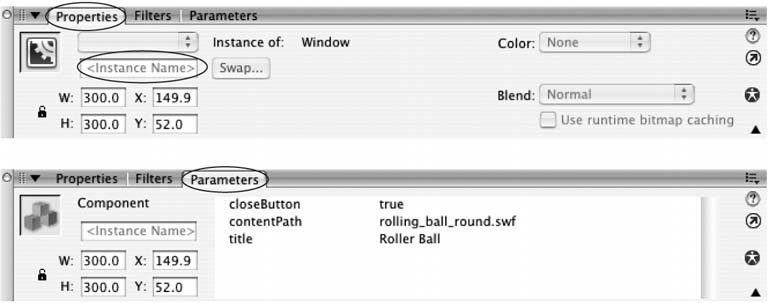
12.3. Customizing ComponentsAfter you've dragged a component to the Stage, you can begin customizing it. For example, if you add a CheckBox component to the Stage, you want to change the standard CheckBox label to a specific label that fits your needs. If you add a Button component to the Stage, in addition to changing the button's label (from Button to Submit Form, say), you want to tell Flash what to do when someone clicks the button. You can't customize a component using Flash's editing tools the way you modify a symbol or an image. Instead, Flash gives you three separate panels to customize a component: the Properties and Parameters panels, the Component Inspector, and the Actions panel. How many (and which) panels you need to use depends both on the component you're customizing and on which characteristics of the component you want to change. For example, you can customize the labels of the MenuBar component using the Parameters panel, but to customize the labels of the Menu component, you need to create ActionScript actions, which you do in the Actions panel. Note: Components are sometimes referred to as black boxes because you can't inspect their inner workings. The only things you can look at or change are the characteristics that the developer exposes (lets you access) through the Property Inspector, the Component Inspector, or ActionScript classes. 12.3.1. Customizing Components Using the Properties and Parameters PanelsAfter you drag a component to the Stage, Flash displays the component's customizable characteristics in the Property Inspector and its customizable parameters in the Parameters panel. As you can see in Figure 12-21, properties (including width, height, and instance name ) affect the entire component; parameters let you customize the way individual component features work. Figure 12-21. Top: The Property Inspector shows you the customizable dimensions of the selected component (here, the Window component) and lets you type an instance name. |
| FREQUENTLY ASKED QUESTION Knowing What to Type for a Parameter |
| I understand the concept of parameters and values. But if I don't know what a parameter doesand frankly, the Parameters panel doesn't give me much in the way of clues. How do I know what to type for the parameter's value? The parameters Flash lets you set in the Parameters and Component Inspector panels vary from component to component. In some cases, you can figure out the value you're supposed to type by looking at the name of the parameter. For example, it doesn't take a rocket scientist to guess what you're supposed to type for the Window component's title parameter: the text you want Flash to display in the title bar of your Window. But you can't always so easily decipher the values Flash expects for other parameters (or the values for the component bindings and schema you're introduced to on Section 12.3.2.1not by a long shot). In the upper-right corner of the Component Inspector, there's a wizard icon. (It looks like a little magic wand.) The hope is that Adobe will eventually make wizards available for each component that comes with Flash. As this book goes to press, however, clicking the wizard icon has no effect (unless you count the pop-up message "No wizards for this component"). That's because only one wizardthe Data Connection wizardis available, and Macromedia designed it to help you specify only certain data bindings. (If you're interested, you can download this wizard: just go to www.macromedia.com/devnet/flash/articles/datawizards.html.) Until that wonderful day when Flash comes with a full set of component wizards, you need to select Help Note: Unfortunately, if you're working with a third-party component you've found on the Internet and installed using the Macromedia Extension Manager (see the box on Section 12.4), Flash Help doesn't help: You need to contact the component author and ask for documentation. 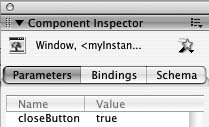 |
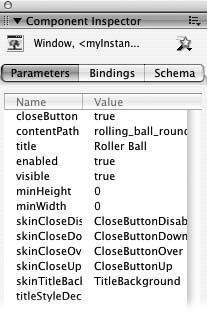
The Component Inspector appears. The panel has a Parameters tab, shown in Figure 12-24, where you can view and, if you want, change the component's parameters.
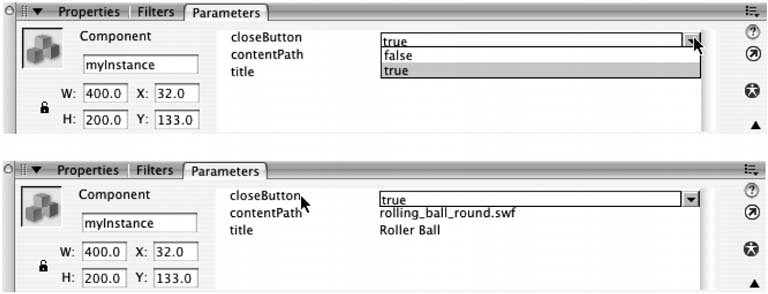
The parameters you see depend on the selected component. In the example of the Window component in Figure 12-24, the parameters you can set include closeButton (whether you want Flash to display a little X in the title bar that your audience can click to close the window), contentPath (the name of the image or animation file you want to load into the Window component), and title (the text you want to appear in the title of the window).
If the Parameters tab isn't already selected, click to select it .
Flash displays all of the parameters you can change.
Click anywhere on the name or value of the parameter you want to change .
Flash highlights the selected value.
Figure 12-24. The Component Inspector's Parameters tab (shown here) lets you inspect and modify all the parameters associated with a component (not just the most-often modified parameters shown in the Parameters tab of the Property Inspector, as Figure 12-22 shows). Clicking the Bindings and Schema tabs lets you change how your component transmits data to other programs and how Flash constrains your component's properties and parameters, respectively.
Either type a new value for the parameter, or choose a value from the drop-down list Flash displays .
For example, if you click the value true next to the closeButton (see Figure 12-24), Flash displays a drop-down box from which you can choose either true or false.
When you're done, or if you don't need to change any parameters, read on to work on the bindings.
Note: Because data bindings link specific component fields (such as the value of a TextInput component) to specific external-to-Flash programs (such as a ColdFusion script or Active Server Page running on a server), this book can't provide you with working examples. Instead, you see how to add and delete bindings in general using the Component Inspector. For help in binding your specific components to your specific server-side programs, start by searching Flash Help for data binding classes (see the Appendix for tips on accessing Flash Help). Then check out Macromedia's cache of data integration articles, which you can find online at the Flash Developer Center (www.macromedia.com/devnet/flash/data_integration.html).
12.3.2.2. Bindings tab
The Bindings tab of the Component Inspector binds , or maps, individual data fields of your component to individual data fields in a server-side program, such as a ColdFusion script or relational database.
Note: Before you can add a binding to your component, you need to know the inner workings of your server-side program. For example, you need to know which server-side data field you want to map your component data to and how you want to format your component data. (Typically, you know this information either because you've written the server-side program yourself, or because you've asked the IT folks who have.)
-
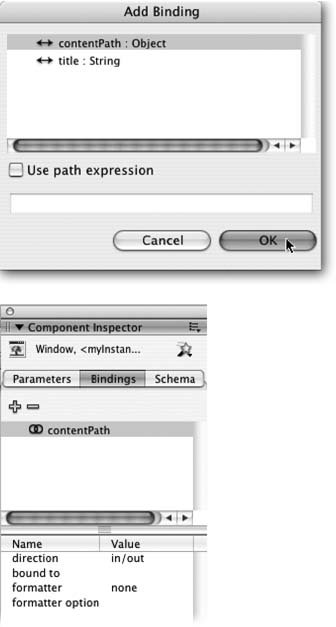
In the Component Inspector, click the Bindings tab .
Flash displays the data bindings associated with the selected component.
-
Click the Add button .
Flash displays the Add Binding dialog box (Figure 12-25, top).
Figure 12-25. In the Add Binding dialog box (top), you can add a data binding to more than one parameter, or data field, although you do need to add bindings one at a time. Selecting a data field and clicking OK displays your new binding in the Component Inspector window (bottom). Now you can build your binding with the newly activated binding parameters (direction, bound to, and so on).
-
Click to select the field you want to bind .
Typically, you want to bind a component field to a field in a database or some other program running on a server.
-
Click OK .
Flash redisplays the Component Inspector, showing your newly created binding (Figure 12-25, bottom).
-
With your newly created binding still selected, click the name of the binding parameter you want to change .
Flash highlights the parameter's value.
-
Either type a new value, or choose a value from the drop-down menu .
For example, clicking the in/out value you find next to the direction parameter (Figure 12-25, bottom) displays a drop-down menu containing three choices: in, out, and in/out.
When you're done, you can click the Schema tab to add additional properties to your component, as discussed next.
12.3.2.3. Schema tab
The Schema tab lets you add additional properties (data fields) to a component, which you can then bind to a server-side program. Typically, you use this tab for one of two reasons:
-
You want to make an existing property bindable . Adding the name of a component property that already exists to the Schema tab tells Flash to let you bind that property (see the "Bindings tab" section, above) to a server-side program.
-
You want to add a brand-new bindable property to a DataSet component . Flash gives you several ways to transfer data between your animation and your server-side program, most of which involve using the DataSet component in conjunction with one or more of the other data integration components (see Table 12-1). Typically, you use the DataSet component to describe all the different fields you want to transfer. (For more information on the DataSet component, search Flash
 Flash Help for "using the DataSet component.")
To add a bindable property to a component:
-
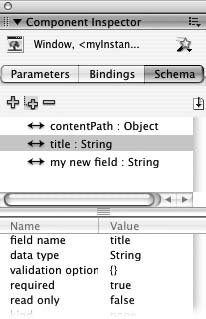
In the Component Inspector, click the Schema tab .
Flash displays the schema (the detailed description of each bindable property, including the name of the property, which type of data it can hold, and so on) for the selected component, as shown in Figure 12-26.
Figure 12-26. You use the Schema tab both to add new bindable properties (fields) to a component and to describe or constrain existing bindable properties. Here are all the parameters for this instance of the Window component's title property, including the name of the property (title), the internal data type of the property (String), and so on. You can tell Flash to calculate the contents of the title property (kind), format the contents for display (formatter), or format the contents for transfer to an external-to-Flash program (encoder).
-
If you like, you can add one or more bindable properties to the component. To add a property, click the Add button .
Flash displays a new property (field) called new field.
You can customize the property you just added, or any of the existing ones, as described next.
Note: To delete a property, first select it; then click the Delete button (the one that looks like asign, as shown in Figure 12-26).
-
Click to select the property you want to change .
In the bottom half of the Component Inspector, Flash displays the schema settings associated with that property.
-
Click the name of the schema setting you want to change .
Flash highlights the schema setting's value.
Either type a new value for the schema setting, or choose a value from the dropdown menu Flash displays. For example, clicking the {} value next to validation option (Figure 12-26) lets you type the minimum and maximum length of the string you want this field to contain.
12.3.3. Customizing Components Using the Actions Panel
To make a component do something usefulto make a Button component send Flash form data to a database running on a server after someone clicks it, for example, or to display a different Web page depending on the option someone chooses from a listyou have to write your own ActionScript code.
You also have to write your own ActionScript code if you want to make a change to the way a component looks, that you can't make using the Property Inspector or the Component Inspector, such as adding a skin to a component (see the box on Section 12.1.3).
Note: In some cases, you need to use ActionScript to customize the way a component looks as well as how it behaves. For example, you can't change the appearance of the Menu component using the Property or Component Inspector; you need to use the Actions panel and ActionScript.
You use the Actions panel (Window Actions) to write ActionScript code. But while the Actions panel offers assistance in the form of a clickable object model and code hints, the fact is that you need to know a good deal about ActionScript if you want to make a component do something useful.
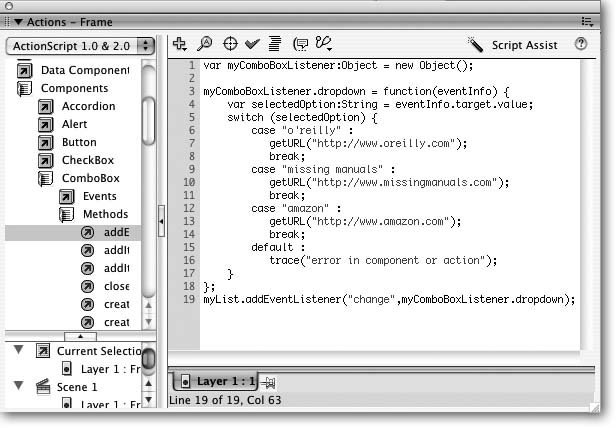
Figure 12-27 shows you an example. Not only do you need to understand ActionScript language constructs (such as the switch and function statements and how to declare a variable); you also need to be familiar with the eventInfo object and understand the listener event model (the messages Flash sends out every time someone clicks a button, chooses from a drop-down list, drags a window, or otherwise interacts with a component).
Figure 12-27. Here's an example of a short action that connects a ComboBox component (Section 12.1.3.3) to an ActionScript statementgetURL( )whose purpose in life is to load a Web page. Choose O'reilly from the drop-down list, and Flash launches a Web browser preloaded with O'Reilly's home page; choose missing manuals, and the Missing Manual home page loads; and so on. There's no getting around it: If you want to use components, you need to know ActionScript.
If you're serious about learning ActionScript, the first thing to do is explore the examples and language reference in Flash Help. Then check out Help Flash Developer Center and invest in a good book on the topic, such as Joey Lotts ActionScript Cookbook (O'Reilly).
Note: You'll find ActionScript examples in Chapters 10 and 11. Chapter 11 also has examples of using the ActionScript wizards Flash calls behaviors .
EAN: 2147483647
Pages: 126