5.9. The Calendar
| < Day Day Up > |
5.8. Information Panel: Titles, Dates, and CommentsWhen the Information panel is visible, as described in the previous section, you may see any number of different displays (Figure 5-11):
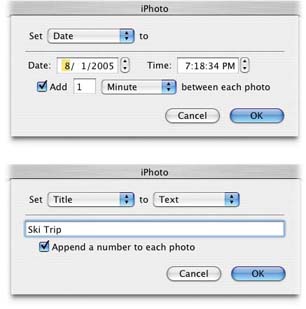
5.8.1. Titles (Renaming Photos)Just about everything in iPhoto has its own title: every photo, album, folder, film roll, photo book, slideshow, and so on. You can rename them easily enough: Just edit the "title" box in the Information panel, as shown in Figure 5-11. Most people find this feature especially valuable when it comes to individual photographs. When you import them from your digital camera, the pictures bear useless gibberish names like CRS000321.JPG, CRS000322.JPG, and so on. To change a photo's name to something more meaningful, just select its thumbnail, click once in the Title field, and type in a new title. While you can make a photo's title as long as you want, it's smart to keep it short (about 10 characters or so). This way, you can see all or most of the title in the Title field (or under the thumbnails). Tip: A new keystroke in iPhoto 5 makes life a lot easier when naming a whole bunch of photos in a row (like a batch you've just imported). Edit the title box for the first photo, and then press 5.8.1.1 Changing titles, dates, or comments en masseThe trouble with naming your photos is that hardly anybody takes the time. Yes, the keystroke described in the Tip above certainly makes it easier to assign every photo its own name with reasonable speedbut are you really going to sit there and make up individual names for 25,000 photos? Mercifully, iPhoto lets you change the names of your photos all at once, thanks to a new "batch processing" command. No, each photo won't have a unique, descriptive name, but at least they can have titles like Spring Vacation 2 and Spring Vacation 3 instead of IMG_1345 and IMG_1346. To use it, choose Photos Tip: Don't be fooled by the command name Batch Change. iPhoto still can't edit a batch of photos. You can't, for example, scale them all down to 640 x 480 pixels, or apply the Enhance filter to all of them at once. Your options, in the second Batch Change pop-up menu, are as follows :
Tip: Once you've gone to the trouble of naming your photos, remember that you can make these names appear right beneath the thumbnails for convenient reference. Choose View  Titles to make it so. Titles to make it so. 5.8.3. CommentsSometimes you need more than a one- or two-word title to describe the contents of a photo, album, folder, book, slideshow, or film roll. If you want to add a lengthier description, you can type it in the Comments field in the Photo Info pane, as shown in Figure 5-13. Even if you don't write full-blown captions for your pictures, you can use the Comments field to store little details such as the names, places, dates, and events associated with your photos. The best thing about adding comments is that they're searchable. After you've entered all this free-form data, you can use it to quickly locate a photo using iPhoto's search command. Tip: If you speak a non-English language, iPhoto makes your life easier. As you're typing comments, you can choose Edit Special Characters. Mac OS Xs Character Palette opens, where you can add international letters like ‰, ˜, and b . Of course, it's also ideal for classic phrases like "I  my cat." my cat." | |||
|

-
If no photos, or several photos, are selected, the notes you type into the Comments box get attached to the current album, rather than to the pictures.
-
You can add the same comment to a group of photos using iPhoto's Batch Change command. For example,
 -click all the pictures of your soccer team, choose Photos Batch Change, choose Comments from the first pop-up menu, and type a list of your teammates names in the Comments field. Years later, you'll have a quick reminder of everyone's name.
You can just as easily add comments for an album, folder, slideshow icon, book, or film roll whose name you've highlighted.
5.8.3.1 Comments as captions
While the Comments field is useful for storing little scraps of background information about your photos, you can also use it to store the captions that you want to appear with your photos. In fact, some of the book layouts included with iPhoto's book-creation tools (Chapter 10) automatically use the text in the Comments field to generate a caption for each photo.
(On the other hand, you don't have to use the Comments box text as your captions. You can always add different captions when you're editing the book.)
| < Day Day Up > |