11.2. Custom Animations PowerPoint lets you animate the individual objects you add to your slides: text boxes, images, charts , and so on. Unlike transitions, these animations don't start moving until the full slide is on the screen. But like transitions, they affect how something enters and exits the screen. You can apply these effects in one or more situations: -
When the object first appears on the slide. You can control how an object first appears on a slide by applying an entrance effect to that object. For example, you can have text appear letter by letteras though it were being typed onto your slideinstead of having it appear all at once. Or you can make bullet points fade in one by one: You click, a bullet point fades in, you discuss it, you click again, the next bullet point fades in, and so on. That way, your audience can focus on what you're saying, as opposed to reading your whole slide and tuning you out. -
When the object leaves the slide. You can control how an object leaves a slide by applying an exit effect. -
When the object is visible on the slideafter it enters but before it leaves. You can bring attention to a bit of text, image, or any other object on your slide by applying an emphasis or motion path effect. Using an emphasis effect, you can make a specific phrase grow dramatically (or spin, or change colors,) so that the phrase jumps out of the paragraph and brings attention to itself. If you want an object to move around on a slide, use a motion path effect. Say your presentation's message is that your company's spinning off some of its divisions. Now imagine that one of your slides contains an image showing the divisions grouped together. To visually reinforce your message, you can add motion path effects to each of the "division" shapes , so when you click the slide, the corporate structure appears to explode, with each division literally spinning off the slide. You can apply multiple effects to the same object, if you like, and you can set up the effects to run simultaneously (the exploding corporate divisions example), or one by one (good for illustrating sequential procedures), or in response to a mouse click, which lets the presenter decide when (or if) to run the effect. PowerPoint always runs your effects in the order in which you add them (see the box on page 350). To help you keep multiple effects organized, PowerPoint lets you group your effects into animated sequences. An animated sequence (Figure 11-4) consists of an effect you've set up to run On Click immediately followed by effects you've set up to run either as With Previous, or After Previous.  | Figure 11-4. Left: Rectangle 24 has four animated sequences applied to it (numbered 03). Animated sequence 0 consists of two effects set up to run After Previousdenoted by the little clock iconsand so will run as soon as the slide appears. Animated sequences 1, 2, and 3 are set up to run On Click (note the mouse icon). The double-down arrow lets you know that Rectangle 24 contains multiple lines of text.
Right: Clicking the double arrow shows you additional text lines in Rectangle 24 to which you can add separate effects if you like. | |
Note: To see a screencast that walks you through the process of adding a custom animation to a slide, visit www.missingmanuals.com.
UP TO SPEED
Order Matters | | The order in which you add effects determines the order in which effects appear in the Custom Animation pane, which in turn determines the order in which PowerPoint runs those effects. But if you change your mind after you add a bunch of effects, no problem. It's easy to reorder effects (page 370 shows you how). A bigger problem is the fact that PowerPoint doesn't warn you if you accidentally place exit effects before other effects. For example, say you add three effects to an object: an exit effect, a motion path effect, and an emphasis effect. Because PowerPoint always runs effects in the order in which they appear in the Custom Animation pane, it begins with the exit effect, whisking your object off the screen. Then it runs your next two effects, out of sight of your audience . So, the more effects you apply to the objects on your slide, the more you need to test (and retest) the way they appear during your slideshow. |
11.2.1. Applying Entrance Effects Applying an entrance effect to an object determines how that object first appears onscreen. Out of the box, PowerPoint assumes you want all of the objects to appear as soon as the slide appears. In other words, PowerPoint doesn't assume you want any entrance effects on any objects until you tell it otherwise . You can choose from two- dozen entrance effects organized for your convenience the following four categories: -
Basic. Appear, Blinds, Box, Checkerboard, Circle, Crawl In, Diamond, Dissolve In, Flash Once, Fly In, Peek In, Plus, Random Bars, Random Effects, Split, Strips, Wedge, Wheel, and Wipe. -
Subtle. Expand, Fade, Faded Swivel, Faded Zoom. -
Moderate. Ascent, Center Revolve, Color Typewriter, Compress, Descend, Ease In, Grow & Turn, Rise Up, Spinner, Stretch, Unfold, Zoom. -
Exciting. Boomerang, Bounce, Credits, Curve Up, Flip, Float, Fold, Glide, Light Speed, Magnify, Pinwheel, Sling, Spiral In, Swish, Swivel, Thread, and Whip.
Note: Although the names of the effects give you a hint at how they'll look, names can be deceiving, you should still preview each effect after you apply it to an object, as described on this page.
To add an entrance effect to an object: -
On your slide, select the text, image, shape, or other object you want to apply an entrance effect to. You can apply an effect to more than one object at a time. To do so, begin by selecting multiple objects. -
Go to Animations  Animations Custom Animation. Animations Custom Animation. PowerPoint highlights the Custom Animation button, and the Custom Animation pane (Figure 11-5) appears. (The Custom Animation button is a toggle. Clicking it when the Custom Animation pane is visible makes the Custom Animation pane disappear.) 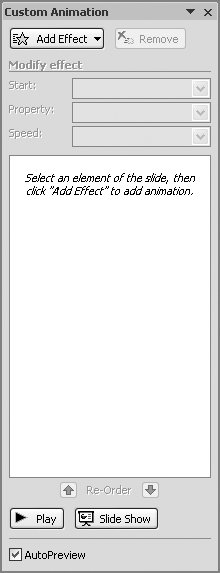 | Figure 11-5. If you forget to select an object before you display the Custom Animation pane, you can always do it afterward. But until you do, the Add Effect button stays grayed out. | | -
On the Custom Animation pane, click Add Effect and then choose Entrance from the drop-down menu. PowerPoint displays a list of entrance- related effects (Figure 11-6). 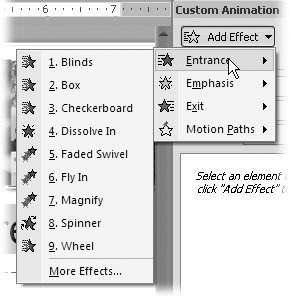 | Figure 11-6. You can't tell in this black-and-white picture, but the Entrance icon is green. When you add a bunch of different effects to the same object, PowerPoint's color-coding scheme (page 366) helps you tell at a glance which kind of effect you're working with. | | -
If you see an effect you like, select it and then head straight to step 7. Otherwise, choose More Effects to see the Add Entrance Effect dialog box, which shows you a full list of entrance-related effects (Figure 11-7). 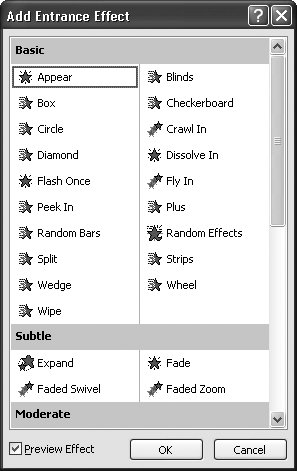 | Figure 11-7. For some reason, PowerPoint groups entrance effects into categories euphemistically named Basic, Subtle, Moderate, and Exciting. Don't pay a lot of attention to the categories. Whether or not an effect is subtle, exciting, or simply annoying is up to youand your audience. | | -
Click the effect you want to apply to your object. On your slide, PowerPoint previews the effect.
Note: If your effect doesn't preview, head to the Custom Animation pane and make sure the AutoPreview checkbox is turned on. When it's turned on, PowerPoint automatically previews the effects you select in the future. To preview your effect right now, click the Play button in the Custom Animation pane.
-
If you're happy with your decision, click OK. PowerPoint modifies the Custom Animation pane to reflect your newly added effect, as shown in Figure 11-8. 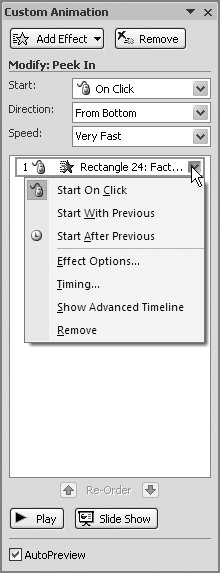 | Figure 11-8. The 1 means this is the first animated sequence you've added to this object; the little mouse icon means that this effect is set up to appear only when the slide is clicked; and the green shooting star icon refers to the type of effect chosen (in this case, an entrance effect). Mousing over the newly created effect pops up a helpful description; clicking the effect's drop-down menu lets you edit the effect. | |
Tip: If you know for sure which effect you want to apply and don't want to waste precious time previewing, simply double-click the effectno need to click OK.
-
If you like, you can modify the way the effect behaves. The exact options PowerPoint lets you set depend on the effect you've chosen. For example, if you choose the Fly In option, in addition to the Start and Speed options in Figure 11-8, PowerPoint may displays a Direction box you can use to make the object enter from the left, right, top, bottom, and so on. (On the other hand, if you choose the Faded Swivel, the swiveling action occurs in place, so PowerPoint doesn't waste your time by asking you to set a Direction option it will never use.) In general, you get to choose: -
When you want the effect to run . The Start drop-down menu lets you choose from On Click, which tells PowerPoint to wait until you click the mouse to begin displaying the effect; Start With Previous, which tells PowerPoint to automatically begin displaying this effect simultaneously with the effect that comes before it in the Custom Animations pane; and Start After Previous, which tells PowerPoint to automatically begin displaying this effect after the effect that comes before it in the Custom Animations pane. -
How fast you want the effect to take place. From the Speed drop-down menu, you can choose Very Slow, Slow, Medium, Fast, and Very Fast. Although the speed you choose is a personal decision, keep in mind that few audiences want to spend a lot of time staring at a spinning globe or headline. (In other words, you can't go wrong with Fast or Very Fast.) -
If you like, set advanced options. PowerPoint hides lesser-used animation options in out-of-the-way dialog boxes. Typically, you only need to bother setting advanced options if you're applying an effect to text, a chart, or a diagram, or if you're creating a complex animation. To set advanced options: -
Set effect options. Click the down arrow at the effect listing's far right and then choose Effect Options from the shortcut menu. An Effect Options dialog box similar to Figure 11-9 appears, with options specific to the chosen effect. 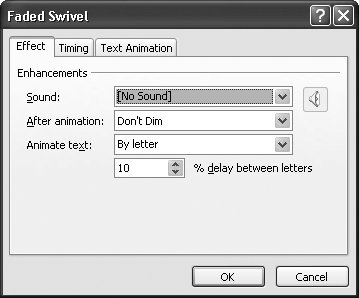 | Figure 11-9. Not surprisingly, the options on the Effect tab depend on the particular effect you've chosenhere, the Faded Swivel entrance effect. PowerPoint sets each of the options for you, but you can override any (or all) of its settings. | |
Tip: Alternatively, you can double-click the effect listing to display the Effect Options dialog box. You can also right-click the effect listing to choose an option from the shortcut menu.
The Sound drop-down menu lets you add sound to your effect; it also lets you stop currently playing sounds (see page 348 for details). The "After animation" drop-down menu lets you choose from the options displayed in Figure 11-10. Finally, the "Animate text" drop-down menu lets you animate text All at once, By word, or By letter. (If you choose "By word" or "By letter," you also get to choose how long to stretch out the entrance of your text. To do so, click the "% delay" box and specify a number. The larger the number, the longer PowerPoint stretches out your text's entrance.) 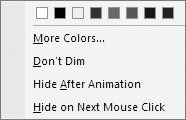 | Figure 11-10. Click a color (or choose More colors) to tell PowerPoint to finish up your effect by redisplaying your object in that color. Select Hide on Next Mouse Click to tell PowerPoint to hide your animation on the first mouse click it detects after the effect has finished running. | |
-
Set advanced timing options. In the Effect Options dialog box, click the Timing tab to display the options shown in Figure 11-11. (If you're not already in the Effect Options box, you can display advanced timing options by clicking the down arrow next to your effect and selecting Timing.) 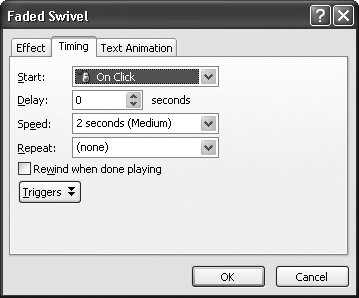 | Figure 11-11. The Start and Speed options you see here are the same ones PowerPoint lets you set at the top of the Custom Animation pane. If you like, you can use the options in this dialog box to tweak those settings, as described below. | |
The Start drop-down menu tells PowerPoint when and how you want your effect to run (see page 354); the Delay box tells PowerPoint how many seconds to wait after the Start option you selected. The Speed drop-down menu lets you specify how fast you want your effect to run (page 354); clicking the Repeat drop-down menu lets you choose how many times you want PowerPoint to run your effect2, 3, 4, 5, 10, Until Next Click, or Until End of Slide. Turning on the "Rewind when done playing" checkbox tells PowerPoint to rewind the effect (which may be useful if you come back to the slide more than once during a presentation); and finally, clicking Triggers lets you choose whether you want your on-click effect to begin when you click anywhere on the slide, or only when you click a specific object (see Figure 11-12). 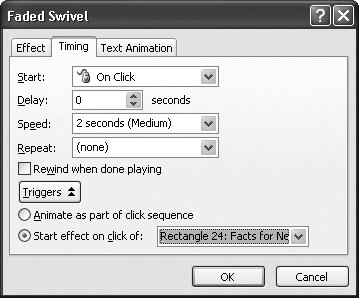 | Figure 11-12. When you set up an entrance effect to start On Click, as described on page 354, PowerPoint assumes you mean "when the slide is clicked." But you can get more specific than that. Turn on the radio box next to "Start effect on click of," and PowerPoint lists all the objects on that slide. Pick one, and your entrance effect only occurs when you click that particular object. | |
Note: PowerPoint hotdogs refer to animated effects that you've set up to run when you click a specific object as trigger animations .
-
Set additional options. Depending on the effect you choose, you may see tabs and options in your Effect Options dialog box that you don't see in this section's. For example, you may see the Text Animation tab, which lets you display lines of text in reverse order (among other things). A complete, blow-by-blow listing of every effect and every option would make this book too heavy to lift, but the help resources in the Appendix show you where to go to find answers for any effect-option-related questions you have.
Note: PowerPoint automatically displays the timeline when you preview an effect. But selecting Show Advanced Timeline lets you see (and edit) the timeline when the effect isn't running. See page 369 for more details.
-
Show advanced timeline. If knowing exactly how many seconds each of your effects lasts and exactly when they overlap each other is important to youbecause you're creating a complicated animation, for exampledisplay PowerPoint's effect timeline. In the Custom Animation pane, click the down arrow at the effect's right and choose Show Advanced Timeline from the shortcut menu. When you do, a timeline similar to the one in Figure 11-13 appears in the Custom Animation pane. 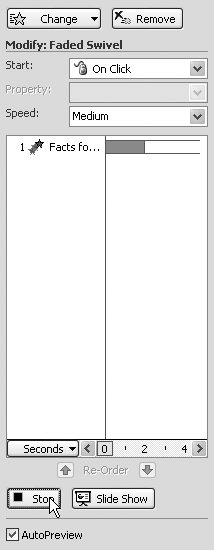 | Figure 11-13. The timeline tells you exactly how many seconds your effect will take to run, from start to finish. The previewed effect is less than one second underway. To adjust the length of the effect, click the effect's orange animation bar and drag left (to shorten) or right (to lengthen). You can also click and drag the bar itself to adjust its start time without changing the duration of the effect. Click the Seconds button to enlarge the animation bars and display the timeline in fractions of seconds (choose zoom in) or shrink the animation bars and display the timeline in multiple seconds (choose zoom out). | |
Tip: If all you want to do is apply one of the three most popular entrance effectsFade, Wipe, or Fly Inyou can save a few keystrokes by selecting the object on your slide, and then choosing Fade, Wipe, or Fly In from the Animations Animations Animate menu.
11.2.2. Applying Emphasis Effects If an entrance effect controls how an object appears on the slide and an exit effect controls how an object disappears, emphasis and motion path effects (page 359) control what happens in between, while the object is on the slide. By applying an emphasis effect, you can make text change color or an image (or other object) spin in response to a mouse click. But you can also set up emphasis effects to run automatically, either along with the other automatic effects you've applied to slide, or in order. The emphasis effects you can applyorganized in groups to help you locate them more easilyinclude: -
Basic. Change Fill Color, Change Font, Change Font Color, Change Font Size , Change Font Style, Change Line Color, Grow/Shrink, Spin, and Transparency. -
Subtle. Bold, Flash, Brush On Color, Brush On Underline, Color Blend, Color Wave, Complementary Color, Complementary Color 2, Contrasting Color, Darken, Desaturate, Flash Bulb, Lighten, and Vertical Highlight. -
Moderate. Flicker, Grow With Color, Shimmer, and Teeter. -
Exciting. Blast, Blink, Bold Bevel, Style Emphasis, and Wave. You apply an emphasis effect the same way you apply an entrance effect, by following the steps starting on page 351. When you get to step 3, go to Custom Animation Add Effect Emphasis. Instead of entrance effects, you see a selection of emphasis effects (Figure 11-14). 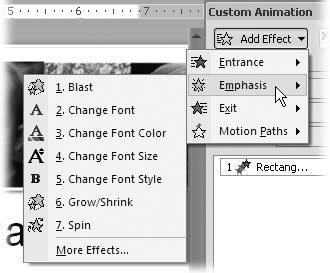 | Figure 11-14. Emphasis effects don't involve entering, leaving, or racing around the slide. Instead, they call attention to objects by enlarging them, changing their color, spinning them around, or jiggling them. You can set up an emphasis effect to run automatically (at the same time as, or after, the other effects you've applied to the slide), or when the presenter clicks either a specific object or the slide itself. | |
11.2.3. Applying Exit Effects An exit effect is one that controls how an object leaves the slide. For example, instead of having an object be there one minute and gone the next, you can have it zoom, fly, or spiral out of sight (among many other options). You apply an exit effect the same way you apply an entrance effect, by following the steps starting on page 351. When you get to step 3, go to Custom Animation Add Effect Exit. Instead of entrance effects, you see a selection of exit effects. As you can see in see Figure 11-15, they include: -
Basic. Blinds, Box, Checkerboard, Circle, Crawl Out, Diamond, Disappear, Dissolve Out, Flash Once, Fly Out, Peek Out, Plus, Random Bars, Random Effects, Split, Strips, Wedge, Wheel, and Wipe. -
Subtle. Contract, Fade, Faded Swirl, and Faded Zoom. -
Moderate. Ascent, Center Revolve, Collapse, Color Typewriter, Descent, East Out, Grow & Turn, Sink Down, Spinner, Stretchy, Unfold, and Zoom. -
Exciting. Boomerang, Bounce, Credits, Curve Down, Flip, Float, Fold, Glide, Light Speed, Magnify, Pinwheel, Sling, Spiral Out, Swish, Swivel, Thread, and Whip. 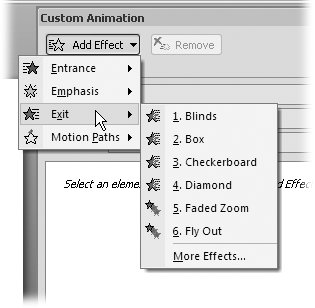 | Figure 11-15. The actual effects you can choose from this dialog box depend on the type of object you're applying an effect to. For example, if you're applying an Exit effect to a text box, the Faded Swivel and Color Typewriter options are activated, but if you're applying an Exit effect to a chart, they appear grayed out. | |
Warning: Because PowerPoint runs effects in order, if you place an exit effect before, say, an emphasis effect, the emphasis effect won't appear (because the object in question is already off-screen , having just exited). Check out the box on page 350 for more details.
11.2.4. Motion Path Effects Similar to an emphasis effect, a motion path effect controls how an object behaves while it's on the slideafter the object has entered the slide and before it exits. There's one difference between emphasis and motion path effects: Emphasis effects offer in-place motion only, such as blinking, spinning, and expansion-and-contraction. Motion path effects let you move objects around on the slide from left to right, right to left, around in a circle, and so on. A motion path is a traced line, curve, squiggle , or shape that tells PowerPoint how you want the object to move (and in what direction). In fact, nothing prevents you from creating a motion path that zings an object onto a slide (similar to the way an entrance effect works), off a slide (similar to an exit effect), or both. PowerPoint offers dozens of prebuilt motion paths, which you can tweak. They include: -
Basic. 4 Point Star, 5 Point Star, 6 Point Star, 8 Point Star, Circle, Crescent Moon, Diamond, Equal Triangle, Football, Heart, Hexagon, Octagon, Parallelogram, Pentagon, Right Triangle, Square, Teardrop, and Trapezoid. -
Lines & Curves. Arc Down, Arc Left, Arc Right, Arc Up, Bounce Left, Bounce Right, Curvy Left, Curvy Right, Decaying Wave, Diagonal Down Right, Diagonal Up Right, Down, Funnel, Heartbeat, Left, Right, S Curve 1, S Curve 2, Sine Wave, Spiral Left, Spiral Right, Spring, Stairs Down, Turn Down, Turn Down Right, Turn Down Up, Turn Up Right, Wave, Zig Zag. -
Special. Bean, Buzz Saw, Curved Square, Curved X, Curvy Star, Figure 8 4, Horizontal Figure 8, Inverted Square, Inverted Triangle, Loop de Loop, Neutron, Peanut, Plus, Pointy Star, Swoosh, Vertical Figure 8. Say you're giving a presentation showing suggested improvements to your company's production line; your company produces cotton sweaters. You can add images to your slide showing the cotton fields; the warehouses; the spinning, weaving, coloring, and sewing factories your company deals with; and your wholesaler. You can place an image of a sweater image on top of the cotton field image and add a Circle motion path so that the sweater moves in an attractive loop from the beginning of the production line (the cotton fields) to the end (your wholesaler). Or imagine you're creating a presentation on cartooning, and you want to demonstrate how to draw profiles. You can add a Crescent Moon motion path to an image of a pencil, and then reshape the basic motion path, so the pencil appears to be drawing a man-in-the-moon profile complete with nose, mouth, and chin. If you like, you can even tell PowerPoint to reverse the direction of the motion path so that the pencil appears to be drawing the moon's profile backwards . Or, instead of starting with a prebuilt motion path, you can also draw your own motion path from scratch. The following sections describe each approach. 11.2.4.1. Applying motion path effects You apply a motion path effect similar to the way you apply an entrance, emphasis, or exit effect, as you'll learn in the following steps: -
On your slide, select the text, image, shape, chart, or other object to which you want to apply a motion path effect. Then go to Animations Animations Custom Animation. PowerPoint highlights the Custom Animation button, and the Custom Animation pane appears. -
On the Custom Animation pane, click Add Effect and then, from the drop-down menu that appears, choose Motion Paths. PowerPoint displays a short list of motion path effects. -
If you see an effect you like, click it to select it and then head straight to step 7. Otherwise, choose More Effects. The Add Motion Path dialog box (Figure 11-16) appears, showing you a complete list of effects to choose from. 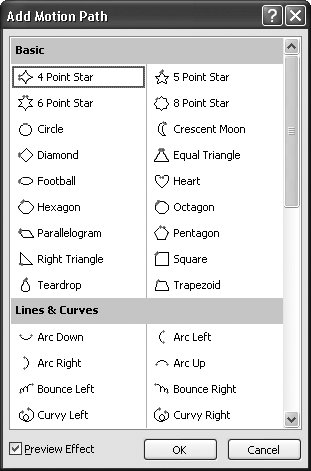 | Figure 11-16. PowerPoint's built-in motion paths come in three different flavors: Basic, Lines & Curves, and Special. Unless you're an old hand at motion path effects, don't turn off the checkbox next to Preview Effect. If you turn it off, PowerPoint won't preview your effect automatically when you make your selection and click OK. | | -
Either double-click the effect you want to apply, or click the effect and then click OK. PowerPoint updates the Custom Animation pane to list your newly created effect. On your slide, PowerPoint previews your effect, and then redraws your motion path (Figure 11-17). 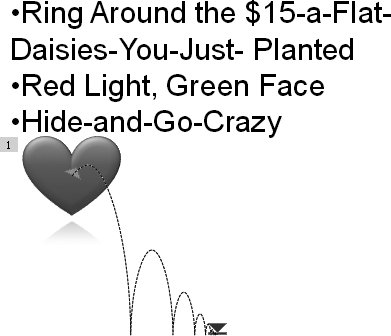 | Figure 11-17. The Bounce Right motion path effect has been added to a heart shape. Notice the green beginning point in the center of the shape, the dotted motion path, and the red ending point. (The direction of the arrows tells you the direction the image will move along the path.) If you like, you can resize, rotate, distort, or reverse the motion path to add your own custom touch; page 363 shows you how. You see motion paths on the slide only when the Custom Animations page is visible. | |
Note: To preview a motion path on your slide without having to commit to adding it, click the effect once. (You may have to drag the Add Motion Path dialog box out of the way to see the preview.)
-
To test your motion path effect, click Animations Preview Preview (to preview the effect in the slide editing area) or press Shift+F5 (to run the slideshow beginning with the current slide). Your image moves along the motion path you chose. 11.2.4.2. Modifying motion path effects You're not stuck with the canned, prebuilt motion paths PowerPoint provides. If you like, you can enlarge, shrink, distort, reshape, or reverse the direction of any motion patheven one you've created yourself (page 365). To modify a motion path effect: -
On your slide, click the image, chart, text box, or other object for which you want to modify an existing motion path effect. Then go to Animations Animations Custom Animation. The Custom Animation pane pops up, listing each of the effects you've defined for that object (Figure 11-18). 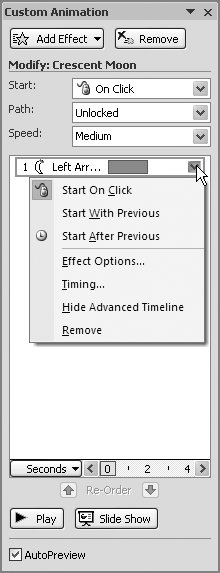 | Figure 11-18. This Custom Animations box shows a Crescent Moon motion path applied to a left-arrow shape. | | -
If you like, click the Start box to change when you want PowerPoint to start the motion path effect. Your choices include On Click, Start With Previous, and Start After Previous (see page 354). -
If you like, you can change the motion path itself. Here are the changes you can make: -
Distort the motion path. By dragging the tiny points that make up your motion path, you can tug the path into another shape altogether. To do so, in the Custom Animation pane, click the Path box and choose Edit Points from the shortcut menu. Then, when you mouse over any of the points in your motion path, PowerPoint redisplays your cursor as a hollow crosshair (Figure 11-19). Drag any point to distort your motion path. When you finish, click Edit Points again to redisplay the selection box. 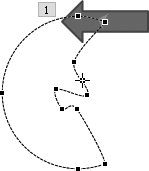 | Figure 11-19. The hollow crosshair on the moon's nose lets you know that dragging this point will distort the motion path. You can tweak as many points as you likeand not just the solid black distortion points, either. PowerPoint lets you drag any point in the path. | |
-
Stretch, resize, or rotate the motion path. Because PowerPoint treats a motion path the same way it treats any other image, you can click your motion path's resize and rotate handles (see Figure 11-20 for examples) to enlarge, shrink, stretch, squish, or rotate your motion path. 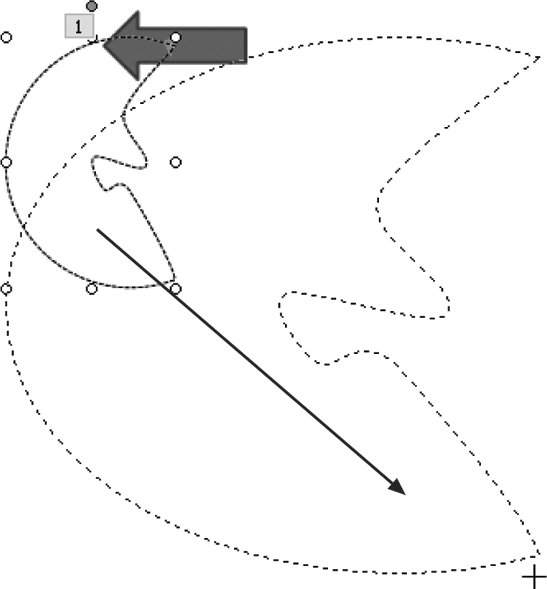 | Figure 11-20. Drag the corner handles to resize your motion path; drag the handles on the sizes of the bounding box to stretch or squish it. To rotate your motion pathto tilt it a little to the left, for exampledrag the green rotate handle (page 293). | |
-
If you like, you can reverse the direction of the motion path. To do so, in the Custom Animation pane, click the Path drop-down box and choose Reverse Path Direction. PowerPoint changes the direction of your green starting path arrow (and your red ending path arrow, if the path has one). -
If you like, click the Speed box to change how fast you want PowerPoint to move your object along the motion path. Your options include Very Slow, Slow, Medium, Fast, and Very Fast (see page 354). -
Preview your motion path effect by clicking Play. 11.2.4.3. Creating your own freehand motion path effect When customizing a prebuilt motion path just won't cut it, PowerPoint lets you draw your own motion path from scratch. The following steps show you how. To create your own custom motion path effect: -
On your slide, select the text, image, shape, chart, or other object to which you want to apply a motion path effect. Then go to Animations Animations Custom Animation. PowerPoint highlights the Custom Animation button, and the Custom Animation pane appears. -
On the Custom Animation pane, click Add Effect Motion Paths Draw Custom Path and choose one of the following: Line, Curve, Freeform, or Scribble. Each of these tools is identical to the corresponding Shape tool described on page 282. 11.2.5. Changing Effects PowerPoint lets you change an existing effect using the same Custom Animation pane you used to create the effect. To change an effect you've already applied to an object: -
Click the text, image, chart, table, or other object for which you want to change a custom animation effect. Then go to Animations Animations Custom Animation. The Custom Animation pane appears, and PowerPoint highlights the Custom Animation button. -
In the Custom Animation pane, click the effect you want to change. The Add Effect button redisplays itself as the Change Effect button. -
To change the type of the effect, click the Change Effect button and follow the steps that begin on page 353. For example, you can change the Spin emphasis effect to the Fly In entrance effect. -
To change effect settings, follow the steps on page 355. 11.2.6. Deleting an Effect If you apply an effect to an object and then change your mind, no worriesPowerPoint lets you delete the effect. To delete an effect you've already applied to an object: -
Click the object from which you want to delete an effect. Then go to Animations Animations Custom Animation. The Custom Animation pane appears, and PowerPoint highlights the Custom Animation button. -
In the Custom Animation pane, click the effect you want to delete; then click Remove. (Or, right-click the effect and then choose Remove from the shortcut menu.) The effect listing disappears from the Custom Animation pane and from your object, which you can verify by clicking Play. 11.2.7. Managing Multiple Effects In some slideshows, you may apply multiple effects to a single object. For example, you may want your company's logo to fade in gradually, expand when you click it, and then bounce off the slide just before the next slide appears. If you have additional objects on the same slide, you can add effects to them, too. There's no trick to applying multiple effects; you simply follow the steps for creating a single effect (described in the preceding sections) multiple times. There is, however, a trick to managing a bunch of effects on the same slide. Fortunately, PowerPoint helps you out with effect category color-coding, effect numbers that appear in the Custom Animation pane and on your slide, the ability to reorder effects, and a timeline. 11.2.7.1. Identifying effect type with color-coded icons In Figure 11-21, you see what the Custom Animation pane looks like when four separate effectsone entrance, one emphasis, one motion path, and one exitare applied to the same shape. 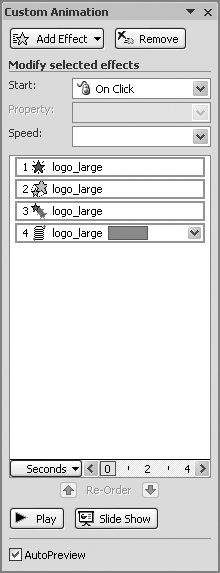 | Figure 11-21. Mousing over an effect listing displays the type of the effect, but sometimes mousing takes too long. Instead, all you have to do is look at the icon in each listing. The icon's color gives you a quick visual reminder: green for entrance, yellow for emphasis, red for exit, and black-and-white for motion paths. (The shapes of each icon are based on the particular effect.) | |
You may recall from page 352 that when you choose which type of effect to add to an object, PowerPoint displays color-coded icons next to the entrance, emphasis, exit, and motion paths options: green for entrance, yellow for emphasis, red for exit, and black-and-white for motion paths. To help you tell at a glance which effects you've already applied to an object, PowerPoint carries over that same color-coding scheme in the Custom Animation pane shown in Figure 11-21. 11.2.7.2. Identifying the particular effect you want to modify The Custom Animation pane can get a little crowded if you've added a bunch of effects to a bunch of objects. PowerPoint gives you two options for selecting the effect you want. The option you want to use depends on whether you want to click an object on your slide and find out which effects you've applied to it, or start with an effect and trace it back to the object on your slide. -
You can head to the Custom Animation pane and click to select an effect listing. When you do, PowerPoint automatically highlights the effect number that appears next to the object on your slide (see Figure 11-22). 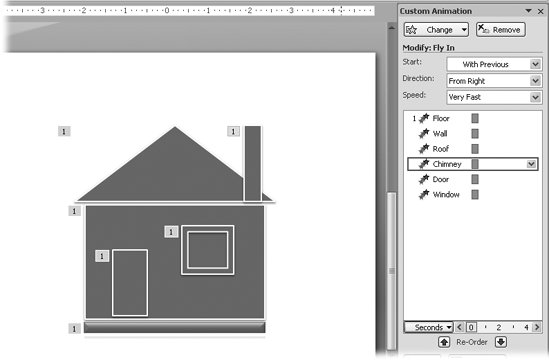 | Figure 11-22. When you click an effect listing displayed in the Custom Animation pane, PowerPoint automatically highlights the effect number on your slide. (Effect numbers appear next to the object to which they're applied.) | |
-
You can head to your slide and click the object to which you've added an effect. Say you've created an animation showing the order of a house's construction and you want to change the direction the chimney flies in from, but you can't remember which order you added your effects in (and so can't tell at a glance which effect is which in the Custom Animation pane, since they're all entrance effects). All you have to do is click the chimney on your slide: in the Custom Animation pane, PowerPoint automatically highlights the corresponding effect listing for you. UP TO SPEED
Name That Object | | PowerPoint automatically assigns a generic name to every text box, image, shape, chart, table, and other object you add to your slide. But if you tend to put a lot of objects on your slides, you want to name the objects yourself. Doing so helps you find them later when you want to add custom animations to them. Follow these steps to name an object you've placed on your slide: -
-
Click Selection Pane again to dismiss the Selection and Visibility pane. Now, when you display the Custom Animation pane, you see the name you typed in. |
11.2.7.3. Using the timeline The timeline (Figure 11-23) is a visual depiction of the order PowerPoint intends to play each of your effects, in addition to how long it intends to play each effect. By displaying the timeline, you can spot goofs that are hard to catch when you're running your slideshow. 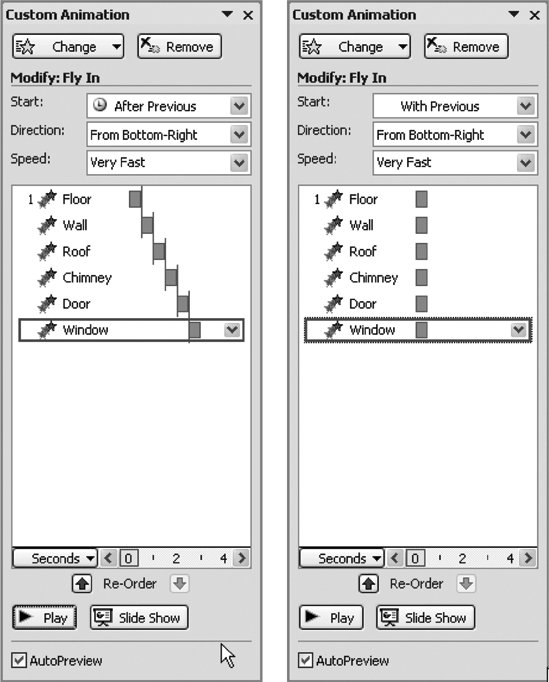 | Figure 11-23. Left: By studying the timeline, you can quickly see that PowerPoint intends to play each of the effects one after the other and that the entire length of all six effects is a mere three seconds.
Right: These are the same effects, but all set to run at the same time, as you can see by the vertical timeline. | |
For example, say you added a bunch of effects to the objects on your slide, but they're not playing the way you expected them to. Displaying the timeline can quickly reveal that you've accidentally set some of your effects to play With Previous (simultaneously) instead of After Previous (one after the other), which is what you'd intended to do. Displaying the timeline is useful, too, when you want to control precisely how long an effect lasts so thatfor exampleyou can sync it up precisely with another effect. 11.2.7.4. Displaying the timeline In the Custom Animation pane, right-click any effect listing and then choose Show Advanced Timeline from the shortcut menu. A timeline consists of one or more animation bars, and you can drag any of the individual effects' animation bars to lengthen or shorten them. You can also drag the timeline itself (make sure you click in the middle of the timeline, as opposed to an edge) to delay or hasten playback. To see the timeline in an increment other than the single seconds shown in Figure 11-23, click the Seconds button.
Note: It's hard to see a long timeline in a scrunched-up pane. To widen the Custom Animation pane so you can see the timeline better, drag the left edge of the pane to the left.
11.2.7.5. To hide the timeline In the Custom Animation pane right-click any effect listing and then choose Hide Advanced Timeline from the shortcut menu. 11.2.7.6. Reordering effects Unless you tell it differently, PowerPoint runs the animated effects in the order in which they appear in the Custom Animations pane. But if you've added an exit effect before a motion path effect, the motion path effect doesn't run (see the box on page 350). No problem: all you need to do is reorder your effects. To do so, in the Custom Animation pane, click the listing of the effect you want to reorder. Then click the up arrow (to move the effect up in the playback chain) or the down arrow (to move the effect lower down the playback chain).  |