Section 7.9. Optimizing Presentations
7.9. Optimizing PresentationsOptimization in PowerPoint means keeping file size as small as possible . Depending on the number of slides, images, sound clips, and animated effects you include in your presentation, you could be looking at a hundred-megabyte-plus PowerPoint file. That's big enough to cause slow- downs and other glitches if you're trying to deliver your presentation on a laptop. But if you plan to deliver your presentation over the Web or email it to each of your department heads for sign-off, it could very well bring your network (or your recipients' virtual in-boxes) to their knees. Fortunately, you can pare down the size of your PowerPoint file by applying the strategies outlined in the following sections. 7.9.1. Go Easy on the BlingImages and embedded sounds ( specifically , .wav files) are the primary cause of PowerPoint file bloat. Use them if they're the most effective way to communicate whatever it is you have to say. But if you can get the same point across using a couple of bullet points or an anecdote, do it. 7.9.2. Pare Down Objects Outside of PowerPointPowerPoint isn't a jack-of-all trades programit doesn't let you edit or optimize sound, video, or animation files. To rein in file size for these types of objects, you'll need a specially designed program, like video- or image-editing software. PowerPoint does let you compress images after you've added them to your slides (page 257 shows you how). But you're still better off optimizing your images in a program that's specifically designed for working with images (such as Adobe Photoshop) before you add those images to your slides. Note: Try to stick with compressed image files such as .jpg, .gif, and .png when you can. Uncompressed files such as .bmp and .tif rack up file bloat astonishingly. 7.9.3. Choose Insert over Dragging or PastingPowerPoint gives you a variety of ways to add pictures, spreadsheets, and other objects created in other programs to your slides. But the tidiest approach is the Insert tab. Using the Insert options to add an object to a slide can save you big bytes over adding that same object by dragging or cutting and pasting it from another program.
7.9.4. Recycle Your ImagesIn PowerPoint as in life, reusing makes good sense: for the file size cost of a single image, you can display the image dozens of timesor more. To get the benefit of recycling, add images to your slide master instead of adding them to individual slides. Reusing the same graphic on multiple slides doesn't just keep file size to a minimum, it also makes good sense design-wise. 7.9.5. Get Rid of Invisible StuffIf you edit your slides a lotadding and deleting objects, for example, or changing your objects' color or transparencyyou could end up with objects on your slides that don't actually appear, either because you've accidentally hidden then behind a larger object, because you've made them transparent or the same color as your slide's background, or because you turned off their visibility in the Selection and Visibility pane. Even if they don't appear, though, they're going to add to your file size. To check forand get rid ofinvisible objects:
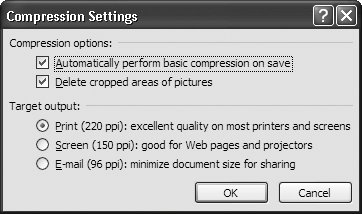
Note: The box on page 257 shows you how to tell PowerPoint to check for certain kinds of invisible objects automatically. When you save your file, PowerPoint deducts the size of your deleted object from your overall file size. Tip: When you're checking for hidden objects, don't forget to check your slide, notes, and handout masters as well as your slides. 7.9.6. Compress Your ImagesWhen you crop or shrink an image in PowerPoint, the program saves the cropped digital scraps (or large version) just in case you want to change your mind and restore your image to its original dimensions later. That's great while you're still editing your slides, but when you've got them the way you want them, you need to tell PowerPoint to delete those file-size-bloating extra scraps and unused versions.
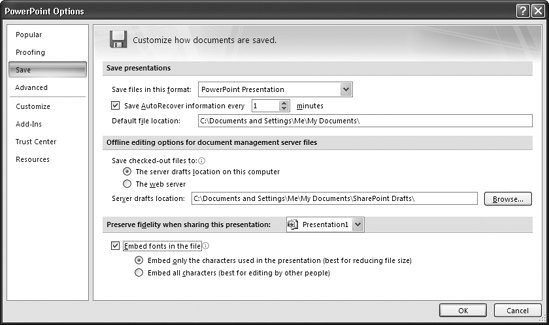
Note: Compression is a complicated beast . Not only does compressing occasionally fail to shrink file size, in rare instances it adds to it. Bottom line? Make sure you check to see that the optimization strategies you apply are shaving off bits by checking your before-and-after file sizes. 7.9.7. Don't Embed Fonts (but if You Have to, Do so Wisely)One way to format the text on your slides is to apply fonts, or typefaces , to your text, which you see how to do on page 85. But unlike other formatting elements, such as colors and images, the fonts you choose aren't automatically added to your PowerPoint file. Instead, PowerPoint assumes it will be able to find the fonts when you run your slideshow, installed on whatever computer you happen to be running your presentation on. If it can't, it automatically substitutes one of the fonts it can find. That's the way PowerPoint works out of the box. And most of the time, this approach works just fine. Unless you choose a wild, wacky font you found on some boutique Web site, PowerPoint will probably be able to display your slide text perfectly . After all, most computers these days come complete with the same bunch of standard fonts. But folks who feel a bit uneasy about letting PowerPoint choose which font to displayafter all, the wrong font can mess up the slide layout you spent so much time oncan choose to embed their fonts instead. The thing is, when you embed a font, you explicitly tell PowerPoint to add all the information necessary to display the alphabet in that font. You get control, but at the cost of a bulked-up PowerPoint file. Bottom line: if you're trying to keep your file size to a minimum, don't embed fonts. If you absolutely have to embed a fontfor example, say you work for a publisher and the purpose of your presentation is to discuss different languages, fonts, and formatting stylesyou can tell PowerPoint to embed just that portion of the font that you've actually used in your slideshow. So, for example, instead of having to add display instructions for everything from A-Z, both uppercase and lowercase, you can get away with adding just the handful of letters that make up your slide text. To embed just enough of a font to display your slideshow correctly formatted:
Note: PowerPoint won't let you embed all fonts (for example, you can't embed PostScript fonts). 7.9.8. Download and Install an Optimization ProgramAs you might expect, file bloat is problem for just about everyone who uses PowerPoint. And because the program itself doesn't offer one-click optimization, several enterprising developers have created specialized programs that do . Some of the optimization program listed in Table 7-4 are available as standalone programs; others, as PowerPoint add-ins (you can find out all about add-ins in Chapter 13). Either way, when you use a PowerPoint optimization program, you can expect a file reduction of anywhere between 30 percent and 90 percent, depending on your presentation without having to comb through each slide and apply all the optimization strategies listed on pages 255262 yourself. Note: The information in Table 7-4 is accurate as this book goes to press, but because the software business changes so quickly, you'll need to contact the companies directly for the latest scoop. You can find additional optimization programs by searching for "PowerPoint optimization" in your favorite search engine. Table 7-4. Popular PowerPoint Optimization Programs
|
 Editing