Choosing the Right Camera Settings
| < Day Day Up > |
| If you produced camcorders and sold them to untrained consumers, your primary goal (if you wanted to sell a lot of them) would probably be to allow your customers to produce the best possible videos right out of the box no tweaking of controls required. Camcorder manufacturers are a bright group, and this is pretty much what they've attempted to do. Still, in certain instances, you can improve the quality of your video if you tune the controls to match your surroundings and the goals of the shot. In addition, there are certain camera features you should always use, and some to avoid at all costs. Finally, two realities of consumer camcorders lighting and audio have their own sets of challenges, which you should know about up front. This section briefly addresses these issues, and then we move on to shot composition. It's all about exposureNo, this isn't a section about Janet Jackson and Justin Timberlake; it's about the exposure setting on your camera, which controls how much light gets to the charged coupled device (CCD) that captures the image. Virtually all consumer camcorders have automatic exposure settings that work well most of the time. However, they also feature special programmed auto-exposure (AE) modes that can improve video quality in well-defined shooting conditions. For example, most Sony camcorders have the following programmed AE modes for specific shooting conditions:
Many DV cameras also have settings for backlit conditions, which, like the Beach and Ski mode, can prevent faces from appearing overly dark. In my experience, these modes work very well in their defined roles, improving image quality over fully automatic settings. For this reason, you should definitely identify the modes available on your camera and learn how to switch to them for the defined conditions. The skinny on night-shot modesMost DV cameras offer one or two low-light modes, which fall into two categories. The first is an infrared-assisted mode that creates a greenish "night-vision goggles" effect. This is very effective for capturing sleeping children or nocturnal animals, but you lose all the color in the shot the image's colors consist of shades of green. The other mode doesn't use infrared, but slows the shutter speed dramatically to ensure that sufficient light gets to the CCD. This preserves color, but even minimal motion produces extreme blurriness that usually makes the video unusable. Depending on your goal, either or both modes work just fine. However, don't expect either to boost light under low-light conditions. That is, if you're shooting video at a quiet dinner party or dark restaurant, neither mode will improve your results. You need to either boost the ambient light in the room by turning on some lights or get a light for your video camera. The white balance issueWhite balance is kind of like bad cholesterol. It's not something you think about often, but whenever it comes up, it's generally bad news. White balance is a problem because cameras perceive the color white differently based on the light source, whether fluorescent or incandescent light or sunlight. All cameras perform white balancing automatically, but under some circumstances, such as shooting in sunlight, under fluorescent lights, or under rapidly changing lighting conditions, the auto-sensing mechanisms may not be accurate, so you run a pretty significant risk that the colors will miss the mark. For example, I once forgot to white balance my camera during a trip to Zoo Atlanta, and all of the video had a blue tone. Another time I switched from outdoor shooting to indoor shooting at a wedding without adjusting the white balance, and all whites appeared slightly pinkish, including the bride's wedding dress, which was a big hit, let me tell you. Both problems could have been prevented with proper white balancing, and fortunately I was able to fix both problems using color correction, as discussed in "To Apply Automatic Color Correction" in Chapter 9. Still, it's always better to avoid these issues by white balancing before you start shooting. The procedure is similar for most cameras: you zoom the camera into a white object like a wall, wedding dress, or piece of paper and press the white-balance button. Alternatively, many cameras have white-balance presets for indoor and outdoor shoots. Check your camera's documentation for details. If this all sounds overly technical, you can also simply stay in automatic white-balance mode and point the camera at a white object for about 10 seconds or so whenever lighting conditions change, such as when you move into direct sunlight from the shade or move indoors from outside. This will give the automatic white-balance mechanism the best chance of operating correctly. Automatic versus manual focusAutomatic focus is generally effective for keeping the video image sharp and in focus. Under certain conditions such as the following, however, manual focus produces superior results:
Check your camera's documentation to learn how to disable automatic focus and how to operate the manual focus controls. When to use image stabilizationImage stabilization is a feature that minimizes minor hand shaking and other camera motion that might occur while walking or shooting from a moving car. While not always effective, image stabilization provides some benefit and should be used whenever you're not shooting from a tripod. When shooting from a tripod, however, most camera vendors recommend disabling this feature. Check your camera's documentation for recommendations regarding image stabilization and to learn how to enable and disable this mode. Other settingsHere are other controls to consider before shooting, along with some suggestions for using the best setting:
The realities of shooting with consumer camcordersThere are two significant shortcomings of shooting with DV camcorders, particularly inexpensive consumer models. First, most camcorders produce suboptimal quality in anything other than extremely bright conditions. Second, it's very difficult to capture clear, crisp audio using solely the camcorder's microphone unless you're very close to the subject. Fortunately, you can minimize or resolve both problems with some advance planning and/or some inexpensive accessories. Let's look at the lighting problem first. This is a particular issue for me because my wife favors cozy, intimate family celebrations with minimal lighting, preferably candlelight. Unfortunately, under these conditions, it's impossible to shoot video that looks even remotely good. For example, Figure 1.2 was taken at a wedding reception without ancillary lighting, and the subject's faces are very indistinct because of the low light. Figure 1.2. Unless you're shooting participants in the witness protection program, poor lighting like this produces unacceptable images.
Of course, under candlelight, the problem is obvious. The low-light issue is much more insidious under normal room lighting, which generally is still too dark for high-quality images. Here, however, the image on your LCD panel may look fine, and you won't discover that your images are too dark until you've captured your video to your computer's hard disk or viewed it on a television screen. Either way, it's too late to address the issue. Basically, there are two ways to solve the lighting problem. First, you can turn on every light in the room, sacrificing short-term intimacy for the long-term quality of your memories of the event. This generally works well in most homes, where lighting is plentiful, so long as you can get your spouse to agree. In darker reception halls, restaurants, and similar venues, where you can't control the lighting, your best option is to purchase a video light like the Sony HVL-20DW2 shown in Figure 1.3 (assuming your camcorder doesn't have a light, of course). This particular model attaches to the accessory shoe on top of the camera and draws power from the camcorder's battery. Alternatively, you can get a light that uses separate batteries. Figure 1.3. Lights like this one from Sony can go a long way toward reducing low-light quality issues.
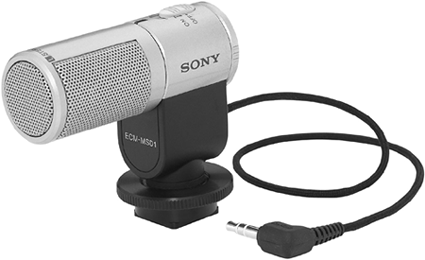
Note that capturing good-quality video under low-light conditions is a serious, serious issue, probably mentioned more in most camcorder reviews than any other deficiency. Unfortunately, short of spending $3,000 for a camcorder that shoots great video in low light, there is no simple solution. Ignore it, and it will repeatedly degrade the quality of your indoor shots; take the steps discussed here, and you can minimize this problem. Improving audio qualityAs you would expect, the problem with camcorder-based audio starts with the microphone. First, since it's located on the camera body, it can easily pick up a host of operator noises such as the clicking of the zoom controls. More serious is the pickup pattern of the microphone, which defines the area from which the microphone gathers sound. Typically, DV camcorders use microphones that prioritize all sounds in front of the camera equally. This pattern works well if you're shooting a group of people equidistant from the camera, but is useless if you're shooting a lecturer or speaker at the front of the room or anyone far away from the camera. Here, you also have two options: either get closer to the speaker or purchase a separate microphone. For the latter, the options are almost limitless, but the easiest and cheapest alternatives are microphones that sit on the camera body itself, like the Sony ECM-MSD1 (Figure 1.4). Figure 1.4. Microphones like this one from Sony help capture better audio when the audio source is distant from the camera.
The MSD1 offers a narrower, front-focused pickup pattern that ignores ambient noise and captures audio primarily from the direction in which the camera is pointing. These types of microphones are also called shotgun or gun microphones. Shotgun microphones probably won't help if you are shooting a lecturer from the back of the room. However, at a birthday party or wedding, you can shoot someone 10 to 15 feet away and clearly hear what the person is saying, which is almost impossible using solely the microphone on the camera body. |
| < Day Day Up > |
EAN: N/A
Pages: 189
- The Effects of an Enterprise Resource Planning System (ERP) Implementation on Job Characteristics – A Study using the Hackman and Oldham Job Characteristics Model
- Distributed Data Warehouse for Geo-spatial Services
- Intrinsic and Contextual Data Quality: The Effect of Media and Personal Involvement
- A Hybrid Clustering Technique to Improve Patient Data Quality
- Relevance and Micro-Relevance for the Professional as Determinants of IT-Diffusion and IT-Use in Healthcare


