Applying Basic Shot Composition
| < Day Day Up > |
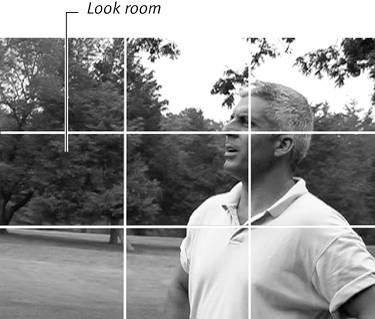
| Once you get the camera settings down and deal with audio and lighting, it's time to start thinking about shot composition, which is the art of placing your subjects in the frame to create the most aesthetically pleasing image. Here are four basic techniques to keep in mind while shooting. After you read this section, watch for them on TV and in the movies. Once you see how consistently the pros use these techniques, you'll be surprised that you never noticed them before. The rule of thirdsAccording to the rule of thirds, you should divide each image into a tic-tac-toe grid, like that shown in Figure 1.5, and place the primary subject of the frame at one of the four saddle points, or intersections of the four lines. This rule has its roots in Greek architecture and Renaissance art and is based on the belief that certain shapes and proportions are more pleasing to the eye than others. Figure 1.5. The rule of thirds. My golf buddy's head is located at the upper-left saddle point in the video frame, providing the necessary look room.
When you are shooting a subject that isn't moving, the image looks best when the open space is located in front of where the subject is facing, as shown in Figure 1.5 and Figure 1.6. This is called providing look room, or nose room. Figure 1.6. My other buddy is facing the opposite direction, so I placed him at the upper-right saddle point. Note how the eyes are above the top third of the frame.
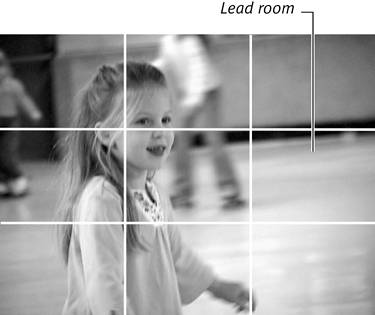
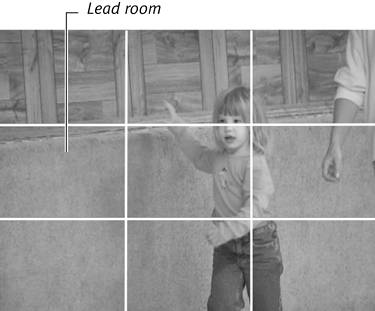
When your primary subject is moving, place your subject in the back third of the frame, leaving lead room in the front. In Figure 1.7, my daughter is skating from left to right, so the lead room is on the viewer's right. Similarly, in Figure 1.8, my other daughter is moving from right to left, so the lead room is on the viewer's left. Figure 1.7. Whatley is skating from left to right, so I try to keep her in the back left of the frame, to provide lead room.
Figure 1.8. Rose is skating (well, shuffling, actually) from right to left, so the lead room is on the other side.
A corollary to the rule of thirds is that the eyes should always be at or above the top third of the video. This holds true regardless whether the shot is taken from close up and includes the face only, or from farther back, as in Figures 1.5 to 1.8. Like all aesthetic guidelines, the rule of thirds isn't fixed in stone; sometimes you simply have to shoot what looks appropriate at the time. For example, if the background is direction-neutral, I find it hard to apply the rule of thirds when shooting a subject looking straight at me, as in Figure 1.9. Figure 1.9. I find it hard to apply the rule of thirds on a subject facing directly at me, unless there's another object in the background that dictates it. Here the background is neutral, so this buddy is framed in the middle.
That said, it's clear that the "center the image in the camera" instruction we learned when we got our first Instamatic is not universally applicable. Though it's impossible to apply the rule of thirds to every frame in your video, especially with moving subjects, use it as a guide, and you'll find your videos more aesthetically pleasing. Motion techniquesOne of the most striking differences between professional and amateur video is the amount and quality of the motion in the video. When you watch most television shows or movies, you'll notice two facts related to motion. First, most shots are either totally stable or have only slight, virtually unnoticeable motion. Second, if there is significant motion, it's very smooth. In contrast, most amateur videos are shot from unstable platforms that shake continuously, with fast zooms (using the camera's zoom controls to zoom into or out of the image), pans (moving the camera from side to side), and tilts (moving the camera up and down). Obviously, the pros have multiple cameras and better equipment, making their jobs much easier. Still, if you follow these five rules, you can produce very similar results.
The Continuity systemBriefly, the Continuity system is a style of editing whose goal is to present a scene so that the cuts from scene to scene are unnoticeable to the viewer that is, the progression of shots within the scene is logical, without any discontinuities that jar the viewer. It's a pretty complex system with lots of rules, so for our purposes here we'll focus on its absolutely critical points. Most importantly, you need to start each sequence with an establishing shot that presents the watcher with a complete view of the setting. Then you can move into medium shots and close-ups, with periodic reestablishing shots to keep the viewer grounded. (See the sidebar "Taxonomy of Shots" later in this chapter for definitions of these types of shots.) This sequence of shots is shown in Figure 1.10, taken from a television interview I participated in several years ago at a trade show. This was a two-camera shoot, so it's unlike what most of us do day to day, but the technique is instructive. Figure 1.10. The Continuity system in action. The first shot is an establishing shot that clearly shows we're at a trade show. The next is a cut to a medium shot and then to a medium two-shot.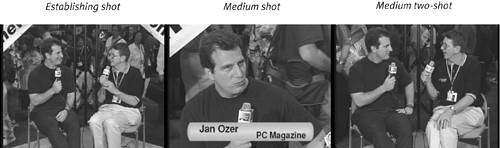 The first shot is the establishing shot: two guys talking, with the stage and people walking around behind us clear to the viewer. This gives the viewer a feel for the environment. This is Camera 1. Next is a medium shot of me with a title on Camera 2. Then Camera 1 tightens the framing to a medium two-shot of the friendly interviewer and me (note the adherence to the rule of thirds in the medium shot of me, but not in either the wide shot or the medium two-shot). What's particularly instructive is the difference between the establishing shot and the medium two-shot. They look very similar, but in the establishing shot, you can clearly tell what's going on in the background folks walking around with bags; must be a trade show. In the medium two-shot, you see only body parts walking around, and the environment is much less comprehensible to the viewer. That's okay, since the establishing shot has already clued the viewer into what's going on. In addition, the camera person periodically shifted back to a wider shot with this camera so that viewers entering in midstream would understand the context. The clear lesson is this: Start every sequence with an establishing shot, or series of shots, that presents the environment to the viewer. Then shoot progressively closer so that you get scenes that present the detail you want without confusing the viewer. Next time you watch ESPN SportsCenter or the evening news, notice how the video follows this progression. Let's apply this theory to our typical one-camera shoot, using the Fiddler's Convention video mentioned earlier. As shown in Figure 1.11, I start with a medium shot of the announcer, breaking the rules, but only for a second. Call this my nod to the Tom Jones Show, which always started with Tom's hand on the microphone before he broke into "It's Not Unusual." I always liked that dramatic effect. Figure 1.11. In my first video of the Fiddler's Convention, I used a series of wide shots to introduce the spectacle to the viewer before transitioning to medium shots of the band.
The first shot is on the screen for only a moment or two, primarily to introduce the audio background track of the announcer and the band playing on the stage. Then I cut to the Fiddler's Convention sign, so the viewer immediately knows what's going on; then several wide shots showing the stage from the background, the acres of trailers and tents, and the thousands of folks in the stands; and then the stage. After this, I can start adding medium shots and close-ups of the band members and interesting attendees because I've set the stage with the wide shot. Let's apply this approach to some common situations:
Remember to shoot an establishing shot each time you change the physical location of the scene. For example, if you're shooting a family wedding, you shouldn't shift from a scene in the chapel to a scene in the reception hall without an establishing shot of the reception hall. It also helps to shoot closing wide shots that you can fade to black during editing so that the viewer understands one sequence is ending and another is starting. Once again, the lovely aspect of digital video is the nonlinear nature of the editing process. You don't have to shoot the establishing shots first; you can shoot them later and cut and paste them in at the proper location. The Continuity system for audioThe Continuity rule for audio is a bit cerebral, but it's exceptionally important so bear with me for a moment. I'll use an example to illustrate the point. Assume that you're at a wedding reception. You want to show people dancing and having a good time, so you shoot a bunch of shots of everyone dancing say 10 minutes' worth taken over a 30-minute period. You start editing and quickly realize that no one will watch 10 minutes of dancing, so you start trimming away footage to get down to a more palatable 4 minutes. Here's the problem: Since the band or DJ didn't play the same song all night, most shots of the revelers have different songs playing in the background. Though your viewers can accept visual cuts from person to person without a sense of discontinuity, audio cuts are a different matter that is, cutting from 5 seconds of one song to 5 seconds of another song is a big red flag that signals a discontinuity. To avoid this, when shooting, make sure that you capture at least one complete song that you can use as background for the entire finished dance sequence. Then, as described in "The Insert Edit" in Chapter 7, you can use that song as the background for the entire 4 minutes and cut and paste bits of other shots to complete the sequence. In essence, you're fooling the audience into thinking that you took all of the shots during one song, simulating a multiple-camera shoot with one camera, which is incredibly effective. Sure, problems can arise for example, if you choose a disco song and have footage of people slow dancing but overall, this is a very powerful technique, with broad application. For example, in the Fiddler's Convention video, I used the audio from the first scene as the background for the entire first sequence. In addition to the wide shots, I came back to medium and close-up shots of the band and pasted in other bits of people listening, dancing, and generally having a good time. These are all the shots I would use to convey the atmosphere of the event, and provide the visual context for later sequences. But because I captured one entire song on tape and used it to create essentially a music video, the presentation is much more polished than if I had pasted the same scenes together with disparate audio tracks, revealing to my viewers that the scenes aren't really continuous. At a recent wedding, I kept the camera running during both the entry and exit processionals, which took about 10 minutes each. Then, using one song from each processional as the background, I condensed each sequence to about 2 minutes, which was much more palatable to viewers. |

| < Day Day Up > |
EAN: N/A
Pages: 189