The Software Side
| < Day Day Up > |
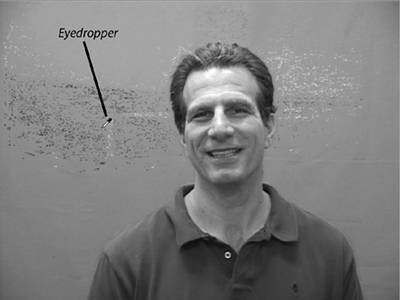
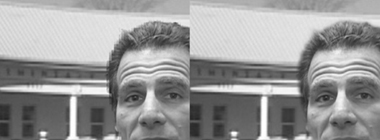
| In many ways, the software side is a breeze after the hassles of setting up and shooting the video. To briefly recap, during the chromakey process, you combine two files, one containing the background video and another containing the video to be inserted into the background, often called the overlay video. Compositing works differently in all programs, but generally follows this workflow: Import the background video into the timeline. Then, load the overlay video onto a track above the background video and apply the chromakey filter to the overlay video. Many programs offer a specific blue-screen or green-screen filter, which, in theory provides drag-and-drop compositing. I recommend against using these filters, because the preset values for green or blue never match those of your Video, and adjustment will always be necessary. Usually, you'll get better results faster using a generic chromakey or color-key filter. Choosing the ColorUsing generic controls, the first step is almost always to choose the background color, typically with an eyedropper or similar control. This is shown in Figure 6.4. Try to choose a spot roughly in the middle of the frame, especially when the lighting is slightly graduated from top to bottom, as it is in Figure 6.4. Figure 6.4. Choosing the chromakey color with an eyedropper. When you choose a pixel with the eyedropper, you choose one color value out of 16.7 million available colors. As you can see in Figure 6.4, this is enough to eliminate some of the small specs on either side of my head, allowing faint glimpses at the background. However, most of the background doesn't match the exact color value chosen by the eyedropper, the result of shadows, folds, creases, or other irregularities. To remove more of the color, in this case the green, (although, of course, this book is printed in black and white so you can't see it) you have to expand the range of colors, typically accomplished via a control labeled Similarity, or some variation on that theme. Basically, as you increase the similarity value, you're telling the editor to expand the search from the original color value chosen to additional colors adjacent to that value on the color chart. The effect is illustrated in Figure 6.5, which shows three shots with increasing similarity values. The image in the middle is almost there. Figure 6.5. Going, going, gone! Expanding the similarity value eliminates more and more of the background color, and if you go too far the foreground image. When adjusting the similarity value (and all chromakey values for that matter), use the program's zooming controls to focus in on problem areas like hair and the edges between the foreground image and the background. Don't be shy with the similarity control; increase it dramatically until you see it eat into the subject itself, as shown in the image on the far right. Then you can back off and find a value that removes the color but doesn't erode the subject. Once you perform this exercise a time or two, it's easy to see why your subject can't wear clothing or accessories that are close to the background color. If you can't find a similarity value that works well, try choosing a different starting color with the eyedropper. In addition, don't rely solely on any single frame to produce the final values. Instead, move from frame to frame to test your values, and use the program's zooming controls (see Figure 6.6) to analyze the detail. Compositing is more art than science, and is usually an iterative process. Figure 6.6. Smoothing or softness controls smooth the edges between the subject and the background image, making the overlay appear more natural. Smoothing ControlsEven the middle image of Figure 6.5 looks pretty clean, we're not done. Your next concern is the edges, where the subject meets the background video. You'd like the edges to be as smooth as possible because "jaggies" make the overlay obvious, spoiling the illusion. Most programs include a smoothing control (also known as feathering or softness) to smooth the edges, which achieves the effect shown in Figure 6.6. On the left is the original, unsmoothed image; on the right, the same image, post-smoothing. As you can see, these controls help the background and overlay videos blend together and appear more natural, fostering a convincing compositing illusion. Garbage MattesSometimes the edges of the overlay video are the toughest regions to eliminate. For this reason, most programs have effects called "garbage mattes" that let you draw a free-form trapezoid around the subject, such as that shown in Figure 6.7, with all segments outside the drawing in the overlay clip discarded as garbage, hence the name. Figure 6.7. Garbage mattes are very effective when you're having problems eliminating the edges of the overlay video. Virtually all prosumer programs have a capability such as the Garbage Matte, though it may have a different name. If you find yourself going crazy trying to eliminate the outer regions of your overlay clip, find the Garbage Matte. One other feature worth mentioning is Spill Suppression, which is generally available only on higher-end software programs. Operationally, spill suppression identifies background coloring that isn't eliminated during the chromakey process, and converts it to gray, making it much less visible. Spill suppression is useful when you can't increase the similarity value without eliminating portions of the subject, so visible residue of the background color remains. The feature isn't widely available in the sub-$1,000 class of editors, but if you run across it, now you know what it does. A CaveatWhenever you composite one video over another, there's a risk the overlay process will change the background image in some undesired way. An example of this is shown on the right edge of Figure 6.8, where I've moved the overlay video to the left to compare regions of the background image that are covered by the overlay video, and those that were not. Figure 6.8. Note that the region on the extreme right of the video looks brighter than the rest. That's compositing residue. As you can see, the overlay darkened the background video slightly, which is visible in both the sky and the parking lot. Since the effect is subtle, you probably wouldn't notice it unless you actually shifted the overlay video and looked for it. For this reason, I recommend you do just that whenever you apply a chromakey effect. In fact, this is my main concern with programs or plug-ins that "automatically" calculate the optimal chromakey settings for you; almost invariably, they leave some residue. It's easy enough to fix, but unless you specifically look for it, you may not notice it's there. |


| < Day Day Up > |
EAN: 2147483647
Pages: 110