#78 Sharing and Reviewing with Adobe Clip Notes Premiere Pro's Clip Notes enables producers to send video files to reviewers in a PDF structure that lets them play the video and add comments at any location. Once returned, these comments appear as markers at that location on the production timeline, where they can easily be viewed in context by the producer. Required Acrobat Version Clip Notes work in any version of Acrobat, from Acrobat Professional to the free Acrobat Reader. Clip Notes are relatively new, however, so consider advising your reviewer to download the most recent updates to his or her Acrobat program. |
Using Clip Notes involves three steps. First, you create the PDF file and transmit it to the reviewer. Then, the reviewer enters his or her feedback and returns a file with comments and timecode location. Finally, you import the package and review the feedback in Premiere Pro. When creating the video file, you can choose either to embed it in the PDF file, or create a separate file you can make available on the Web for streaming. This task describes the first alternative. QuickTime vs. Windows Media If your reviewer is running Windows, consider using QuickTime, which has superior playback controls, including the ability for the reviewer to move through the video file frame by frame. That said, Windows Media is certainly an acceptable alternative. On the Mac, however, many users have experienced problems playing the latest version of Windows Media, making QuickTime a safer choice for reviewers running the Mac OS. |
| | 1. | To create the Clip Notes PDF File, choose Sequence > Export for Clip Notes. Premiere Pro will open the Export for Clip Notes dialog box shown in Figure 78a.
Figure 78a. Choose your Clip Notes export options in this dialog box. 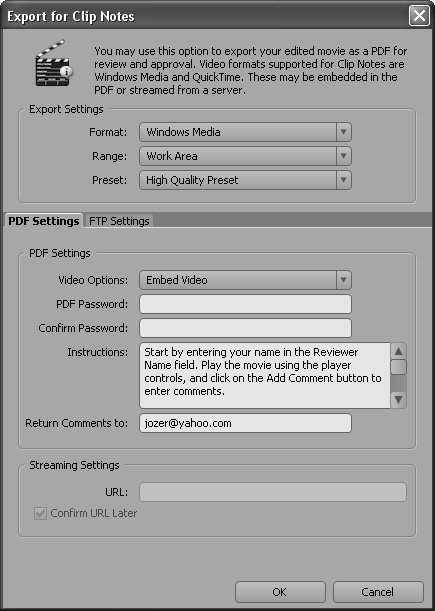
- Format Choose either Windows Media (a good choice when your reviewer is running Windows) or QuickTime (good when your reviewer is running either Windows or the Mac OS).
- Range Choose either Work Area or Entire Sequence, depending upon what you want the reviewer to see. In general, given how large compressed video can be, choose the smallest possible segment.
- Preset Choose High Quality Preset (720x480 resolution, 30fps, 1650Kbps), Medium Quality Preset (360x240, 30fps, 850Kbps), or Low Quality Preset (360x240, 30fps, 300Kbps).
Smaller Is Better Clip Notes-related video files can quickly become large and unwieldy. For example, the 13-second video sent for approval in the example was about 4MB at the High Quality preset. When possible, consider sending multiple smaller files that contain discrete scenes rather than the entire production. |
Note If you choose to Embed the video into the PDF file and plan to email the file to the reviewer, choose a preset that produces a file within the file size limits imposed by your email provider (typically no higher than 10MB). Our 13-second test file, at the High Quality setting, yielded a 3.8MB file when rendered. If streaming the video, you have more latitude, especially when your reviewer connects via broadband. XFDF Files Are Compact While the original PDF file can be quite large, the XFDF files are text only. Though getting the original PDF and video files to the reviewer might be a logistical pain, unless the reviewer is Tolstoy or Stephen King, the returned XFDF file should be very compact. |
- Video Options Choose Embed Video or Stream Video. If you choose the latter, enter a URL in the Streaming Settings area, and Premiere Pro will automatically link the video to the PDF file from that URL. Also consider clicking the FTP Settings Tab (which is not discussed here) to have Premiere Pro automatically upload the file to your FTP site.
- PDF Password If desired, enter a password, which Acrobat will require to open the PDF file.
- Instructions If desired, modify the text in the Instructions box.
Note The text in the Instructions box pops up when the reviewer opens the PDF File. The default text Adobe provides includes useful information for first-time users, so you should consider using the default text with minimal modification the first few times you send Clip Notes to a new reviewer. Return Comments toIf desired, type an email address in the Return Comments to text box. If you enter an address, Acrobat will automatically create an email message to that email address, and attach the comments file, when the reviewer exports his or her comments. Click OK, and Premiere Pro will open a new dialog box, where you can choose a name and storage location for the PDF file. Click Save in that dialog box, and Premiere Pro will start producing the video and PDF files.
Consider Optical Media For reviewing an entire production, consider sending your Clip Notes via optical media like CD or DVD. Choose the Embed Video option (Figure 78a), and burn the PDF file created by Premiere Pro to CD or DVD using any recording program. Send it to the reviewer, who can enter comments and store the XFDF file on his or her hard drive for returning to the producer. |
Note Depending upon the duration of the file and the speed of your computer, producing the PDF and video file can be very time-consuming, since Premiere Pro has to compress the file into the selected streaming format. When finished, transmit the PDF file to the reviewer via email or other medium. | | | 2. | To review the video and make Clip Note comments, double-click the saved PDF file to open it in Acrobat (Figure 78b). Once in Acrobat, do the following:
Figure 78b. Reviewers enter their comments in any Acrobat version, including the freely downloadable Reader. 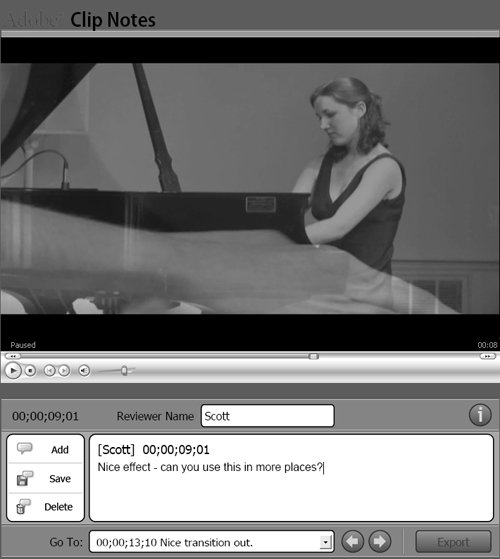
Enter your name or initials in the Reviewer Name box. Use the player controls to play the file. To add a comment, start typing in the text box area (you don't need to click the Add button to add a comment; just start typing). When your notes are complete, click Export in the bottom-right corner of the dialog box. Acrobat will open the Export Form Data As dialog box, where you can name and store the file in XFDF format. Click Save to store the file and transmit it back to the video producer via email or other medium.
| 3. | To import the Clip Notes comments into Premiere Pro, choose Sequence > Import Clip Notes Comments. Premiere Pro will open the Import Clip Notes Comments dialog box that enables you to navigate to and select the XFDF file created by your reviewer. After selecting the file, click Open to import it into Premiere Pro.
Reviewer comments appear as markers above the Premiere Pro timeline. To open a marker and review the comment, double-click the marker. After reviewing, you can leave the marker in place or delete it by clicking Delete. Figure 78c. Reviewer comments appear as markers, which you double-click to open. 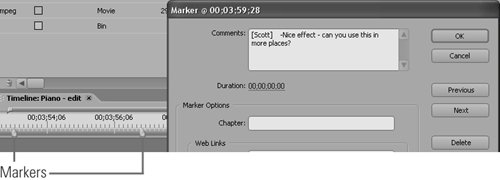 Click Next or Previous to jump to another marker. Click OK to close the dialog box.
|
|