#25 Perfecting the Auto Color Effect I have a four-level hierarchy for color correction in Production Studio. First, in Premiere Pro, I try the Auto Color effect. If that doesn't get the job done, I move on to the Fast Color Corrector, and then the Three-Way Color Corrector. If my results are inadequate, I try Color Finesse in After Effects, but I won't demonstrate that here. When to Use Auto Color Not to beat a dead horse, but I get much better results with the Auto Color effect if brightness and contrast are properly adjusted, and I get poor results when they're not. So check and adjust Levels if necessary before applying this effect. |
Basically, my goal is to make color correction as automatic as possible, and each tool requires more manual input than the last. Before starting, check the YC Waveform monitor (#21) and apply the Levels or Brightness & Contrast effect (#23), if necessary. To apply the Auto Color effect, do the following: 1. | In Premiere Pro, double-click the target clip on the timeline to bring it up in the Source Monitor.
| 2. | Click the Effect Controls tab to open that panel.
| 3. | Click and drag the Auto Color effect from the Effects panel's Adjust subfolder to the space above the Levels or Brightness & Contrast effect in the Effect Controls panel, if you've already applied those effects to your clip. Otherwise drag the effect to the slot just below the Opacity effect (Figure 25a).
Figure 25a. Drag the effect directly to the Effect Controls panel, so you can control its placement order. 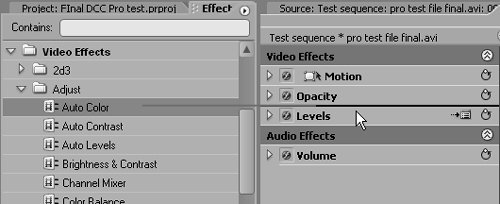
Note I typically get better results when the Auto Color effect is above the Levels effect. Order does matter, and you can experiment by dragging the effects up and down in the Effect Controls panel to change the sequence in which they're applied, and previewing the impact in the Program Monitor. You can always restore the original order if you don't like the results. | | | 4. | Preview the image in the Program Monitor. If acceptable, skip to step 7. If not, continue to step 5.
| 5. | Click the triangle to the left of the Auto Color effect to reveal its configurable properties (Figure 25b).
Figure 25b. Select the Snap Neutral Midtones checkbox to adjust the Auto Color effect. 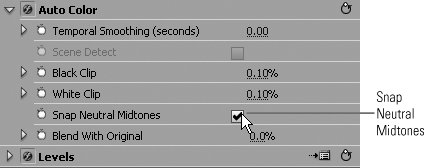
| 6. | Select the Snap Neutral Midtones checkbox. If this doesn't produce the desired quality, delete the effect by right-clicking the effect and choosing Clear. Then move to #26. If the results are acceptable, continue to step 7.
Note Technically, when you "snap" the neutral midtones, you're adjusting the gamma values in the clip, which often adds significant contrast and vividness to the Auto Color effect. | 7. | Render at least a 30-second segment of the clip (#14), and then preview, watching for flicker.
| 8. | If there's flicker in your rendered clip, set Temporal Smoothing (found in the Auto Color configurable controls) to 5 seconds, re-render, and preview.
| 9. | If the flicker persists, adjust duration of smoothing and toggle the Scene Detect button (also in the Auto Color controls) on and off to see if this resolves the problem. If not, delete the effect and refer to #26.
|
|