#26 Adjusting White Balance with the Fast Color Corrector What the Fast Color Corrector Tools Do There are several tools within the Fast Color Corrector to help you fine-tune your video. Top to bottom, here's what they do: Hue Angle controls the outer ring of the color wheel; rotating left shifts the colors toward green; rotating right shifts them toward red. Balance Magnitude controls correction intensity. This corresponds to the ball on the end of the Color Correction widget, with more intense adjustments produced further from the center. According to the user manual, Balance Gain controls the "coarseness or fineness of the Balance Magnitude and Balance Angle Adjustments," and corresponds to the crossbar in the middle of the Color Correction widget. I use it to fine-tune these adjustments, and find it easier to adjust by dragging over the numerical values than dragging the crossbar directly. Balance Angle controls which colors are adjusted. Generally, when fixing a colorcast, you're moving away from a color, as shown in Figure 26b, which is pointed away from blue to cure a bluish colorcast. Saturation controls color saturation, or the intensity of the color. When adjusting Balance Magnitude or Balance Angle, you're changing the actual colors in the frame, while saturation makes these colors more or less vivid. |
If the Auto Color effect doesn't resolve color problems in your video, try white balancing your clip using the Fast Color Corrector effect. Here's how: 1. | Double-click the target clip on the timeline.
| 2. | Click the Effect Controls tab to open that panel.
| 3. | In the Effects panel, click and drag the Fast Color Corrector effect from the Color Correction subfolder to the Effect Controls panel, to the space below the Levels or Brightness & Contrast effect, if applied. Otherwise drag it to the slot just below the Opacity effect.
Note The Fast Color Corrector seems to work best when inserted below the Levels effect. You can easily shift the order by dragging the effects up and down in the Effect Controls panel. | | | 4. | Click the triangle to the left of the Fast Color Corrector to reveal its configurable properties (Figure 26a).
Figure 26a. Click this eyedropper to make it active, and then click a region that's supposed to be pure white in the frame. 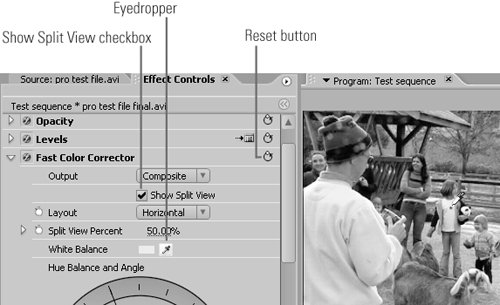
| 5. | If desired, select the Show Split View checkbox and adjust options to your liking (Horizontal or Vertical view in the Layout drop-down list and percentage in the Split View Percent).
| | | 6. | Click the eyedropper next to the White Balance chip, press the Ctrl key, and click a spot in the video frame that should be pure white. I'm using the white shirt of the girl in the coat. Sample a few white areas to see which provides the best result. If this resolves your problem, skip to step 8. If not, move to step 7.
Note If there are no white patches in a particular frame, move to a frame from the same scene that contains some white. If there are no frames that contain white, see #28 on using the RGB Parade scope.
Don't Sample Pure White Pixels Even if your video has a colorcast, pixels that are overexposed (e.g., over 100 IRE) are "pure white." If you choose one of these pixels, the Fast Color Corrector will assume that your whites are white, and won't correct the cast. Keep your eye on the color chip next to the eyedropper as you choose your pixels in the frame, and if it's pure white, don't click that pixel. By the way, pressing the Ctrl key while making your selection forces Premiere Pro to sample a group of pixels, rather than a single pixel, which reduces the risk of aberrant results. |
| 7. | Drag the outside color wheel and/or the Color Correction widget to get close, then fine-tune it with the numerical controls (Figure 26b).
Figure 26b. You're now in the "wiggle the controls until it looks right" phase of the adjustment; here's your toolset. 
What About the Other Controls? Immediately under the Saturation controls are Auto Black Level, Auto Contrast, and Auto White Level controls and individual eyedroppers for Black Level, Gray Level, and White Level. These largely duplicate the controls used in the Levels tool (#22) Levels Settings histogram (Figure 23c). For this reason, I typically don't use these adjustments. |
| | | 8. | When you've completed your adjustment, remember to deselect the Show Split View checkbox you selected in Step 5; otherwise Premiere Pro will render your video with the split view intact.
What About Scene Changes? If there's a scene change in your project, you may have to reapply the Fast Color Corrector, as you will if you white balance your camera. However, if multiple shots from the same basic setup are on your timeline, there are strategies for quickly applying effects to multiple clips on the timeline (refer to #31 and #32). |
|
|