24 Fixing Backlight Issues with the ShadowHighlight Filter


#24 Fixing Backlight Issues with the Shadow/Highlight Filter

Caveats

When you apply the Shadow/Highlight effect, watch for a slight strobe effect in Auto mode, which you can minimize by applying Temporal Smoothing. This averages the effect over adjacent frames. Unfortunately, this option is unavailable in manual mode, which is why it's grayed out in Figure 24b.

Also watch for "banding" where adjacent pixels coagulate into bands that dance around lights in the video frame. If this occurs, adjust the Highlight Amount downward.


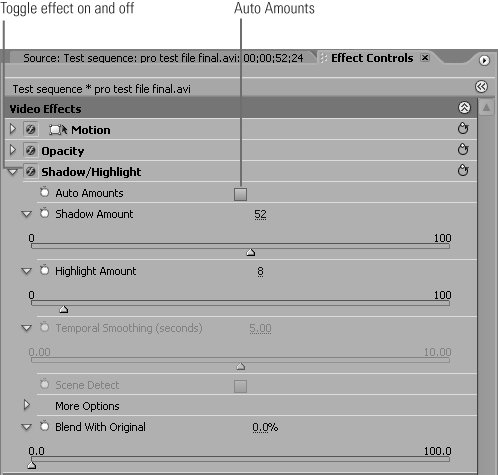
Backlighted videos are shot with a bright light behind the subject with automatic exposure enabled. To avoid overexposure, the camera darkens the entire image, often obscuring the subject as shown on the left in Figure 24a.

Figure 24a. The Shadow/Highlight effect boosts the foreground lighting without touching the back. This figure shows a clip before (left) and after (right) the effect is applied.


If you checked this image in the YC Waveform (see #21), you'll be surprised to see that the overall contrast and brightness is great; the lighting is just in the wrong places. You need a tool to brighten the foreground image without boosting the background light. Fortunately, Premiere Pro has such a tool. It's called the Shadow/Highlight filter, and it works like absolute magic on backlighted images. To apply this filter, do the following:

1.

Select Premiere Pro's Video Effects folder in the lower-right panel and open the Adjust subfolder.

2.

Select Shadow/Highlight and drag it onto your clip.

3.

Open the Video Effects panel and you'll see the controls located in Figure 24b.


Figure 24b. I usually end up going manually with this tool by deselecting the Auto Amounts box.


How to Toggle the Shadow/Highlight Effect on and off

See the little f in a circle to the left of the Shadow/Highlight effect in Figure 24b? Click it to toggle the effect on and off in the Program Monitor to assess how well it's working.


4.

To make manual adjustments (the effect defaults to Auto Amounts; I've deselected the box in the figure), use the slider bars below the Shadow Amount and Highlight Amount headings. In the example shown in Figure 24b, I had to boost the Shadow Amount (the lighting applied to the shadows in the image) and reduce the Highlight Amount (the lighting applied to the highlighted areas). The result is shown on the right in Figure 24a.


Adobe Digital Video How-Tos. 100 Essential Techniques with Adobe Production Studio
Adobe Digital Video How-Tos: 100 Essential Techniques with Adobe Production Studio
ISBN: 0321473817
EAN: 2147483647
Year: 2006
Pages: 148
Authors: Jan Ozer

flylib.com © 2008-2017.
If you may any questions please contact us: flylib@qtcs.net