#23 Adjusting Brightness with Levels I find the Levels effect the most intuitive and visual brightness adjustment tool in Premiere Pro's repertoire (After Effects too). Here's how it works. Auto Levels Premiere Pro's Auto Levels effect performs a similar operation, but is more conservative, often producing less contrast. For example, in Figure 23b the pixels to the right of the Input White triangle will likely be overexposed and obscured (often called "crushed"), but there are so few that the result is insignificant (though obviously you should preview to be sure). Though similar controls aren't available in the Auto Levels effect, it appears that Adobe (wisely) prefers to err on the safe side, preventing any under-or overexposure, but limiting the improvement in brightness or contrast. |
1. | Select Premiere Pro's Video Effects folder in the lower-right panel and open the Adjust subfolder.
| 2. | Select the Levels effect and drag it onto your clip.
| 3. | Click the Effect Controls tab in the Source Monitor to open the Effect Controls panel.
Figure 23a. Working in the Effect Controls panel, click Setup to view the histogram shown in Figure 23b. This clip has insufficient contrast. 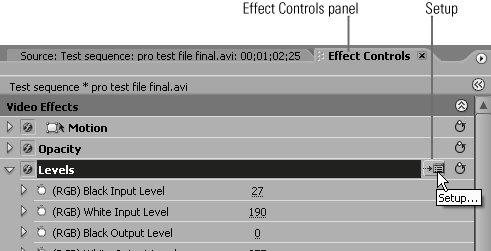
| | | 4. | Click Setup to open the Levels Settings dialog (Figure 23b).
Figure 23b. Now "bracket" the histogram, dragging Input Black to the first significant group of pixels on the left, and the Input White to the first significant group of pixels on the right. 
What About Gamma? While "bracketing" (what you did in Step 5) is very objective, adjusting gammathe middle triangle in Figure 23bis largely subjective. Technically, gamma adjustments change brightness in the midtones of the frame, leaving the darkest and lightest areas unaffected. If your clip still doesn't look right after bracketing, go ahead and wiggle the gamma triangle around and see if it helps. |
Note The Levels Settings histogram displays the brightness values of all pixels in the current frame on a scale from 0 to 255, shown on the bottom X-axis from darkest to brightest. The Y-axis represents the total number of pixels at the particular brightness value. Figure 23b confirms that most pixels are bunched in the middle, with few approaching the extremes. What if My Levels Show a Flat Line? This can happen when shooting stage productions with a black backdrop, and potentially other shots with lots of black. As a result, you won't have sufficient information on the line to make a decision. In these instances, switch to the Brightness & Contrast effect, and keep the YC Waveform scope open while making your adjustments. |
| 5. | Move the black triangle (Input Black) inward to the first value with significant numbers of pixels. Then do the same with the white triangle (Input White).
Note This tells Premiere Pro to ignore the pixel values outside the triangles, and to convert the Input Black value to 7.5 IRE and the Input White value to 100 IRE. As shown in Figure 23c, the luma pixels are spread over a much larger range, indicating increased contrast. Figure 23c. Now the pixels are much more broadly spread vertically, indicating better contrast. 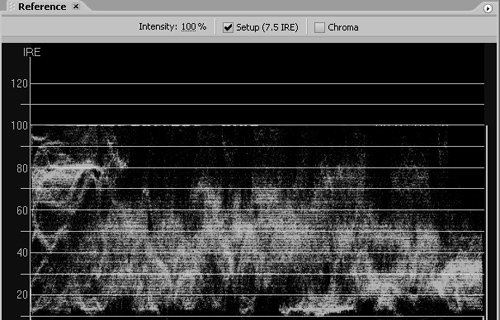
That Sneaky Brightness & Contrast Effect When you apply this effect, Premiere Pro automatically adjusts both brightness and contrast to keep them broadcast legaleven when the values are set to zero! Watch the YC Waveform and toggle the effect on and off, and you'll see. In this manner, it works more like an auto-correcting brightness and contrast tool than a manual one. |
|
|