Modifying a Clip Art Image
Microsoft Office Specialist Double-clicking a clip art image or selecting it and clicking Picture on the Format menu displays the Format Picture dialog box, where you can make the following modifications to an image:
-
On the Colors and Lines tab, you can change the color of the image s background and its border.
-
On the Size tab, you can enter specific dimensions for the height and width of the image, or you can scale the image as a percentage of its current size or of its original size. You can specify that the height and width must be scaled proportionally by selecting the Lock aspect ratio check box. You can also specify that the size of the image be optimized for a slide show screen by selecting the Best scale for slide show check box.
-
On the Position tab, you can fine-tune the position of the image by entering exact dimensions in relation to either the upper-left corner or the center of the slide.
-
On the Picture tab, you can crop away parts of an image. You can also specify whether the image should be colored (Automatic), gray, or black and white, and you can control its brightness and contrast.
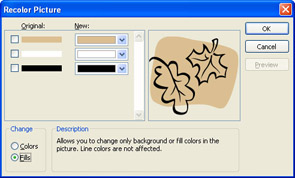
You can change the colors used in a clip art image to create a different look or to match the current color scheme. Clicking the Recolor Picture button on the Picture toolbar displays a dialog box where you can change any of the image s existing colors.
In this exercise, you will scale a clip art image and then change its colors.
USE the ChangeClip presentation in the practice file folder for this topic. This practice file is located in the My Documents\Microsoft Press\PowerPoint 2003 SBS\AddingPicture\ModifyingClip folder and can also be accessed by clicking Start/All Programs/Microsoft Press/PowerPoint 2003 Step by Step .
OPEN the ChangeClip presentation.
-
Move to Slide 2, and double-click the clip art image.
The Format Picture dialog box appears.
-
Drag the dialog box to the left by its title bar so that you can see the image in the right half of the slide, and then click the Size tab.
-
In the Scale area, select the number in the Height box, and type 150 .
-
Click Preview to view the image without closing the dialog box.
Because the Lock aspect ratio check box is selected, the setting in the Width box has also changed to 150%.
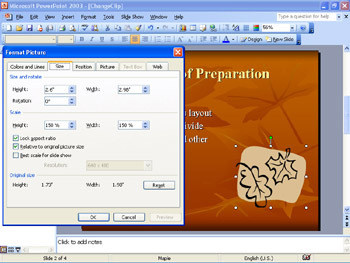
Tip If you change the size of an image and then want to restore the original size, you can set the scale back to 100% or click Reset in the Format Picture dialog box.
-
Click OK to close the Format Picture dialog box.
-
With the image still selected, click the Recolor Picture button on the Picture toolbar.
The Recolor Picture dialog box appears with the Colors option selected in the Change area.
-
Select the Fills option to display the fill colors of the image.
-
In the New area, click the down arrow to the right of the top box, and click the first color box in the color scheme.
The color swatch changes to dark orange, and the preview box on the right shows that all parts of the image that had been beige are now dark orange.
-
In the New area, click the down arrow to the right of the bottom box, and click the fourth color box in the color scheme.
-
Click OK to close the Recolor Picture dialog box, and click a blank area of the slide to deselect the image.
The clip art image now coordinates with the rest of the slide.
-
On the Standard toolbar, click the Save button to save the presentation.
CLOSE the ChangeClip presentation.
EAN: N/A
Pages: 145