Working with Text in Longer Publications
Working with Text in Longer Publications
In short publications, you generally have only a few text elements to work with, and you don t have to worry too much about the way text flows and making everything fit. With longer publications, you have to juggle more elements, and if a story won t fit on one page, you have to ensure both that it continues on another page with no lost text and that the reader knows exactly where to find the continuation.
Entering and Formatting Text
Before we can show you some techniques for manipulating text in a longer publication, you need to have some text to work with. In this case, you will use multiple copies of a paragraph from a publication you already created, instead of doing a lot of typing. You will also see how to quickly move through a multiframe story and how to format copied text to match other text in the publication. Follow these steps:
1. Without closing the Newsletter publication, open the Brochure publication that you created in Chapter 3.
2. In the left panel of the first page, select the paragraph about fossil dig tours by clicking its frame and pressing Ctrl+A. Then click the Copy button on the Standard toolbar.
3. Redisplay the Newsletter publication, press F9 to zoom to 100% , and move to the bottom of the first page.
4. Click the first frame of the two-column Turtle Mountains story, and with all the text selected, click the Paste button to replace the placeholder text with the paragraph from the brochure.
As you can see, the paragraph retains its original formatting when you paste it. Publisher recognizes that the two frames of the Turtle Mountains story are connected, and assigns a Go to Previous Frame button to the second column.
5. Click the Go to Previous Frame button to move to the first frame of the story, and then click the Go to Next Frame button to move back to the second frame.
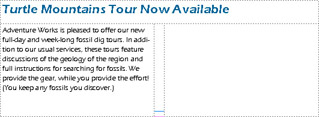
6. Press Ctrl+A to select the text of the newly inserted paragraph, and click Line Spacing on the Format menu to display the Line Spacing dialog box.
7. Type 1.17 in the Between Lines box, press Tab twice, type 6 in the After Paragraphs box, click OK , and then click a blank area of the page to remove the text selection.
The results are shown in this graphic:
8. Select the text of the new paragraph again, click the Copy button to copy the paragraph with the correct formatting, press End to move the insertion point to the end of the selected paragraph, press Enter , and click the Paste button.
9. Press Enter , and click the Paste button again to insert the paragraph a third time.
| Information about | Flowing text, page 124 |
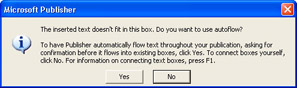
Publisher displays the message box shown in this graphic, asking whether you want to have the text of the story automatically flowed into new frames:
| |
Newsletters and magazines often designate the ends of stories with a graphic character. This device is not only useful to the readers but to anyone proofreading your publications. The graphic element assures them that they have reached the end of the story and that no text is missing or located elsewhere in the publication. To add a graphic character, click an insertion point at the end of the story, and use the Symbol dialog box to insert a symbol.
| |
| |
To insert new pages in a one-page publication, click Page on the Insert menu, or press Ctrl+Shift+N. In the Insert Page dialog box, designate how many pages you want to insert and whether they should appear before or after the existing page. You can decide to insert a blank page, a page with a single text frame that takes up the whole page, or a page that duplicates all objects on the existing page. To insert a new two-page spread in a multi-page publication, click Page on the Insert menu to display the Insert Pages dialog box. Then designate what you want to appear on the left and right pages by selecting options from drop-down lists. (You can add stories, calendars, and three types of forms.) If you want to add just one page to a multi-page publication, rather than a spread, click More Options in the Insert Pages dialog box to display the Insert Page dialog box with options for inserting a single page. To delete a page, move to the page, click Delete Page on the Edit menu, and click OK to confirm the action.
| |
10. Click No to return to the story.
Because not all of the story is visible, it has been assigned a Text in Overflow button.
11. Move to page 2, and replace the text of the Adventure Works Souvenirs story with two copies of the brochure paragraph. Then replace the text of the Sandy s Stories story with three copies, and replace the text of the Preserving Our National Parks story with two copies.
12. Move to page 4, and replace the text of the final story of the newsletter with five copies of the paragraph.
Editing Text in Microsoft Word
The paragraphs that represent the Turtle Mountains story are present in the newsletter, but not all of the story is visible. You have several options: You can increase the size of the story s frames; flow the text into an additional connected frame; or edit the text to make it fit the existing available space. You want to delete all but the first sentence of the final paragraph to make the paragraph fit in the frame. This is a relatively simple process, but for those times when more complicated editing is involved, it s good to know that you can switch to Microsoft Word to take advantage of its superior editing capabilities. Follow these steps to see how this works:
1. Right-click the second frame of the Turtle Mountains story on the first page, click Change Text , and then click Edit Story in Microsoft Word .
| |
To fit text in a frame, you can try eliminating extraneous words to decrease the number of lines or adding words to increase the number of lines. Depending on the type of text you are dealing with and whether you have the authority to make changes to it, you might consider the following:
-
Active vs. passive .. Active sentences are usually shorter than passive ones. For example, We provide the gear is one word shorter than The gear will be provided.
-
Words vs. phrases . You can often expand words into phrases or contract phrases into words. For example, the geology of the region is two words longer than the region s geology.
-
Simple vs. compound structures. You can often insert or delete adjectives or adverbs without changing meaning, and you can substitute shorter or longer words or interchange simple and compound verbs. For example, Adventure Works is very pleased to be able to offer our exciting new full-day and week-long fossil dig tours is five words longer than the equivalent sentence in the newsletter.
| |
The text of the story appears as a Word document that you can edit as you would any Word document.
2. Click an insertion point to the left of the second sentence in the final paragraph, hold down the Shift key, and press the Down Arrow key three times to select the last three sentences.
3. Press Delete to delete the selected sentences.
4. Click Word s Close button to close Word and return to the newsletter.
The story now fits in its frame with no overflow.
Flowing Text from Frame to Frame
When placing longer stories in a multi-page publication, you will often need to start a story on one page and continue it on another. Because all text must be contained in a frame, you need to tell Publisher which frame to continue the text in. To add the text for the Fossil Dig Tours story on page 1 and continue the story on page 3 of the newsletter, follow these steps:
1. Move to page 1 , scroll the Fossil Dig Tours story into view, select its placeholder text, and press Delete .
2. Click the Paste button to insert the paragraph you copied from the Turtle Mountains story, and then press Enter . Repeat this step four more times.
3. When Publisher displays the overflow text message box, click No .
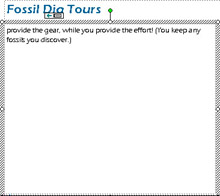
Before you can continue the Fossil Dig Tours story in the frame on page 3, you need to delete its placeholder text.
4. Move to page 3 , select the text of the Fossil Dig Tours story, and press Delete .
5. Move back to page 1 , click the second frame of the Fossil Dig Tours story to select it, and then click the Create Text Box Link button on the Connect Frames toolbar.
The pointer changes into a pitcher, indicating that you can now pour the story into a continuing frame.
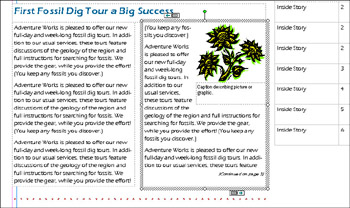
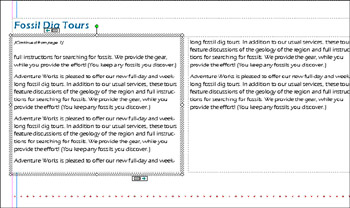
6. Move back to page 3 , and click the first frame designated as the continuation of the Fossil Dig Tours story.
Publisher connects the frames and inserts the text that overflows from the Fossil Dig Tours frame on page 1 into the frame on page 3, as shown in this graphic:
7. Click an insertion point at the end of the text, press Enter , and then paste the paragraph again. Repeat this step three more times to finish up the story.
8. With the story s last frame selected, click the Go to Previous Frame button to move to the frame to the left of the selected frame.
9. Click the Go to Previous Frame button again to move to the second frame of the story, which is on page 1 of the newsletter.
Adding Continued Lines
Suppose you want to add continued lines to the Fossil Dig Tours story to let the readers know on which pages the story begins and ends. Follow these steps:
1. With the second frame of the Fossil Dig Tours story selected on the first page of the newsletter, right-click the text frame, and click Format Text Box on the shortcut menu.
The Format Text Box dialog box appears.
2. Click the Text Box tab, select the Include Continued on page check box below the Text autofitting area, and click OK .
| |
To disconnect two text frames, click the first frame and then click the Disconnect Text Frames button on the Connect Frames toolbar. The second frame is then removed from the chain, and the text it contained is placed back in the text overflow area. You can then pour the text somewhere else by connecting its frame to another frame, or you can make the first frame big enough to display it all.
| |
The results are shown in this graphic:
Notice that you don t have to enter a page number. Because the frames are connected, Publisher knows that the story continues on page 3. Also notice that by adding this line to the selected frame, you have bumped one line of text to page 3. The second frame would look better with one more line to balance the two columns .
3. Drag the second frame s lower-middle handle downward to make the frame large enough to move the displaced line of text back onto the first page.
4. Click the Go to Next Frame button to move to page 3.
5. Right-click the first text frame in the Fossil Dig Tours story on that page, and then click Format Text Box .
6. Click the Text Box tab, select the Include Continued from page check box, and click OK .
This time, Publisher adds a line to the top of the selected frame, as shown in this graphic:
EAN: N/A
Pages: 76