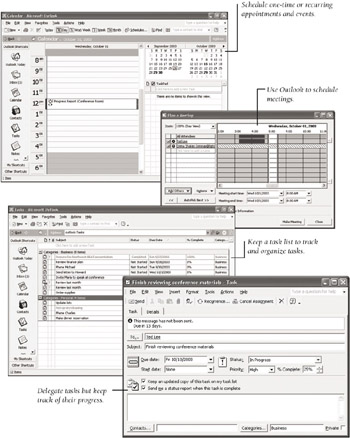
As your schedule becomes increasingly busy, you might have trouble juggling the many
When you have finished this chapter, you will know how to:
Schedule appointments
Schedule events
Edit appointments and events
Schedule meetings
Create tasks
Edit tasks
Manage tasks
Organize tasks
Delegate tasks
The Calendar component of Outlook is designed to take the hassle out of time management by enabling you to keep track of appointments. In this topic, we first explore Calendar s different views and then take a look at ways you can schedule your appointments.
|
|
If used faithfully, Outlook s Calendar component can eliminate the need for a paper schedule and can actually function better than one. This is
|
|
You probably don t have any appointments in your calendar yet, but before you start adding appointments, it is useful to know a few standard techniques for viewing your calendar in different ways. Knowing how to look at a particular day, your entire work week, or the entire calendar week will help you when you start scheduling your own appointments. Later in this chapter, we will talk about ways to customize your calendar, but for now, follow these steps to explore some simple possibilities:
If necessary, start Outlook, and if the folder list is
On the Outlook bar, click the Calendar icon.
The workspace now looks like the one shown in this graphic:
On the left side is the
appointment pane
, divided into halfhour intervals. By default, Outlook displays your schedule for today. In the upper-right corner is the
Date Navigator
, which displays calendars for the current month and
Outlook obtains the date and time from your system clock. If this clock is wrong, Outlook keeps an inaccurate calendar and reminds you of appointments at the wrong time. To set the right date and time, double-click the clock at the right end of the Windows taskbar. In the Date and Time Properties dialog box, make the appropriate adjustments to the date or time. (If Outlook has trouble keeping your schedule, there might be problems with your computer s battery, which maintains the system clock.)
Click the Work Week button on the toolbar.
The workspace now looks like the one shown here:
Click the Week button on the toolbar.
The result is shown in this graphic:
Finally, click the Day button on the toolbar.
The workspace switches back to the original single-day view.
|
|
Outlook Today gathers information about the current day s activities from Calendar, Tasks, and the Inbox and summarizes them on one screen. To display Outlook Today, click its icon on the Outlook bar. From this screen, you can jump to other
|
|
{% if main.adsdop %}{% include 'adsenceinline.tpl' %}{% endif %}
|
|
By default, Outlook uses an 8:00 AM to 5:00 PM, Monday through Friday work week. It displays these hours of these days in a light
|
|
The half-
Suppose you have a meeting with David Perry at 3:00 next Monday afternoon, and you expect the meeting to last half an hour. Here s how to enter the appointment:
Display the calendar in Day view.
In the Date Navigator , click the date for the following Monday.
Click the 3:00 time slot, type David Perry , and then press the Enter key.
The David Perry appointment now occupies the 3:00 slot, and a bell icon
|
|
You can schedule appointments based on e-mail messages you have received. Select the desired message header in the Inbox and drag it to the Calendar icon on the Outlook bar. Outlook then displays the appointment window with the contents of the message displayed in the message area at the bottom of the window and with the message subject displayed in the Subject box. To complete the appointment, fill in the remaining information and then click the Save and Close button. This same procedure works for quickly creating tasks. Simply drag the desired message header to the Tasks icon on the Outlook bar to display a task window and fill in any additional information.
|
|
Suppose you need to schedule an interview with a
In the Date Navigator , click the date for the following Tuesday .
That day s appointment area is now displayed.
Double-click the 4:00 time slot.
Outlook displays the Appointment window shown in this graphic:
In the Subject box, type Carol Phillips , and in the Location box, type Conference Room .
You can also click the Location box s down arrow and select one of the last seven locations you have used from the drop-down list.
Change the start time by selecting 00 in 4:00 PM and typing 15 . Then change the end time to 5:45 PM by clicking the rightmost End time box s down arrow and selecting 5:45 from the drop-down list.
Change the Reminder time to 10 minutes by either typing the time or selecting it from the drop-down list.
Click the Show time as box s down arrow to display a dropdown list of options.
If you are working on a network that uses Exchange Server, the four options in the Show time as drop-down list show
Leave the Busy option selected by clicking away from the list, and then maximize the window and select the Private check box in the lower-right corner.
Now other people will see that you are not available at this time, but they will not be able to see why.
Click the Save and Close button to confirm the appointment.
The appointment pane now looks like the one shown in this graphic:
Click the Today button on the toolbar or click today s date in the Date Navigator to move back to the appointment pane for today.
| Information about |
Scheduling meetings, page 324 |
Unless you specify
For example, suppose you meet with the Washington BEAT Coordinator, Nathan Chou, every other Wednesday from 12:00 to 1:00 PM. Here s how to schedule this recurring appointment:
Click the date for next Wednesday in the Date Navigator , and drag through the time slots for 12:00 and 12:30 to select them.
On the Actions menu, click New Recurring Appointment .
Outlook opens an Appointment window and then displays the dialog box shown in this graphic:
By default, Outlook assumes you want the meeting to occur weekly on the same day of the week, starting and ending at the times you selected, with no end date.
In the
To add an end date, click the End by option in the Range of recurrence area, and use the drop-down calendar to change the date to the last Wednesday of the year. Then click OK .
In the Appointment window s Subject box, type Progress Report .
Click the Location box s down arrow, and select Conference Room in the drop-down list. Then change the Reminder setting for the appointment to 30 minutes , and click the Save and Close button.
The result is shown in this graphic:
Outlook has entered the recurring appointment in the specified time slot for next Wednesday and also for every other Wednesday thereafter, designating it with circular arrows to
|
|
To
|
|
|
|
To attach a file to a scheduled appointment, click an insertion point in the message area at the bottom of the Appointment window, click the Insert File button on the toolbar, navigate to the file you want to attach, and click to select it. Specify how you want the file inserted by clicking the Insert button s down arrow and selecting an option from the drop-down list. If you insert the file as text, the file becomes part of the appointment. If you insert the file as an attachment, Outlook attaches a copy of the file to the appointment. If you insert the file as a hyperlink, Outlook adds a link to the attachment that you can simply double-click to open the file from its original location.
|
|