Using AutoCAD Drawings in Desktop Publishing
As you probably know, AutoCAD is a natural for creating line art, and because of its popularity, most desktop-publishing programs are designed to import AutoCAD drawings in one form or another. Those of you who employ desktop-publishing software to generate user manuals or other technical documents will probably want to use AutoCAD drawings in your work. In this section, you'll examine ways to output AutoCAD drawings to formats that most desktop-publishing programs can accept.
You can export AutoCAD files to desktop-publishing formats in two ways: by using raster export and by using vector file export.
Exporting Raster Files
In some cases, you might need only a rough image of your AutoCAD drawing. You can export your drawing as a raster file that can be read in virtually any desktop-publishing and word-processing program. To do this, you must create a new plotter configuration that plots to an image file instead of an output device. (Chapter 7 describes how to use the Add-A-Plotter Wizard to add a plotter configuration to AutoCAD.)
Here is some additional information on how to use that wizard to set up AutoCAD for raster file output:
-
On the Begin screen of the Add-A-Plotter Wizard, choose My Computer.
-
On the Plotter Model screen, select Raster File Formats from the Manufacturers list, and then select the type of raster file you want to use from the Models list. For example, you can choose Independent JPEG Group JFIF (JPEG Compression). This is one of the more universal file types.
-
Skip over the Import PCP or PC2 screen and the Ports screen.
-
Enter a name for your raster output settings on the Plotter Name screen.
-
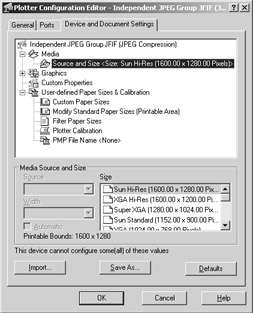
On the Finish screen, click the Edit Plotter Configuration button to open the Plotter Configuration Editor dialog box.
-
Click the Source And Size listing that appears in the large list box in the top of the dialog box. A list of options appears in the Size list box in the lower-right corner of the dialog box.
-
Click Custom Paper Sizes from the large list box at the top of the dialog box. The options change in the lower half of the dialog box.
-
Click the Add button to start the Custom Paper Size Wizard.
-
Click the Start From Scratch radio button, and then click Next to open the Media Bounds screen.
-
Enter a height and width in pixels for your image file, and then click Next to open the Paper Size Name screen. Enter a name that best describes the size of the image file, and then click Next to open the File Name screen.
-
Enter a name for the Plotter Model Parameters file. This file stores specific setting information about the plotter. Click Next when you are finished.
-
On the Finish screen, click Finish. The Plotter Configuration Editor dialog box reappears. Click OK, and then click Finish in the Add-A-Plotter Wizard.
After you've finished creating a plotter configuration, it appears as a file in the Plotter subfolder of the AutoCAD2005 folder. You can access this file through Windows Explorer or from AutoCAD by choosing File Plotter Manager.
To create a raster file version of your drawing, choose File Plot, and then in the Plot dialog box, click the Plot Device tab and select your raster file plotter configuration from the Name drop- down list of the Plotter Configuration group. You can then proceed to plot your drawing, but instead of paper output, you'll get a raster file. You can specify the filename in the Plot Device tab of the Plot dialog box under the Plot To File group.
If you need to make changes to your raster file configuration, choose File Plotter Manager, and then in the Plotters window, double-click your raster file configuration file. You will see the same Plotter Configuration Editor you used to set up the raster plotter configuration.
You can set up a different plotter configuration for each type of raster file you use. You can also set up plotter configurations for different resolutions , if you choose. To learn more about plotting in general, see Chapter 7. Appendix B provides detailed information on the Plotter Configuration Editor.
Exporting Vector Files
If you need to preserve the accuracy of your drawing, or if you want to take advantage of TrueType or PostScript fonts, you can use either the DXF, WMF, or PostScript vector formats.
For vector format files, DXF is the easiest to work with, and with TrueType support, DXF can preserve font information between AutoCAD and desktop-publishing programs that support the DXF format. The WMF (Windows Metafile) format is also a commonly accepted file format for vector information, and it preserves TrueType fonts and line weights that are used in your drawings.
PostScript is a raster/vector hybrid file format that AutoCAD supports; unfortunately , AutoCAD has dropped direct PostScript font support since Release 14. However, you can still use substitute fonts to stand in for PostScript fonts. These substitute fonts are converted to true PostScript fonts when AutoCAD exports the drawing. You won't see the true results of your PostScript output until you actually print your drawing on a PostScript printer.
The DXF file export was covered in the "Using the DXF File Format" section of this chapter, so this section will concentrate on the WMF and PostScript file formats.
| Tip | If you are a circuit board designer or drafter, you might want to use the PostScript Out option to send your layout to PostScript typesetting devices. This saves time and reduces file size because the PostScript Out option converts AutoCAD entities into true PostScript descriptions. |
WMF Output
The Windows Metafile (WMF) file type is one of the more popular vector file formats in Windows. It can be opened and edited by most illustration programs, including CorelDRAW and Adobe Illustrator. Most word-processing, database, and spreadsheet programs can also import WMF files. It's a great option for AutoCAD file export because it preserves TrueType fonts, and now that AutoCAD offers line-weight settings, you can export WMF files that preserve line weights as well.
To export WMF files, do the following:
-
Choose File Export to open the Export Data dialog box.
-
The default file type in this dialog box happens to be WMF, so all you need to do is enter a name and location for your WMF file and then click OK. The dialog box closes , and you are prompted to select objects.
-
Select the objects you want to export to the WMF file and press
 . The objects are saved to your WMF file.
PostScript Output
AutoCAD can export to the Encapsulated PostScript file format (EPS). If you are using AutoCAD 2005, you can obtain PostScript output in two ways: you can use the File Export option on the menu bar, or you can install a PostScript printer driver and plot your drawing to an EPS file. LT users cannot export to EPS by using the File Export option. You must set up a PostScript plotter and use it to plot to a file.
To set up AutoCAD to plot your drawing to an EPS file, follow the same steps described in the previous " Exporting Raster Files" section, but in step 2, select Adobe from the Manufacturers list and then select the appropriate PostScript level from the Models list.
| Warning | AutoCAD does not preserve font information when creating EPS files from the printer option. It also produces larger files, especially if your drawing contains a lot of area fills and filled fonts. |
PostScript Font Substitution
ACAD only I mentioned earlier that AutoCAD substitutes its own fonts with PostScript fonts when you use the Export Data dialog box to export a file to an EPS file. If your work involves PostScript output, you will want to know these font names in order to make the appropriate substitution. Table 14.1 shows a list of AutoCAD font names and their equivalent PostScript names.
To take advantage of AutoCAD's ability to translate fonts, you need to create AutoCAD fonts that have the names listed in the first column of Table 14.1. You then need to use those fonts when creating text styles in AutoCAD. AutoCAD then converts the AutoCAD fonts into the corresponding PostScript fonts.
Creating the AutoCAD fonts can be simply a matter of copying and renaming existing fonts to those listed in Table 14.1. For example, you can make a copy of the Romans.shx font and name it
Agd.shx . Better yet, if you have the PostScript PFB file of the font, you can compile it into an Auto- CAD font file and rename the compiled file appropriately. By compiling the PFB file, you get a close approximation of its appearance in AutoCAD. See Chapter 8 for a description of how to compile PostScript fonts.
| AutoCAD | PostScript | AutoCAD | PostScript |
|---|---|---|---|
| agd | AvantGarde-Demi | agdo | AvantGarde-DemiOblique |
| agw | AvantGarde-Book | agwo | AvantGarde-BookOblique |
| bdps | Bodoni-Poster | bkd | Bookman-Demi |
| bkdi | Bookman-DemiItalic | bkl | Bookman-Light |
| bkli | Bookman-LightItalic | c | Cottonwood |
| cibt | CityBlueprint | cob | Courier-Bold |
| cobo | Courier-BoldOblique | cobt | CountryBlueprint |
| com | Courier | coo | Courier-Oblique |
| eur | EuroRoman | euro | EuroRoman-Oblique |
| fs | FreestyleScript | ho | Hobo |
| hv | Helvetica | hvb | Helvetica-Bold |
| hvbo | Helvetica-BoldOblique | hvn | Helvetica-Narrow |
| hvnb | Helvetica-Narrow-Bold | hvnbo | Helvetica-Narrow-BoldOblique |
| hvno | Helvetica-Narrow-Oblique | hvo | Helvetica-Oblique |
| lx | Linotext | ncb | NewCenturySchlbk-Bold |
| ncbi | NewCenturySchlbk-BoldItalic | nci | NewCenturySchlbk-Italic |
| ncr | NewCenturySchlbk-Roman | par | PanRoman |
| pob | Palatino-Bold | pobi | Palatino-BoldItalic |
| poi | Palatino-Italic | por | Palatino-Roman |
| rom | Romantic | romb | Romantic-Bold |
| romi | Romantic-Italic | sas | SansSerif |
| sasb | SansSerif-Bold | sasbo | SansSerif-BoldOblique |
| saso | SansSerif-Oblique | suf | SuperFrench |
| sy | Symbol | te | Technic |
| teb | Technic-Bold | tel | Technic-Light |
| tib | Times-Bold | tibi | Times-BoldItalic |
| tii | Times-Italic | tir | Times-Roman |
| tjrg | Trajan-Regular | vrb | VAGRounded-Bold |
| zcmi | ZapfChancery-MediumItalic | zd | ZapfDingbats |
If you are using PostScript fonts not listed in Table 14.1, you can add your own AutoCAD-to- PostScript substitution by editing the Acad.psf file. This is a plain-text file that contains the font substitution information as well as other PostScript translation data.
| Tip | The HPGL plot file format is another vector format you can use to export your AutoCAD drawings. Use the method described earlier in the section " Exporting Raster Files"to add the HPGL plotter driver to your printer/plotter configuration. |
EAN: 2147483647
Pages: 261