Getting General Information
So far in this book, you've seen how to get data about the geometry of your drawings. AutoCAD also includes a set of tools that you can use to access the general state of your drawings. You can gather information about the status of current settings in a file or the time at which a drawing was created and last edited.
In this section, you will practice extracting this type of information from your drawing, using the tools found in the Tools Inquiry option's cascading menu.
Determining the Drawing's Status
When you work with a group of people on a large project, keeping track of a drawing's setup becomes crucial. You can use the Status command to obtain some general information about the drawing you are working on, such as the base point, current mode settings, and workspace or computer memory use. The Status command is especially helpful when you are editing a drawing someone else has worked on, because you might want to identify and change settings for your own style of working. Choosing Tools Inquiry Status displays a list like the one shown in Figure 14.5.
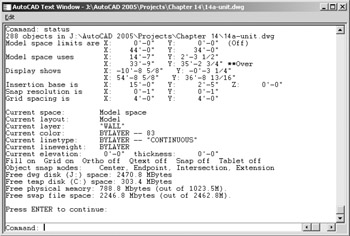
Figure 14.5: The Status screen of the AutoCAD Text window
| Tip | If you have problems editing a file created by someone else, the difficulty can often be attributed to a new or different setting you are not used to working with. If AutoCAD is acting in an unusual way, use the Status command to get a quick glimpse of the file settings before you start calling for help. |
Here is a brief description of each item on the Status screen. Note that some of the items you see listed on the screen will vary somewhat from what I've shown here, but the information applies to virtually all situations except where noted.
( Number ) Objects In Drive:\Folder\Subfolde The number of entities or objects in the drawing.
Model Space Limits Are The coordinates of the Model Space limits. (See Chapter 3 for more details on limits.)
Model Space Uses The area the drawing occupies; equivalent to the extents of the drawing.
**Over If present, this item means that part of the drawing is outside the limit boundary.
Display Shows The area covered by the current view.
Insertion Base Is, Snap Resolution Is, and Grid Spacing Is The current default values for these mode settings.
Current Space Model Space or Paper Space.
Current Layout The current tab.
Current Layer The current default layer.
Current Color The color assigned to new objects.
Current Linetype The line type assigned to new objects.
Current Lineweight The current default Lineweight setting.
Current Elevation/ Thickness The current default Z coordinate for new objects, plus the default thickness of objects; these are both 3D- related settings. (See Chapter 15 for details.)
Fill, Grid, Ortho, Qtext, Snap, and Tablet The status of these options.
Object Snap Modes The current default Osnap setting.
Free Dwg Disk ( Drive: ) Space The amount of space available to store drawing-specific temporary files.
Free Temp Disk ( Drive: ) Space The amount of space you have left on your hard drive for AutoCAD's resource temporary files.
Free Physical Memory The amount of free RAM available.
Free Swap File Space The amount of Windows swap file space available.
| Tip | When you are in Paper Space, the Status command displays information regarding the Paper Space limits. See Chapter 12 for more on Model Space and Paper Space. |
In addition to being useful in understanding a drawing file, the Status command is an invaluable tool for troubleshooting. Frequently, a technical support person can isolate problems by using the information provided by the Status command.
| Tip | For more information on memory use, see Appendix B. |
Keeping Track of Time
The Time command enables you to keep track of the time spent on a drawing, for billing or analysis purposes. You can also use the Time command to check the current time and find out when the drawing was created and most recently edited. Because the AutoCAD timer uses your computer's time, be sure the time is set correctly in Windows.
To access the Time command, enter Time ![]() at the command prompt or choose Tools Inquiry Time. You get a message like the one in Figure 14.6.
at the command prompt or choose Tools Inquiry Time. You get a message like the one in Figure 14.6.
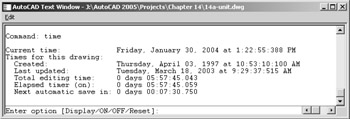
Figure 14.6: The Time screen in the AutoCAD Text window
The first three lines of this message tell you the current date and time, the date and time the drawing was created, and the last time the drawing was saved or ended.
The fourth line shows the total time spent on the drawing from the point at which the file was opened. This elapsed timer lets you time a particular activity, such as changing the width of all the walls in a floor plan or redesigning a piece of machinery. The last line tells you when the next automatic save will be.
You can turn the elapsed timer on or off or reset it by entering ON , OFF , or Reset at the prompt shown at the bottom of the message. Or press ![]() to exit the Time command.
to exit the Time command.
Getting Information from System Variables
If you've been working through this book's ongoing studio apartment building tutorial, you'll have noticed occasional mentions of a system variable in conjunction with a command. You can check the status or change the setting of any system variable while you are in the middle of another command. To do this, you simply type an apostrophe ( ¢ ), followed by the name of the system variable, at the command prompt.
For example, if you start to draw a line and suddenly decide you need to rotate your cursor 45 °, you can do the following:
-
At the Specify next point or [Undo]: prompt, enter ¢ snapang .
-
At the Enter new value for SNAPANG <0>: prompt, enter a new cursor angle. After you have entered an angle value, you are returned to the Line command with the cursor in its new orientation.
You can also recall information such as the last area or distance calculated by AutoCAD. Because the Area system variable duplicates the name of the Area command, you need to choose Tools Inquiry Set Variables and then type Area ![]() to read the last area calculation. You can also type ¢ Setvar
to read the last area calculation. You can also type ¢ Setvar ![]() Area
Area ![]() . The Tools Inquiry Set Variables option also lets you list all the system variables and their status, as well as access each system variable individually by entering a question mark ( ? ).
. The Tools Inquiry Set Variables option also lets you list all the system variables and their status, as well as access each system variable individually by entering a question mark ( ? ).
Many of the system variables give you direct access to detailed information about your drawing. They also let you fine-tune your drawing and editing activities. In Appendix C you'll find all the information you need to familiarize yourself with the system variables. Don't feel that you have to memorize them all at once; just be aware that they are available.
| Tip | Many of the dialog box options you have been using throughout this book, such as the options in the Options dialog box, are actually system variable settings. |
Keeping a Log of Your Activity
At times you might find it helpful to keep a log of your activity in an AutoCAD session. A log is a text file containing a record of your activities in AutoCAD. It can also contain notes to yourself or others about how a drawing is set up. Such a log can help you determine how frequently you use a particular command, or it can help you construct a macro for a commonly used sequence of commands.
The following exercise demonstrates how to save and view a detailed record of an AutoCAD session by using the Log feature:
-
Choose Tools Options to open the Options dialog box. Click the Open And Save tab. A new set of options appears.
Tip As a shortcut, you can quickly turn the Maintain A Log File feature on and off by typing Logfileon
 and Logfileoff at the command prompt.
 -
In the File Safety Precautions group, click the Maintain A Log File check box and then click OK.
-
Choose Tools Inquiry Status.
-
Return to the Open And Save tab of the Options dialog box, and turn off the Maintain A Log File option.
-
Click OK to exit the dialog box.
-
Switch to Windows and start the Notepad application or any text editor.
-
With the text editor, open the log file whose name starts with 14a-unit in the folder listed here:
C:\Documents and Settings\ User Name \Local Settings\Application Data\Autodesk\AutoCAD 2005\R16.1\enu\
This file stores the text data from the command prompt whenever the Log File option is turned on. You must turn off the Log File option before you can actually view this file in AutoCAD.
As you can see in step 7, the log file is given the name of the drawing file from which the log is derived, with some additional numeric values. Since the 14a-unit log file is a standard text file, you can easily send it to other members of your workgroup or print it for a permanent record.
| Tip | If you cannot find the log file for the current drawing, you can enter logfilename |
Capturing and Saving Text Data from the AutoCAD Text Window
If you are working in groups, it is often quite helpful to have a record of the status, editing time, and system variables for particular files readily available to other group members. It is also convenient to keep records of block and layer information, so you can see whether a specific block is included in a drawing or what layers are normally on or off.
You can use the Windows Clipboard to capture and save such data from the AutoCAD Text window. The following steps show you how it's done:
-
Move the arrow cursor to the command prompt at the bottom of the AutoCAD window.
-
Right-click and choose Copy History from the shortcut menu to copy the contents of the Text window to the Clipboard.
If you want to copy only a portion of the Text window to the Clipboard, perform the following steps:
-
Press the F2 function key to open the Text window.
-
Using the I-beam text cursor, highlight the text you want to copy to the Clipboard.
-
Right-click and then choose Copy from the shortcut menu. You can also choose Edit Copy from the Text window's menu bar. The highlighted text is copied to the Clipboard.
-
Open Notepad or another text-editing application and paste the information.
Although you used the Text window to copy text in this exercise, you can also copy from the docked command line at the bottom of the AutoCAD window.
You might notice four other options on the shortcut menu: Recent Commands, Paste, Paste To CmdLine, and Options. Choosing Recent Commands displays a list of the most recent commands. For most activities, you'll use a handful of commands repeatedly. The Recent Commands option can save you time by giving you a shortcut to those commands you use the most. The Paste options paste the first line of the contents of the Clipboard into the command line or input box of a dialog box. This can be useful for entering repetitive text or for storing and retrieving a frequently used command. Choosing Options opens the Options dialog box.
| Tip | Items copied to the Clipboard from the AutoCAD Text window can be pasted into dialog box input boxes. This can be a quick way to transfer layers, line types, or other named items from the Text window into dialog boxes. You can even paste text into the drawing area. |
Storing Searchable Information in AutoCAD Files
As you start to build a library of AutoCAD files, you'll have to start thinking about how to manage those files. Keeping track of AutoCAD files can be a daunting task. Most AutoCAD users start to name files by their job number to keep things organized. But even the best organization schemes don't help if you need to find that one special file among thousands of files in your library. In this section, you'll learn how to include information in an AutoCAD file that you can use later to locate the file by using the Windows Search utility.
| Tip | AutoCAD includes the DesignCenter, a tool that can help you locate a file more easily based on a keyword or description. Chapter 21 contains a complete discussion of the DesignCenter. |
To add general information about your drawing file that is searchable, use the drawing Properties dialog box (choose File Drawing Properties).
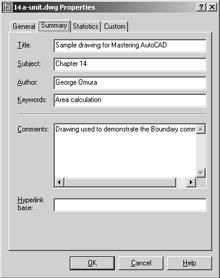
Here's a description of the four tabs in this dialog box:
General The General tab gives you general information about the file. This information is similar to what you would see if you use the Properties options in Windows Explorer to view the properties of a file.
Summary In the Summary tab, enter any text in the Title, Subject, Author, and Keywords fields that is appropriate to the drawing. The information you enter here is stored with the drawing and can be used to locate the file through the AutoCAD DesignCenter or the Windows Find Files Or Folders utility (choose Start Search).
In addition, you can enter a base location for hyperlinks that are applied to objects in your drawing. This base location can be a folder on your computer or network or an Internet web address. See Chapter 21 for more information on hyperlinks .
Statistics The Statistics tab contains the Windows username of the person who last edited the drawing, as well as the time spent on the file. This is the login name at the beginning of the Windows session.
Custom The Custom tab contains two columns of input boxes. This tab lets you store additional custom data with the drawing that is also searchable. For example, you might enter Job Number in the Name column and then enter 9901 in the Value column. You might also include information such as project manager names , consultants , or revision numbers . You can then locate the file by using the AutoCAD DesignCenter or the Windows Search utility by doing a search for those keywords from the Name and Value columns.
Searching for AutoCAD Files
After you've included information in the Properties dialog box of a file, you can use the AutoCAD DesignCenter, the File dialog box, or the Windows Search functions to locate your file.
A Find option is also located in the Tools menu in the upper-right corner of the AutoCAD Select File dialog box. To access it, choose File Open, and then in the Select File dialog box, choose Tools Find in the upper-right corner.
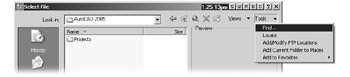
This option opens a Find dialog box that works just like the Windows XP Search dialog box.
Recovering Corrupted Files
No system is perfect. Eventually, you will encounter a file that is corrupted in some way. AutoCAD offers two tools that can frequently salvage a corrupted file:
Audit Enables you to check a file that you are able to open but suspect has some problem. Audit checks the currently opened file for any errors and displays the results in the Text window.
Recover Enables you to open a file that is so badly corrupted that AutoCAD is unable to open it in a normal way. A File dialog box appears, enabling you to select a file for recovery. After you select a file, it is opened and checked for errors.
You can access these tools from the File Drawing Utilities cascading menu. More often than not, these tools will do the job, although they aren't a panacea for all file-corruption problems. In the event that you cannot recover a file even with these tools, make sure your computer is running smoothly and that other systems are not faulty.
EAN: 2147483647
Pages: 261