Security
| < Day Day Up > |
| There probably hasn't been a time in the modern era of computing where there was more widespread concern for security. Only a few years ago, security was one of those dark corners of the industry for hard- core types, but largely ignored by most of us. Today, securing computing resources ripples from the largest corporation to the most computer-illiterate home consumer, trying to prevent sophisticated hackers not only from infecting their computers with destructive viruses, but also from stealing information or using their computer as an ad hoc server. note Jan de Clercq of HP's Security Office provided much of the technical information and technical review of this section. Jan is one of HP's leading security experts. I highly recommend his new book, Windows Server 2003 Security Infrastructures , Digital Press, 2004. Windows 2000 made some huge strides in securing the computing environment with features such as Kerberos for authentication and authorization, IP Security (IPSec) for remote access security, and the Encrypted File System (EFS) for protecting sensitive data. Windows NT and 2000 provided Certificate Services, which gave Administrators the ability to install their own CA and secure the certificates in their enterprise inexpensively, enticing smaller companies to implement Public Key Infrastructures (PKI). Security issues always provide room for improvement, and Windows Server 2003 and Windows XP have taken a step forward in a number of areas. Think of XP as a Windows 2003 client ”they both have very similar and compatible features. Significant security feature improvements in Windows XP and Windows Server 2003 include
The following sections provide a brief description of each issue. Refer to Jan de Clercq's books listed in the "References" section at the end of the chapter for more information. Software Restriction PoliciesAlso known as SAFER, these policies are Microsoft's first attempt to provide stronger cryptographic compliance with Federal Information Processing Standards (FIPS) 140-1. FIPS determines whether products meet the standard and evaluates overall security provided by a cryptosystem. The kernel mode driver, FIPS.SYS, supports EFS (efs.sys), IPSec (ipsec.sys), and other crypto functions. Although this is only a level 1 compliance intended for general PC use, it is nonetheless a start. The idea with SAFER policies is to provide the Administrator the ability to grant granular client-level security policies to restrict the access to read, write, or execute software on computers. Because the "How To" basics of configuring these policies are reasonably well documented in the Microsoft KB 324036 article "How to use Software Restriction Policies in Windows Server 2003," I'll use the space here to describe some important concepts and implementation recommendations. Software Restriction Policies is implemented through GPO settings located in the GPO tree Computer Configuration\Windows Settings\Security Settings\Software Restriction Policies , and in User Configuration\Windows Settings\Security Settings\Software Restriction Policies . When you drill down to this location on a new policy, a warning appears in the right pane of the GPO Editor, "No Software Restriction Policies Defined," as shown in Figure 1.23. Right-click on the Software Restriction Policies in the left pane and click New Software Restriction Policies. You will then see two folders titled Security Levels and Additional Rules. Security Levels defines a high-level access policy, whereas Additional Rules allows you to define specific rules, including the following:
Figure 1.23. Defining Software Restriction Policies in the Group Policy Editor.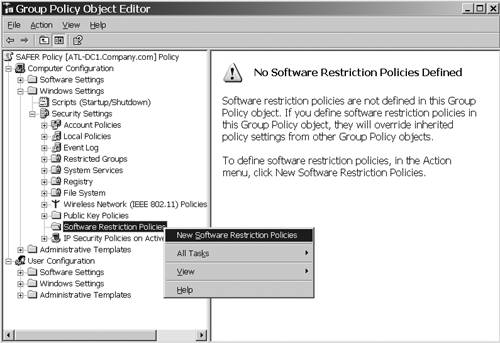 Security LevelsThink of Security Levels as the locked condition on the front door to a building. There are two options (look in the Security Levels folder in the GPO): Disallowed and Unrestricted. The Disallowed option locks the front door and requires all who enter to provide proper credentials. No public access. Employees with ID badges only. The Unrestricted option leaves the front door unlocked, allowing anyone to enter the building. Inside the building are special rooms (programs and files on the PC) that also have locks on the door. These locks are the four classes of rules described in the previous section. If the front door is Disallowed , then you don't get access unless you can prove you have access to a room in the building. The guard escorts you to that room (or rooms), but you can't go anywhere else. This obviously is a high-security condition. If the front door is set to Unrestricted, anyone can walk in and roam through the building and enter any room that is not locked. However, if a room is locked (that is, a rule has been created to restrict access to a program), you have to be granted specific access to get in. I recommend, as does Microsoft's KB 310791 article "Description of the Software Restriction Policies in Windows XP," you use the Unrestricted option because it simply locks out certain files and programs. Unrestricted is the default. Setting the Disallowed mode, unless it is in a very controlled environment, will generate a lot of help desk calls if it's not well planned and tested . Additional RulesThese are the keys to the rooms ”the exceptions to the lockout. Note that four Registry path policies are created by default in the Additional Rules folder. Figure 1.24 shows the default Registry path rules, as viewed in the GPMC. They are all defined as Unrestricted and are applied to %systemroot% %systemroot%\*.exe %systemroot%\system32\*.exe %programfilesdir%\ Figure 1.24. The additional rules defined by default in Software Restriction Policies are shown using the GPMC snap-in.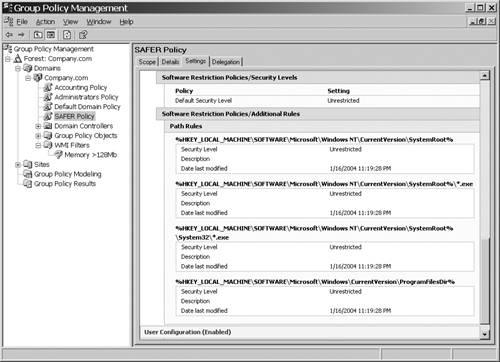 The purpose of these policies is to permit access to critical directory space when you've set the Security Level to Disallowed. These policies allow access to areas like c:\> Program files. ImplementationSo far these rules seem fairly straightforward. If you want to put the admin pack on every PC, but restrict users from running it, you set the SAFER policy to Unrestricted, and then create a path policy to restrict domain users from executing it. Pretty simple until you get multiple rules defined in multiple policies and perhaps in a combination of User and Computer Configuration settings. note The description of functionality described here is based on my experience and testing and asking questions of Microsoft PSS. I have not seen any Microsoft documentation to confirm or deny these assertions. Your mileage may vary, so be sure you test these policies before implementing. If multiple Software Restriction Policies are defined, things get complicated. Several design rules apply to the application of these policies. Understanding them is critical to obtaining the desired results.
Evaluation of these policies at this time seems like a bit of black magic. As of this writing, Microsoft had not seen a lot of customers using these policies, but in the work I've done with the policies, I've found they are difficult to design and it's difficult to get the desired results if you have a lot of them. Again, adding complexity to these policies results in a high probability of failure, so you must test them thoroughly. You can apply them to User Config and Computer Config on multiple levels (domain and OU), and then have them all sorted by rule precedence, closest match, and most restrictive. Keep these GPOs in as few domains and OUs as possible, keep the rules simple and well planned, and avoid applying them to both User Config and Computer Config in the GPO. Sample RulesLet's look at a couple of examples of rules. Suppose we have six policies defined in a Domain SAFER Policy defined at the domain:
Using these rules, a user attempting to run the following programs would have these results:
Suppose the same rules are defined, but the Security Level is set to Disallowed. Path Rule 1 and Hash Rule 2 are not needed because the Security Level is set to Disallowed. With that setting, all you need to do is define rules to allow access to programs that you want the user to access. Microsoft has attempted to help with some exceptions to these rules. In the Software Restriction Policies folder in the GPO, you'll see three policies besides the two folders. These policies are
In summary of Software Restriction Policies, I'd say to use them very carefully and only after extensive testing so you understand what the ramifications are. They have some value in the security configuration of the enterprise, but they are complex and can create a lot of problems if you aren't careful. Some good resources for SAFER policies include the Microsoft whitepaper , and Jeremy Moskowitz's Group Policy, Profiles and IntelliMirror for Windows 2003, Windows XP, and Windows 2000 , Sybex, March 2004. Internet Connection (Personal) FirewallAlso referred to as the Personal Firewall, this feature is provided with Windows XP as built-in protection for each computer. It isn't the most secure firewall, but it's probably sufficient for casual home users. If firewalls are implemented elsewhere, the personal firewall in XP is usually required to not be enabled. To enable the Internet Connection Firewall, open a network connection's Properties page, go to the Advanced tab, and select the Protect My Computer and Network by Limiting or Preventing Access to this Computer from the Internet check box. Click the Settings button to access the Advanced Settings pane, shown in Figure 1.25 to configure advanced settings, including
Figure 1.25. Internet Connection Firewall Advanced Settings enable you to define what the user is allowed to do. note Windows XP Service Pack 2 enables the Internet Connection Firewall by default. EFS (Encrypting File System) EnhancementsAlthough Windows 2000 EFS brought a level of security to local files, it had a number of deficiencies:
EFS has been enhanced in Windows XP and Windows Server 2003 to support sharing of encrypted files. Windows 2000, Windows Server 2003, and Windows XP all store the EFS metadata in the NTFS. Thus, encrypted files on NTFS volumes in Windows 2000 and Windows Server 2003. Sharing an encrypted file is enabled by opening the file's Properties page, clicking the Advanced button, and selecting the Details button in the Advanced Attributes area. You can add users who you want to share the file with to the list. Note that EFS file sharing is set at the file level ”not the folder level ” ”and inheritance of EFS file-sharing metadata is not supported. Another option for sharing encrypted files in Windows Server 2003 is to use Web folders. Windows Server 2003's support for the transport of EFS metadata using the WebDAV protocol, an extension of HTTP 1.1, makes Web folders an excellent alternative to sharing files on file servers, and is recommended by Microsoft. WebDAV is supported on IE v5.0 on the client and IIS v5.0 and later on the server. For more information about WebDAV, see the WebDAV Resources FAQs at http://www.webdav.org/other/faq.html. To configure a Web folder on the server running IIS, go to the properties sheet of the encrypted file (or any file), go to the Web Sharing tab, and select the Share this Folder option. Table 1.5 provides a side-by-side comparison of features between the Web folders and File Shares. Table 1.5. Comparison of EFS Features Between File Shares and Web Folders
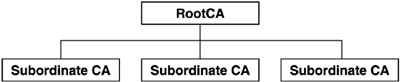
Credential ManagerSingle Sign On (SSO) capability has been a frequent request from users and Administrators who find it challenging to keep track of all the credentials needed to log on to the domain, or use Microsoft Passport credentials and Smart Card credentials. Managers who must keep getting validated to perform administrative tasks on various computers also have requested this capability. Windows Server 2003 introduces Credential Manager, a client-based SSO solution that uses an intelligent credential-caching mechanism that keeps credentials in a store on the client, requiring the user to provide a single username/password to open the store. Credentials in the store can consist of a user account and password; a user account, certificate, and private key (which can be stored on a smart card); or Microsoft Passport credentials. The credential store is part of the user profile and supports roaming and can optionally be disabled by the Administrator via the GPO. This is done by opening a GPO and going to Windows Settings\Security Settings\Local Policies\Security Options and enabling the option Network Access: do not allow storage of credentials or .NET Passports for network authentication . This feature is available in Windows Server 2003, Windows XP Pro, and Windows XP Home operating systems. Public Key Infrastructure (PKI) ImprovementsMicrosoft provided an out-of-the-box, user-defined and administered CA in the Windows NT 4.0 Option pack. This might not have been the most effective and robust product on the market, but it was cheap (and was included at no extra cost with Windows 2000). This allowed small- and medium-size companies, who couldn't afford the high cost of third-party companies such as VeriSign and Entrust, to fortify their security systems. However, according to one of HP's security experts, consultant Jan de Clercq, "ease of use and security don't easily coexist." But considering the improvements made in Windows Server 2003 security features, especially in the PKI arena, Jan stated that "Given the low cost and the advanced PKI features of Windows.NET, it may be a product that will bring PKI to the masses." Let's see what features are now available to make this possible. Cross Certification Trust ModelWindows 2000 used a hierarchical CA trust model, shown in Figure 1.26, whereby the parent (root) CA was linked to the child (subordinate) CA by trusts. Only one root CA can be in the forest, and the only way to configure it to trust certificates issued by other CAs in other forests was to reconfigure the entire CA structure using Certificate Trust Lists. This might be desirable in multiforest enterprises or to link extranets. Figure 1.26. Hierarchical CA structure with the root (enterprise) CA at the top and subordinate (issuing) CAs below. Note that the CA hierarchy is not specifically tied to the domain hierarchy. Rather, it might more appropriately be associated with geographies of the enterprise to provide accessible CAs to users and computers in each geography. Windows Server 2003 introduces the Cross Certification trust model, which allows CAs in different organizations (forests) to trust each other and is in addition to the subordinate trust model. The Cross Certification model permits the Administrator some freedom in configuring the trust relationships with the extranet partners , by specifying whether it is a one-way or two-way trust, and by controlling the issuance and usage scope of the CA agreement via naming constraint, application, and issuance policy rules. Cross certification provides the ability to create transitive cross forest trusts, as described in the "Creating a Cross Forest Trust" section in this chapter. Editable Certificate Templates (v2)Windows 2000 provided v1 certificate templates that were not editable. Windows 2003 provides v2 templates that are editable and include a mechanism to modify v1 templates and convert them to v2. The v2 templates facilitate cross certification and policy enforcement, which allows configuration of certificate trust relationships across forest boundaries. This could be trusts to CAs in other forests within the company or to a CA in a business partner's extranet. This also allows a CA to issue certificates to a CA in another forest and can link a policy to this cross certification. The policy can limit the issuance and usage scope of the CA cross-certification agreement. A new Certificate Templates snap-in is included in Certificate Services for Windows Server 2003, as shown in Figure 1.27. Note that the icons for v1 and v2 templates are a different color , the Minimum Supported column identifies v2 templates as Windows 2003 and Auto Enrollment functionality is listed. This snap-in is used to modify Version 2 templates to perform the following functions:
Figure 1.27. Certificate Template snap-in.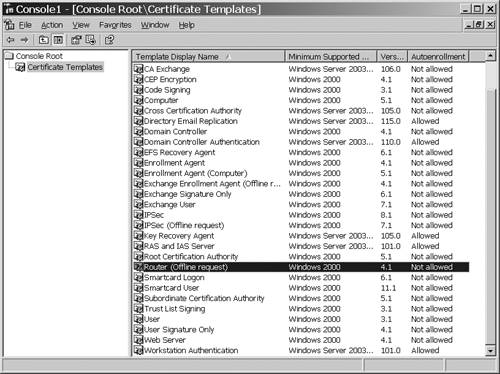 note You can copy and save a v1 template as a v2 template and then configure it as desired. You also can select the Duplicate Template option when you right-click on the template in the Certificate Templates snap-in, which will make a duplicate and give you a head start on creating a similar one. Private Key RecoveryWindows Server 2003 PKI made significant changes to the key recovery process, providing centralized key recovery services. An important component to this process is the Key Recovery Agent ”usually one or more Administrators who have the ability to recover encrypted files, by means of a special public key stored in an EFS Recovery Agent certificate. The key recovery data is stored in the CA database. A user's archived private key is encrypted using a symmetric key, which is encrypted using a Key Recovery Agent's public key. These keys are stored in the CA database in the RawArchivedKey and KeyRecoveryHashes columns , respectively. To recover a user's private key, an Administrator must be added to the Recovery Agent list. The preparation for the Key Recovery process includes the following steps:
note Multiple Administrators can be designated as Recovery Agents so that both public keys are required to recover private keys for an added measure of security. This four-step process will recover a private key in Windows Server 2003:
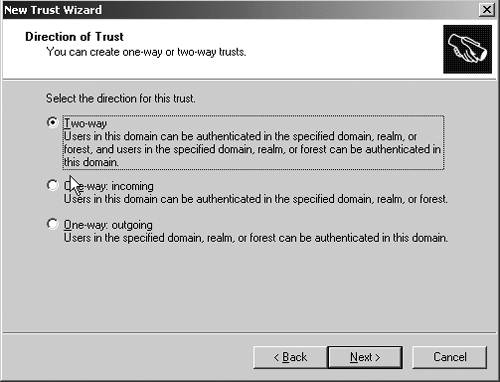
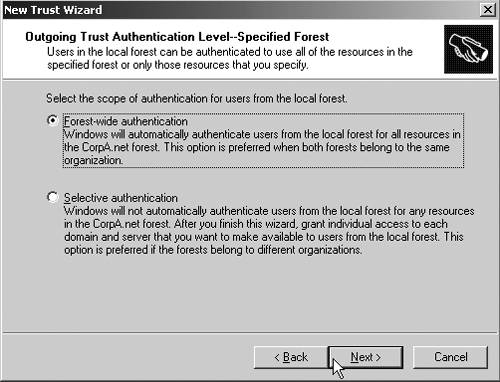
Enhanced Security Management ”Effective Permissions TabThe Effective Permissions tab displays the cumulative permissions calculated from group membership and any inherited permissions, and displays the result applied to a given user. This is part of the Advanced Settings on the ACL properties page. For instance, right-click on an NTFS folder, go to Properties, select the Security tab, and then select the Advanced button. In the Effective Permissions tab, shown in Figure 1.28, you see a cumulative summary of all permissions applied to that user on that object. Figure 1.28. Effective Permissions tab.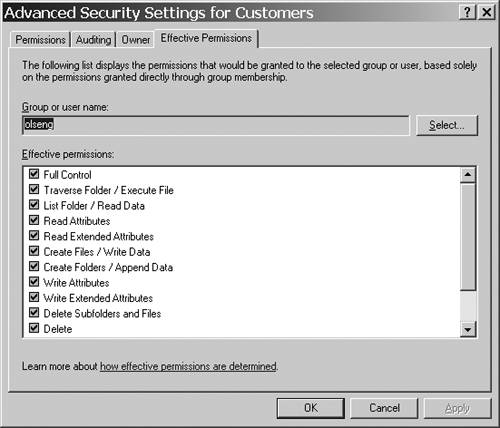 User AutoenrollmentWindows 2000 Certificate Services provided a valuable feature in the autoenrollment and renewal of machine certificates. This allowed DCs to obtain and renew certificates. Windows Server 2003 now provides autoenrollment of users. You can do this in a Certificate Template by going to the Properties of the template, and then on the Security tab, giving Autoenroll the READ privilege. You also can enable it via Group Policy, as shown in Figure 1.29. In Computer Configuration\Windows Settings\Security Settings\Public Key Policies , check the Enroll Certificates Automatically option. Figure 1.29. Using Group Policy to enable autoenrollment of users.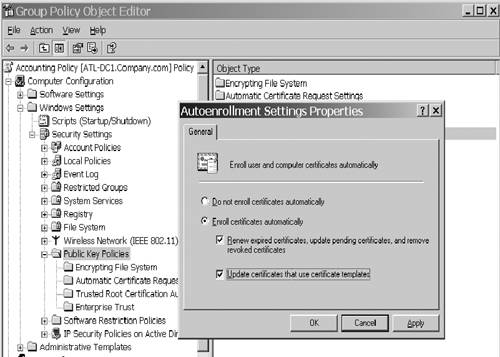 Kerberos and Forest TrustsWindows 2000 was unable to create a transitive trust between forests, allowing only a one-way NTLM type trust that had to be created between individual domains in different forests ”much like what we had to do in Windows NT to build trusts between all domains. Interestingly enough, this actually has a side benefit ”because this type of trust can't be used by Kerberos, it solves a migration problem known as the "Pile On" issue, described in Chapter 3. Other than that, an NTLM trust isn't a good thing because it requires the Administrator to manage a lot of trusts between forests. Windows Server 2003 includes schema modifications made to the trusted domain object (TDO), which allows Kerberos to authenticate across the domain. This provides transitive trusts to be built across forests. That is, we create a trust between two forests, (one way or two way) and no other trust is needed. The Administrator does have some control over the trust, in making it a one-way trust or a two-way trust, and determining the default level of authentication that is allowed between forests (described in more detail in the next section). Creating a Cross Forest TrustThe preparatory steps to creating a cross forest trust include establishing DNS name resolution between the two forests, synchronizing system time between all computers in both forests (easier than it sounds), and setting the forest functional level to Windows 2003 (native). Windows Server 2003 provides three different ways to establish DNS name resolution between the two forests:
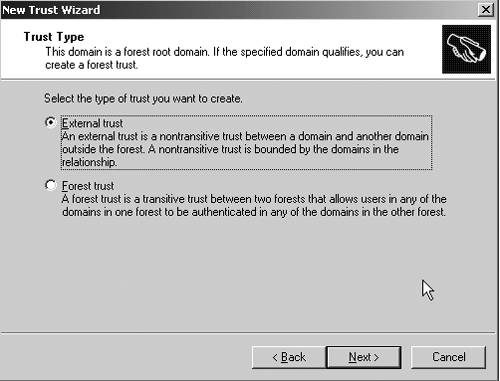
Test name resolution by pinging the root domain name of each forest from the other forest. In addition, you must ensure that the system time of all computers in both forests is within the allowable Kerberos time skew (default is five minutes). If the time skew between the two DCs contacted to build the trust is more than the allowable time skew, the trust might be created successfully, but authentication will fail. note There is no default time synchronization between two forests. Because Kerberos authentication, by default, requires the system time of all computers to be within five minutes of each other, ensure the time between forests is synchronized. It is recommended that you configure the PDC emulator of the root domain in each forest to synchronize with the same external time source. Time synchronization is configured by default for a forest, but not between forests. More information is available in the "Time Services" section of Chapter 6. Setting the forest functional level is described in Chapter 3. To do this, all DCs in every domain must be Windows 2003 servers, and the domain functionality must be set to Windows Server 2003 (referred to as native, though the word "native" is not used in the UI). After the domains are all raised to Windows 2003, the forest must be raised to Windows 2003 native ”similar to the way Windows 2000 domains were raised to native mode, but Windows 2000 didn't have a forest native mode. After the forest is at Windows 2003 level, Time Services are synchronized, and DNS name resolution is established between the two forests, the trust can be created. You create the trust just as you did in Windows 2000 by going to the Active Directory Domains and Trusts snap-in, choosing Domain Properties, selecting the Trusts tab, and clicking New Trust. This engages the New Trust Wizard. Some of the options specified in the wizard are described here, along with screen shots of the dialog boxes used in the wizard.
The wizard also gives you the ability to choose to verify the trust. I recommend that you do so. After the trust is created, you will be able to see users and groups of the other forest in the object picker to assign permissions to resources. For instance, in Figure 1.33, we have a share on a server in forest CorpB.Net, and in assigning permissions, the users and groups of forest CorpA.Net are available. Note that all you see in the locations option of the object picker is the remote forest with a triangle-like icon. Child domains in that forest, if any, are not exposed. However, entering user or group names (including the use of wild cards) in the object picker will find objects in any domain in the remote forest. For instance, if you entered Admin as the name in the object picker, it would return the Administrator account for all domains in the remote forest. Figure 1.33. The object picker displays the trusted forest for assigning rights.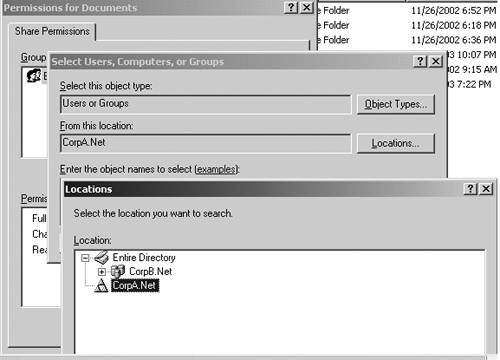 The cross forest trust will be a valuable benefit to enterprises with multiple forest deployments. Where Windows 2000's NTLM trusts have made multiple forests prohibitive to manage, Windows Server 2003's cross forest trusts could easily make the multiple forest configuration feasible . ConclusionThis is by no means a comprehensive dissertation on security or even Windows 2003 security, but it does give a good overview of the many improvements provided in Windows Server 2003. Hopefully, after reading these issues, you will have some area you want more information on that might affect your Windows infrastructure and should be included in the migration plan. I have the good fortune of getting much of this information from HP's Jan de Clercq, a recognized security expert and author of two books regarding PKI and other security issues in the Windows environment. I highly recommend Jan's latest book, Windows Server 2003 Security Infrastructures , Digital Press, 2004. | ||||||||||||||||||||||||
| < Day Day Up > |
EAN: N/A
Pages: 214