Configuring Realms
Now that you’re familiar with the concepts of realms and container-managed security, it’s time to start configuring Tomcat to protect its resources. This section will start with server.xml and the settings you can use to configure realms. The “Protecting a Resource with a Realm” section will show you the settings required in each application’s web.xml file. The first stop is the file-based realm.
Configuring a File-Based Realm
The memory realm is a simple realm implementation that loads the user and role information into memory at server startup. The server can then use this information for container-managed security, and developers can use it in their code.
You shouldn’t use the memory realm unless you have an extremely pressing need to do so. It’s for demonstration purposes only and doesn’t support runtime updates. Tomcat 4.1 introduced a much-improved version called a user database (more on the user database in the next section).
The memory realm configuration element in server.xml can have attributes specified in Table 11-1.
| Attribute | Description | Required? |
|---|---|---|
| className | The class that implements the memory realm. It must be set to org.apache.catalina.realm.MemoryRealm. | Yes |
| debug | Tomcat 5.0.x only. The level of the debugging message that will be sent to the log. The default is zero. | No |
| digest | The digest algorithm used to store the password. By default, passwords are stored in plain text. | No |
| pathname | The XML file that will be the source of data for the memory realm. The default is CATALINA_HOME/conf/tomcat-users.xml. | No |
A memory realm is configured in the default server.xml, but it’s commented out. This reflects the concerns mentioned previously. Listing 11-1 shows the relevant section.
Listing 11-1: The Memory Realm in server.xml
<!-- <Realm className="org.apache.catalina.realm.MemoryRealm" /> -->
This specifies a memory realm that uses the CATALINA_HOME/conf/tomcat-users.xml file. It’s at the engine level, so it will be used in all Web applications running in that engine. It will also use the logger associated with that engine, be that a logger component or a Log4J implementation. If you want to use or test this implementation, remember to comment out any other realms in server.xml.
If you need to specify your own set of users, passwords, and roles for a memory realm, add them to tomcat-users.xml, as shown in Listing 11-2.
Listing 11-2: The tomcat-users.xml File
<?xml version='1.0' encoding='utf-8'?> <tomcat-users> <role rolename="tomcat"/> <role rolename="role1"/> <role rolename="admin"/> <user username="admin" password="admin" roles="admin"/> <user username="tomcat" password="tomcat" roles="tomcat"/> <user username="role1" password="tomcat" roles="role1"/> <user username="both" password="tomcat" roles="tomcat,role1"/> </tomcat-users>
As has already been noted, this memory realm isn’t configured by default. Instead, a greatly improved memory realm implementation called a user database has superseded this primitive memory realm implementation. The old memory realm is retained for backward compatibility (which is still no excuse to use it).
If you’re using a digested password, you should copy the digested output of the digest script into the password attribute of the appropriate <user> element in tomcat-users.xml, as shown in Listing 11-3.
Listing 11-3: A Digested Password Is Added for the Admin User
<?xml version='1.0' encoding='utf-8'?> <tomcat-users> <role rolename="tomcat"/> <role rolename="role1"/> <role rolename="admin"/> <user username="admin" password="d033e22ae348aeb5660fc2140aec35850c4da997" roles="admin"/> <user username="tomcat" password="tomcat" roles="tomcat"/> <user username="role1" password="tomcat" roles="role1"/> <user username="both" password="tomcat" roles="tomcat,role1"/> </tomcat-users>
When Tomcat asks for a password and you’ve set it up to use digested passwords, it digests whatever users enter as their passwords and compares them to the values stored in the realm (see Figure 11-3).
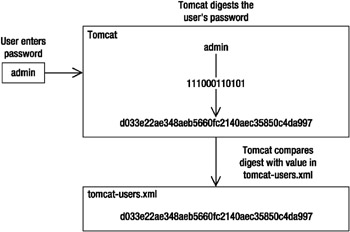
Figure 11-3: Tomcat using digested passwords
You can see that it’s important to tell Tomcat to digest the password entered so that it can make a proper comparison. If Tomcat doesn’t know to digest the password, then it won’t authenticate the user.
You’ll see how to protect a Web application in the “Protecting a Resource with a Realm” section.
Configuring a User Database Realm
A user database is a greatly enhanced implementation of a memory realm. Though it may not seem like much (it still uses tomcat-users.xml, for instance), it does offer three large improvements:
-
You can now change the user information programmatically during the lifetime of the engine. This allows you to build administrative utilities. Note that this doesn’t mean you can edit the file manually and expect the changes to be reflected instantly. You’ll have to restart the server in that case.
-
Upon modification and shutdown, the user database can save any changes to the tomcat-users.xml data file for use in the future.
-
You can alter the username, password, and role mapping with the admin Web interface utility as described in the next section.
In the default server.xml, the user database is already configured in place of the legacy memory realm implementation, which you may have uncommented earlier. The user database is usually configured in the <GlobalNamingResources> element as a JNDI resource that’s available to all applications on the server. Unlike the memory realm, which is implicitly used in configuring each Web application, the user database must be configured for each Web application. Listing 11-4 shows the user database global settings as configured in Tomcat 5.0.x’s server.xml. Tomcat 5.5 uses attributes of the <Resource> element rather than a <ResourceParams> element.
Listing 11-4: The Global Settings for the Default User Database in server.xml
<!-- Global JNDI resources --> <GlobalNamingResources> <!-- Editable user database that can also be used by UserDatabaseRealm to authenticate users --> <Resource name="UserDatabase" auth="Container" type="org.apache.catalina.UserDatabase" description="User database that can be updated and saved"> </Resource> <ResourceParams name="UserDatabase"> <parameter> <name>factory</name> <value>org.apache.catalina.users.MemoryUserDatabaseFactory</value> </parameter> <parameter> <name>pathname</name> <value>conf/tomcat-users.xml</value> </parameter> </ResourceParams> </GlobalNamingResources>
This makes the user database called UserDatabase accessible through JNDI lookup, relative to the java:comp/env naming context. The factory parameter sets the class that will return a user database to Tomcat for use in authentication.
This configuration also allows you to reference the user database in a later scope. For example, you can use the user database as a realm at the engine level as the default server.xml file does. Listing 11-5 shows this situation.
Listing 11-5: Adding a User Database
<!-- This realm uses the UserDatabase configured in the global JNDI resources under the key "UserDatabase". Any edits that are performed against this UserDatabase are immediately available for use by the Realm. --> <Realm className="org.apache.catalina.realm.UserDatabaseRealm" debug="0" resourceName="UserDatabase"/>
This realm has all the same attributes as the memory realm, save the addition of the resourceName attribute. For example, if you wanted to use message digests with this realm, you’d set it up as in Listing 11-6.
Listing 11-6: A User Database That Uses Digested Passwords
<Realm className="org.apache.catalina.realm.UserDatabaseRealm" debug="0" resourceName="UserDatabase" digest="sha"/>
This will allow you to use the admin user from Listing 11-3. If you didn’t set the digest attribute in this case, then Tomcat would make a comparison between the plain password entered by a user and the digested password stored in the realm. Setting the digest attribute makes Tomcat digest the password before comparing it every time the user enters it.
As noted previously, you can alter this realm while the server is running, which is a vast improvement over the memory realm. You can, if you like, write an application that manipulates this file to add, remove, and modify users, though Tomcat’s admin application does just that. You saw the admin application in Chapter 6 but not in any great detail. I’ll now show you how to use the admin application to work with user databases.
Configuring User Databases with the Admin Application
To add a new user database start Tomcat, then visit the admin application via the URL http://localhost:8080/admin/. You may have to set up appropriate users for this application if you haven’t followed the steps in Figure 11-4.
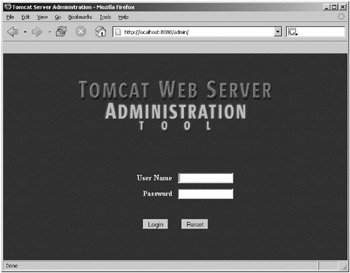
Figure 11-4: The Tomcat admin application
Log in using the details of a user with the admin role. You’ll see the admin Web interface. Click the User Databases link in the left pane, and you’ll see the screen shown in Figure 11-5.
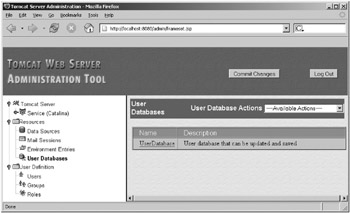
Figure 11-5: User databases in the Tomcat admin application
This corresponds to the user database entry as defined in Listing 11-4, right down to the description. Click the user database’s name, and you’ll see a screen like Figure 11-6.
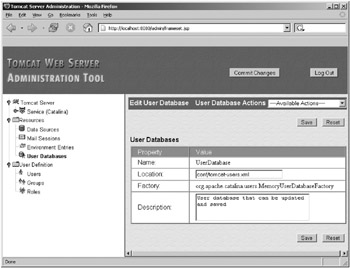
Figure 11-6: Editing the default user database
This is the default user database as defined in server.xml. Only one user database factory for user databases exists, so you can’t edit that setting. The others allow you to change the location of the user information from the default tomcat-users.xml file and change the description.
To add a new user database, click the User Database Actions box and select Create New User Database. You’ll see a blank version of the screen in Figure 11-6, with the factory already filled in. Enter the details you require, and click Save. Once you’ve clicked Save, Tomcat holds the configuration in memory. When you’ve made all the changes you want to make to the server configuration, click the Commit Changes button at the top of the Web interface. Any comments you had in server.xml will be lost, as Tomcat overwrites the entire file. The good news is that Tomcat will create a backup of the old server.xml file with the date appended to the filename.
| Note | When you click Commit Changes, the admin application will restart the server. This means you’ll have to log in again once the server has restarted. If you attempt any actions while the restart is in progress, you’ll receive multiple errors in multiple frames. You don’t have to click Commit Changes to update the user database, as described next. |
You can also delete user databases if you no longer require them. Click the User Database Actions box, and select Delete User Databases. You’ll see a list of user databases and their descriptions along with a checkbox, as shown in Figure 11-7.
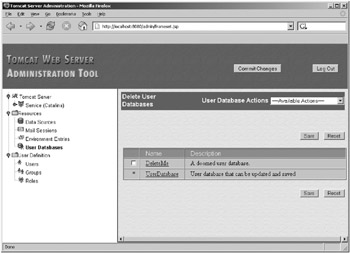
Figure 11-7: Deleting a user database
In Tomcat 5.0.x, you can’t delete the default user database, as indicated by the star, but you can delete any of the others listed. Tomcat 5.5 allows you to remove any user database. Select the checkbox of the user database you want to delete, and click Save. That’s the theory anyway. As things stand, this function of the admin application is fairly flaky, so you may have to delete your user databases by hand for the time being.
Editing the User Database with the Admin Application
To edit the user database, click the Users item in the tree view on the left; you’ll see a screen like Figure 11-8.
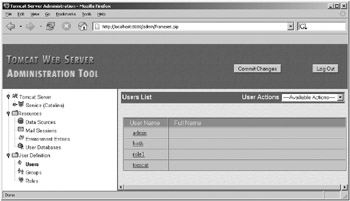
Figure 11-8: Viewing users with the admin application
It’s worth noticing that the list of users shown in the table on the right is the same as the list of users shown in Listing 11-2, where an example tomcat-users.xml file is shown.
To edit a user, click a name. You can change the password, add a full name or description, and change the roles (see Figure 11-9).
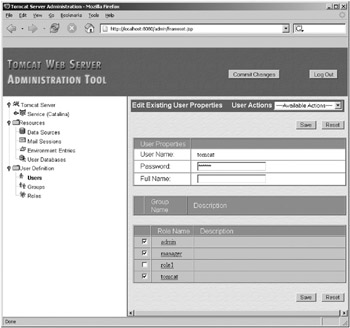
Figure 11-9: Editing a user’s details
Any changes you make will be written to tomcat-users.xml (or whichever realm you’re using) once you click Save. As with all the actions of the admin application, any changes will remove comments from the user database file. This is because the admin application writes a new file every time, so “modifying the user database” is a slight misnomer; you’re really specifying new values to replace the old user database, which the admin application will overwrite. You don’t have a backup in this case, though.
To create a new user, click the User Actions box and select Create New User. You’ll see a screen like in Figure 11-10.
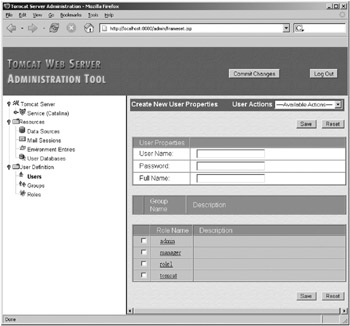
Figure 11-10: Creating a new user
Click the Save button. After clicking Save, open tomcat-users.xml and check that your new user has been added. You don’t need to click Commit Changes in this case, unless you’ve made changes elsewhere and want to restart the server and overwrite server.xml. Your user is now available to Tomcat for authentication. If you gave the user the admin role, log out of the admin application and try to log in as the new user. Their details should allow you to access the admin application.
Protecting a Resource with a Realm
It’s usually a Web application developer who will specify which resources need to be protected, though you’ll have your own applications you want to protect, such as the admin and manager Web applications.
You saw the important security-related elements of web.xml in Chapter 5. You use these elements to specify the Web resource to protect and the way in which you want to protect it.
The security-related elements from web.xml are as follows:
-
<security-constraint>: Protects a group of Web resources and specifies the role that a user must have before accessing the resource.
-
<web-resource-collection>: A subelement of <security-constraint>. This specifies the Web resources that this security constraint protects. This can be a URL pattern using wildcard notation or an HTTP method. In other words, you can protect physical resources or protect access from certain access methods.
-
<auth-constraint>: A subelement of <security-constraint>. This specifies the roles that are allowed to access resources covered by this security constraint.
-
<user-data-constraint>: Specifies the data transport security constraint. This can be NONE, INTEGRAL, or CONFIDENTIAL. NONE specifies that no transport guarantee is required. INTEGRAL specifies that the data must not be changed in transit. CONFIDENTIAL specifies that others may not view the date in transit. The last two mean that HTTPS must be used.
-
<login-config>: Specifies the type of authentication Tomcat should perform. The choices are BASIC, DIGEST, FORM, or SSL client methods for authentication. BASIC uses the browser’s password request box but transmits the username and password in unencrypted text. DIGEST uses the browser’s password request box and encryption. This isn’t always well supported by browsers. FORM allows you to specify a custom login form, like the admin application. The SSL client methods require digital certificates. You’ll learn more about them in Chapter 12.
-
<security-role>: Specifies the security roles used within this Web application.
You’ve seen these used in various incarnations throughout the book so far, but I won’t discuss them in detail until Chapter 12 because they’re security configuration, not realm configuration.
However, Listing 11-7 shows how to set up basic protection for the ch11 directory of the tomcatBook Web application.
Listing 11-7: A Simple Security Setup
<?xml version="1.0" encoding="ISO-8859-1"?> <web-app xmlns="http://java.sun.com/xml/ns/j2ee" xmlns:xsi="http://www.w3.org/2001/XMLSchema-instance" xsi:schemaLocation="http://java.sun.com/xml/ns/j2ee http://java.sun.com/xml/ns/j2ee/web-app_2_4.xsd" version="2.4"> <!-- Describe a DataSource --> <resource-ref> <description> Resource reference to a factory for java.sql.Connection instances that may be used for talking to a particular database that is configured in the tomcatBook.xml file. </description> <res-ref-name> jdbc/CatalogDB </res-ref-name> <res-type> javax.sql.DataSource </res-type> <res-auth> SERVLET </res-auth> </resource-ref> <!-- Define a Security Constraint on this application --> <security-constraint> <web-resource-collection> <web-resource-name>Tomcat Book Application</web-resource-name> <url-pattern>/ch11/*</url-pattern> </web-resource-collection> <auth-constraint> <role-name>tomcat</role-name> </auth-constraint> </security-constraint> <!-- Define the Login Configuration for this Application --> <login-config> <auth-method>BASIC</auth-method> <realm-name>Tomcat Book Application</realm-name> </login-config> <!-- Security roles referenced by this Web application --> <security-role> <description> The role that is required to log in to the TomcatBook application </description> <role-name>tomcat</role-name> </security-role> </web-app>
Configuring a JDBC Realm
Now that you’re familiar with realms in general, and file-based realms in particular, it’s time to introduce JDBC realms. JDBC realms use relational databases as their data storage mechanism and can be extremely useful if you have an existing user database that contains usernames and passwords. They’re even better if the database already contains the roles each user has. Even if this isn’t the case, you can easily add another table to the database.
JDBC realms allow you to seamlessly integrate Tomcat into your existing network infrastructure. You gain all the advantages of using a common database for all your users, which include making database maintenance easy, making code maintenance easy, and removing the need to rewrite any application code. Like the user database, a JDBC realm is up-to-date and reflects any changes in your common database.
Even if you don’t have a common database, a JDBC realm is a good option for your realm, especially if you have any database applications running on your server. Using the same database server as Tomcat’s Web applications won’t adversely affect performance and brings some of the advantages outlined previously, namely ease of maintenance. JDBC realms are robust, and you can easily secure databases against unauthorized entry. It’s certainly more difficult for casual observers to view user information in a database than it is to view it in a text file residing in Tomcat’s directory structure.
Creating a JDBC Realm’s Data Store
JDBC realms are designed to be integrated with existing user databases, and as such their configuration maps to a common user database setup. Each of the configuration parameters you saw in tomcat-users.xml has a corresponding parameter in a JDBC realm, so a database should contain a username column, a user password column, and a user role column associated with a username. Following good database design, the username and password should be stored in one table and the username and role should be stored in another table, as shown in Figure 11-11.
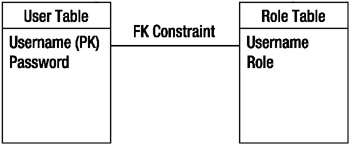
Figure 11-11: The JDBC realm table schema
The user table has a username field, which is the primary key, and a password field. This ensures that all usernames are unique, as should be the case in any existing database. The role table also has a username field, which is linked to user.username with a foreign key constraint to enforce relational integrity. There’s no primary key, though you should use a compound primary key if your database allows it, either of which means there may be more than one role assigned to a username in the role table. Each combination is given its own row.
These tables and fields don’t have to follow any naming conventions because you can configure the JDBC realm to use any table and fields you want. This is all part of the graceful integration that makes JDBC realms so easy to use.
You configure JDBC realm definitions in a realm element at the level of any container component, just like the file-based realms previously described. Table 11-2 shows the JDBC realm’s attributes.
| Attribute | Description | Required? |
|---|---|---|
| className | The Java class that implements the JDBC realm. This must be org.apache.catalina.realm.JDBCRealm. | Yes |
| connectionName | The JDBC connection username to be used. | Yes |
| connectionPassword | The JDBC connection password to be used. | Yes |
| connectionURL | The JDBC connection URL used to access the database instance. | Yes |
| debug | Tomcat 5.0.x only. Controls the level of debugging information that’s printed to the log file. The default is zero. | No |
| digest | Specifies the digest algorithm for the password (as used by the java.security.MessageDigest class). The default is plain text. | No |
| driverName | The JDBC driver. | Yes |
| userTable | The name of the users table in the database. | Yes |
| userNameCol | The username column in the userTable table and the userRoleTable table. | Yes |
| userCredCol | The password column in the userTable. | Yes |
| userRoleTable | The user role table in the database. | Yes |
| roleNameCol | The role column in the userRoleTable. | Yes |
As you can see, it’s a straightforward task to specify the database server, the user and role tables, and the username, password, and role columns. server.xml contains three JDBC realms by default: MySQL, Oracle, and ODBC. Let’s examine how to work with MySQL before looking at ODBC.
Configuring a MySQL JDBC Realm
Listing 11-8 shows the default MySQL setting in server.xml. You shouldn’t change its className and driverName attributes because they’re required when using a MySQL JDBC realm. You should make sure that the MySQL driver is in Tomcat’s classpath. For details of obtaining and installing a MySQL driver, see Chapter 10.
Listing 11-8: The Default MySQL JDBC Realm in server.xml
<!-- <Realm className="org.apache.catalina.realm.JDBCRealm" debug="99" driverName="org.gjt.mm.mysql.Driver" connectionURL="jdbc:mysql://localhost/authority" connectionName="test" connectionPassword="test" userTable="users" userNameCol="user_name" userCredCol="user_pass" userRoleTable="user_roles" roleNameCol="role_name" /> -->
You should note, however, that the MySQL driver is no longer called org.gjt.mm.mysql.Driver, though this class is still supplied in the driver JAR file for backward compatibility. You should use com.mysql.jdbc.Driver for all other purposes.
Before you change any of these values, you should ensure you have a database ready. In this example you’ll be replicating the tomcat-users.xml file from Listing 11-3, digested admin password and all. Listing 11-9 shows a SQL script (realmDB.sql) that will create the database, the tables, and the columns. It will also insert the user data from Listing 11-3.
Listing 11-9: A SQL Script to Set Up the JDBC Realm in MySQL
CREATE DATABASE realmDB; USE realmDB; CREATE TABLE deptusers ( apressusername VARCHAR(15) NOT NULL PRIMARY KEY, password VARCHAR(40) NOT NULL ) TYPE=InnoDB; CREATE TABLE deptroles ( apressusername VARCHAR(15) NOT NULL, apressrole VARCHAR(15) NOT NULL, PRIMARY KEY (apressusername, apressrole), FOREIGN KEY (apressusername) REFERENCES deptusers(apressusername) ON DELETE CASCADE ) TYPE=InnoDB; INSERT INTO deptusers VALUES ('tomcat', 'tomcat'); INSERT INTO deptusers VALUES ('both', 'tomcat'); INSERT INTO deptusers VALUES ('role1', 'tomcat'); INSERT INTO deptusers VALUES ('admin', 'd033e22ae348aeb5660fc2140aec35850c4da997'); INSERT INTO deptroles VALUES ('tomcat', 'tomcat'); INSERT INTO deptroles VALUES ('both', 'tomcat'); INSERT INTO deptroles VALUES ('both', 'role1'); INSERT INTO deptroles VALUES ('role1', 'role1'); INSERT INTO deptroles VALUES ('admin', 'admin'); MySQL provides MD5() and SHA() functions to digest passwords as they’re placed into the database. The SHA() function is available only in MySQL 4.0.2 onward, so you still have to use Tomcat’s digest script to calculate the digest if you have an older version. Change the digested line to the following as appropriate if you want to use these functions:
# Can be used in all versions of MySQL INSERT INTO deptusers VALUES ('admin', MD5('admin')); # MySQL 4.0.2 onwards INSERT INTO deptusers VALUES ('admin', SHA('admin')); Remember to delete this script when you’ve finished, though.
Versions of MySQL older than 3.23.44 don’t support foreign keys, but they will parse the script, and newer versions of the MySQL 3.23 series must use InnoDB tables as specified in Listing 11-9. MySQL 4 uses InnoDB tables by default. The absence of foreign key support isn’t too big a problem; you must just be careful when modifying the database.
To check whether InnoDB tables are enabled on your server, run the following in MySQL:
mysql> SHOW VARIABLES LIKE 'have_%';
If InnoDB tables are enabled, you’ll see the following:
+---------------+-------+ | Variable_name | Value | +---------------+-------+ | have_bdb | YES | | have_gemini | NO | | have_innodb | YES | | have_isam | YES | | have_raid | NO | | have_openssl | NO | +---------------+-------+
6 rows in set (0.00 sec)
If the have_innodb variable is set to DISABLED, then your server has the potential to use InnoDB tables, and you’ll have to configure them. Add the following line under the [mysqld] section to your my.ini file (through the MySQL admin interface) on Windows or your MYSQL_HOME/data/my.cnf file on other platforms:
innodb_data_file_path = ibdata1:30M:autoextend
This creates a 30MB store for InnoDB tables in the MYSQL_HOME/data directory that grows if required. Restart the server, and check that InnoDB tables are enabled.
To run the realmDB.sql script, log into the MySQL server and run the following, assuming the script is in MySQL’s bin directory:
mysql> \. ./realmDB.sql
You should create a user in MySQL that will allow Tomcat to read the values in the user database. This follows a similar pattern to the read-only user you created in Chapter 10. You could even use the same read-only user if you wanted, though you still have to execute a new GRANT command. The following creates a tomcat read-only user in the MySQL privileges database:
mysql> GRANT SELECT ON realmDB.* -> TO 'tomcat'@'localhost' -> IDENTIFIED BY 'meow';
Now that you’ve prepared the database, you should create the realm definition in server.xml. Listing 11-10 shows the settings for the realmDB database, though you should change the connectionName and connectionPassword attributes if you have a different username and password than the ones just shown. Comment out any other realm definitions.
Listing 11-10: The Example MySQL JDBC Realm Configuration
<Realm className="org.apache.catalina.realm.JDBCRealm" debug="99" driverName="com.mysql.jdbc.Driver" connectionURL="jdbc:mysql://localhost/realmDB" connectionName="tomcat" connectionPassword="meow" userTable="deptusers" userNameCol="apressusername" userCredCol="password" userRoleTable="deptroles" roleNameCol="apressrole" digest="sha" />
You should now test the realm by visiting a protected resource, such as the admin application. If the setup was successful, you’ll be able to log in using the admin user as before. Open the Service node, and click the Realm node. You’ll see that Tomcat is using the MySQL JDBC realm for authentication, as shown in Figure 11-12.
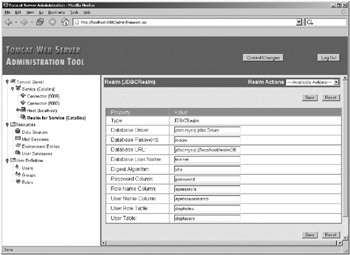
Figure 11-12: The admin application shows that Tomcat is using the new realm.
Configuring an ODBC JDBC Realm
For this example you’ll use an Access database as the ODBC data source, though SQL server or Excel spreadsheets are just as easy. Create the two tables as described in the previous section, with a relationship as shown in Figure 11-13.
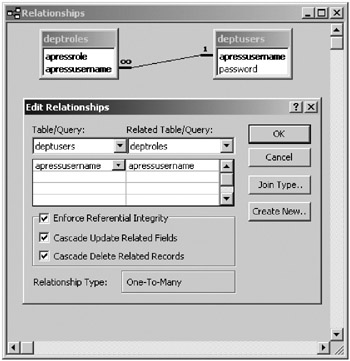
Figure 11-13: The relationship between deptroles and deptusers
Now you need to populate the tables. Access allows you to add data to the deptroles table while you’re adding data to the deptusers table: the beauty of defining a relationship. Add the data as shown in Figure 11-14, using Tomcat’s digest utility to create the digested password for the admin user.
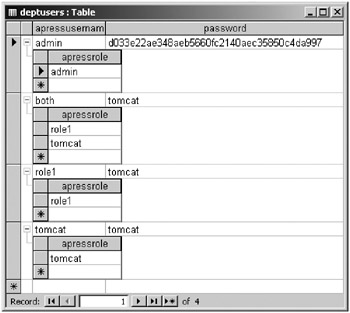
Figure 11-14: The data in deptroles and deptusers
Of course, you may already have data you can use. The final step of configuration for Access is to add a Windows data source. Click Start ![]() Settings
Settings ![]() Control Panel
Control Panel ![]() Administrative Tools
Administrative Tools ![]() Data Sources (ODBC). Choose a System DSN, and click Add.
Data Sources (ODBC). Choose a System DSN, and click Add.
Choose an Access (*.mdb) driver, and fill in the details as shown in Figure 11-15; you can browse to the database by clicking Select.
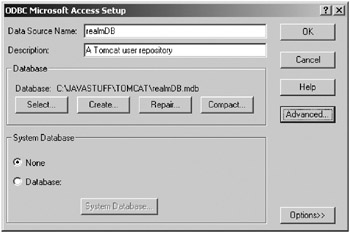
Figure 11-15: Configuring an ODBC data source
Click Advanced to set a username and password. In this case, enter the username tomcat and the password meow.
The JDBC ODBC driver is part of the Java distribution, so you don’t need to add any JAR files to Tomcat’s classpath. This just leaves the realm configuration in server.xml. Comment out any other realms, and add the definition as shown in Listing 11-11.
Listing 11-11: A JDBC Realm Using an ODBC Data Source
<Realm className="org.apache.catalina.realm.JDBCRealm" debug="99" driverName="sun.jdbc.odbc.JdbcOdbcDriver" connectionURL="jdbc:odbc:realmDB" connectionName="tomcat" connectionPassword="meow" userTable="deptusers" userNameCol="apressusername" userCredCol="password" userRoleTable="deptroles" roleNameCol="apressrole" digest="sha" />
You shouldn’t change the className or driverName options because they’re standard for ODBC JDBC realms. The connectionURL option is the name of the ODBC data source you configured earlier, and the other settings correspond to the database and user details you added. The password for the admin Tomcat user is digested with the SHA algorithm, so enter the digest attribute sha.
Start Tomcat, and attempt to log into the admin application using this setup. If all went well, you’ll be able to log in successfully. Open the Service node, and click the Realm node. You’ll see that Tomcat is using the ODBC JDBC realm for authentication, as shown in Figure 11-16.
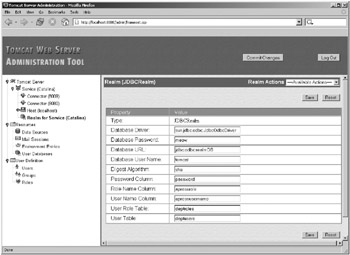
Figure 11-16: The admin application shows that Tomcat is using the new realm.
Configuring JNDI Realms
JNDI realms also allow you to use existing data, this time in the form of directory services. To use a JNDI realm, you must be able to map the configuration attributes to an existing directory schema. This is similar to the process of mapping database tables and columns to Tomcat login details. Table 11-3 shows the attributes for the JNDI realm.
| Attribute | Description | Required? |
|---|---|---|
| className | Class name of the JNDI realm implementation. Must be org.apache.catalina.realm.JNDIRealm. | Yes |
| connectionName | The username used to log into the directory service. Not required if simple binding is in use. | No |
| connectionPassword | The password used to log into the directory service. Not required if simple binding is in use. | No |
| connectionURL | The URL of the directory service. | Yes |
| contextFactory | The class used to create the context for the JNDI connection. The standard JNDI LDAP provider is sufficient in most cases. | No |
| debug | The level of debugging messages that will be logged. | No |
| digest | Specifies the digest algorithm used to digest the user’s password. This attribute is ignored if you don’t specify userPassword. | No |
| roleBase | The base element for role searches. The default is the top-level element. | No |
| roleName | The name of the directory attribute that contains the role name. | No |
| roleSearch | An LDAP pattern for searching the directory for roles. The {0} placeholder inserts the user’s distinguished name, and {1} inserts the username. Often these are the same. | No |
| roleSubtree | If set to true, a subtree search will be conducted for the role. The default is false. | No |
| userBase | The base element for user searches using the userSearch attribute. This isn’t used if you’re using the userPattern expression. The default is the top-level element in the directory context. | No |
| userPassword | The name of the user element’s directory attribute that contains the password information. | No |
| userPattern | An LDAP pattern for searching the directory for a user entry. The {0} placeholder inserts the username entered by the user. | No |
| userRoleName | The name of an attribute in the user’s directory entry containing zero or more roles assigned to the user. If userRoleName isn’t specified, all the roles for a user derive from the role search. | No |
| userSearch | The LDAP filter expression for searching for a user’s directory entry. {0} inserts the username as entered by the user. Use this property (along with the userBase and userSubtree properties) instead of userPattern to search the directory for the user’s entry. | No |
| userSubtree | Set to true if you want to search the entire subtree of the element specified by the userBase property for the user’s entry. The default value of false causes only the top level to be searched. Not used if you’re using the userPattern expression. | No |
Let’s see some of these attributes in action, because JNDI realms are slightly more complicated than the other realm types.
Setting Up a Directory Server
If you don’t already have a directory server, then you may want to install OpenLDAP (http://www.openldap.org). It’s a free, open-source directory server that uses Lightweight Directory Access Protocol (LDAP), and you can use its services via a JNDI driver, which means you can also use it as a JNDI realm data repository. Download the server, and install it in a convenient location (LDAP_HOME for the purposes of this discussion). A Windows binary is available at http://download.bergmans.us/openldap/.
The main configuration file is LDAP_HOME/slapd.conf. The default file already contains a number of settings, none of which you should have to change. However, you may need to add some settings. Listing 11-12 shows the minimum you’ll require (using OpenLDAP 2.2).
Listing 11-12: The Settings in slapd.conf
ucdata-path C:/openldap/ucdata include C:/openldap/etc/schema/core.schema include C:/openldap/etc/schema/cosine.schema include C:/openldap/etc/schema/inetorgperson.schema pidfile C:/openldap/var/slapd.pid argsfile C:/openldap/var/slapd.args database bdb suffix dc="mycompany,dc=com" rootdn "cn=Manager,dc=mycompany,dc=com" rootpw secret directory C:/openldap/var/openldap-data
You should, of course, change the paths to suit your system. The include directives at the beginning of the file include object definitions that you’ll use when adding users and roles to the directory. The suffix attribute specifies the domain in which this directory server is running, and the rootdn and rootpw attributes set the admin user and password for this directory server. The directory attribute specifies where the directory files will be stored.
Once you’ve modified slapd.conf, start the directory server.
> slapd -d 1
The directory server will listen on port 339 (the default LDAP port) and will report at debug level 1. Now that the directory server is running, you can add entries to the directory using LDAP Data Interchange Format (LDIF). LDIF is a text-based directory description format that’s processed by client tools so that directory entries can be added.
Again, you’ll replicate the information in tomcat-users.xml in LDIF. Create a file called realmDB.ldif, and add the entries shown in Listing 11-13.
Listing 11-13: The Users and Roles from tomcat-users.xml in LDIF
# Define top-level entry dn: dc=mycompany,dc=com objectClass: dcObject objectClass: organization dc: mycompany o: mycompany # Define an entry to contain people # searches for users are based on this entry dn: ou=people,dc=mycompany,dc=com objectClass: organizationalUnit ou: people # Define a user entry for tomcat dn: uid=tomcat,ou=people,dc=mycompany,dc=com objectClass: inetOrgPerson uid: tomcat sn: tomcat cn: tomcat user userPassword: tomcat # Define a user entry for role1 dn: uid=role1,ou=people,dc=mycompany,dc=com objectClass: inetOrgPerson uid: role1 sn: role1 cn: role1 user userPassword: tomcat # Define a user entry for both dn: uid=both,ou=people,dc=mycompany,dc=com objectClass: inetOrgPerson uid: both sn: both cn: both user userPassword: tomcat # Define a user entry for admin dn: uid=admin,ou=people,dc=mycompany,dc=com objectClass: inetOrgPerson uid: admin sn: admin cn: admin user userPassword: d033e22ae348aeb5660fc2140aec35850c4da997 # Define an entry to contain LDAP groups # searches for roles are based on this entry dn: ou=groups,dc=mycompany,dc=com objectClass: organizationalUnit ou: groups # Define an entry for the "tomcat" role dn: cn=tomcat,ou=groups,dc=mycompany,dc=com objectClass: groupOfUniqueNames cn: tomcat uniqueMember: uid=tomcat,ou=people,dc=mycompany,dc=com uniqueMember: uid=both,ou=people,dc=mycompany,dc=com # Define an entry for the "role1" role dn: cn=role1,ou=groups,dc=mycompany,dc=com objectClass: groupOfUniqueNames cn: role1 uniqueMember: uid=role1,ou=people,dc=mycompany,dc=com uniqueMember: uid=both,ou=people,dc=mycompany,dc=com # Define an entry for the "admin" role dn: cn=admin,ou=groups,dc=mycompany,dc=com objectClass: groupOfUniqueNames cn: admin uniqueMember: uid=admin,ou=people,dc=mycompany,dc=com
Here you’ve added the users to the people group, which is part of the mycompany.com domain. Table 11-4 shows what each of the user attributes means.
| Attribute | Description |
|---|---|
| cn | This user’s common name, which can be used as a description. |
| dn | The user’s distinguished name, which makes it unique within the directory. This is used when searching for a user. |
| objectClass | The object that models this user. The inetOrgPerson is a standard definition of a person with common attributes, such as e-mail addresses and telephone numbers. |
| sn | The user’s surname. |
| uid | The unique username for this person. |
| userPassword | The password of this user. |
The roles are added to a groups called groups and follow the same pattern as the users. The uniqueMember attribute specifies a member of that role using the user’s distinguished name. If you’re interested in seeing how objects and attributes are linked together, examine the *.schema files in LDAP_HOME/etc/schema.
You have two choices for adding these entries to the directory: online or offline. You should create the database online using LDAP only when creating small databases (1 to 2,000 entries) because it uses the directory server to create the database. Clients can also access the database while an online operation is in progress, meaning that large, slow updates will result in problems. The offline method creates the database files directly without going through the directory server.
To add the entries to the directory online, use the ldapadd utility that comes with OpenLDAP:
> ldapadd -x -D "cn=Manager,dc=mycompany,dc=com" -w secret -f realmDB.ldif adding new entry "dc=mycompany,dc=com" adding new entry "ou=people,dc=mycompany,dc=com" adding new entry "uid=tomcat,ou=people,dc=mycompany,dc=com" adding new entry "uid=role1,ou=people,dc=mycompany,dc=com" adding new entry "uid=both,ou=people,dc=mycompany,dc=com" adding new entry "uid=admin,ou=people,dc=mycompany,dc=com" adding new entry "ou=groups,dc=mycompany,dc=com" adding new entry "cn=tomcat,ou=groups,dc=mycompany,dc=com" adding new entry "cn=role1,ou=groups,dc=mycompany,dc=com" adding new entry "cn=admin,ou=groups,dc=mycompany,dc=com"
The -x switch tells the ldapadd client to connect to the directory server using the simple bind method, as opposed to an encrypted method. In this case, the username and password are sent in plain text. -D specifies the bind distinguished name, essentially the username for the domain you’re configuring, and -w specifies the password. The -f switch specifies the LDIF file to use for creating the directory entries.
To add the entries offline, use the slapadd utility.
> slapadd -v -l realmDB.ldif -f slapd.conf added: "dc=mycompany,dc=com" (00000001) added: "ou=people,dc=mycompany,dc=com" (00000002) added: "uid=tomcat,ou=people,dc=mycompany,dc=com" (00000003) added: "uid=role1,ou=people,dc=mycompany,dc=com" (00000004) added: "uid=both,ou=people,dc=mycompany,dc=com" (00000005) added: "uid=admin,ou=people,dc=mycompany,dc=com" (00000006) added: "ou=groups,dc=mycompany,dc=com" (00000007) added: "cn=tomcat,ou=groups,dc=mycompany,dc=com" (00000008) added: "cn=role1,ou=groups,dc=mycompany,dc=com" (00000009) added: "cn=admin,ou=groups,dc=mycompany,dc=com" (0000000a)
-v specifies verbose mode, -l specifies the LDIF file, and -f is the slapd configuration file.
To test that your entries are in the directory, use the ldapsearch tool, as follows, where -b is the base distinguished name to search:
> ldapsearch -b "dc=mycompany,dc=com"
If the search is successful, you’ll see output that’s similar to realmDB.ldif with the passwords scrambled.
To delete the entries, use ldapdelete with the -r switch to do a recursive delete.
> ldapdelete -x -D "cn=Manager,dc=mycompany,dc=com" -w secret -r "dc=mycompany, dc=com"
Adding the JNDI Realm
You now need to configure the realm in Tomcat’s server.xml file. Listing 11-14 shows a realm definition that will connect to the directory server with an anonymous login and search for users and roles according to the username entered by the user:
Listing 11-14: A JNDI Realm in server.xml
<Realm className="org.apache.catalina.realm.JNDIRealm" debug="99" connectionURL="ldap://localhost:389" userPassword="userPassword" userPattern="uid={0},ou=people,dc=mycompany,dc=com" roleBase="ou=groups,dc=mycompany,dc=com" roleName="cn" roleSearch="(uniqueMember={0})" digest="sha" /> You shouldn’t change the className or connectionURL attributes because they’re standard for JNDI realms. The userPassword attribute specifies which attribute in a user’s directory entry should be used for password comparison when trying to log into an application.
The userPattern attribute tells the driver which pattern should be used when searching for a user. If you look at the previous realmDB.ldif file, you’ll see that each user is specified with a distinguished name in the form given in this attribute. When the user types in their username, it will be substituted in this string and the result will be used to search for that user. If that user is found then they have been authenticated for the purposes of this realm. However, they still must be authorized.
The role* attributes combine in the search for a user role. roleBase tells the directory server where to begin the search, in this case with the groups organizational unit. The roleName attribute specifies which attribute in a role’s entry should be used to identify its name. Once a role has been identified with this directory attribute, the attribute specified in roleSearch is used to confirm that a user is a member of that role.
The digest attribute is used as in other realms.
Start Tomcat, and attempt to log into the admin application using this setup. If all went well, you’ll be able to log in successfully. Open the Service node, and click the Realm node. You’ll see that Tomcat is using the JNDI realm for authentication, as shown in Figure 11-17.
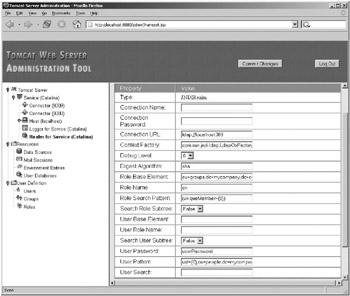
Figure 11-17: The admin application shows that Tomcat is using the new realm.
For a further insight into the communication between Tomcat and the directory server, examine the log for the service component. You should see something similar to Listing 11-15.
Listing 11-15: The Communication Between Tomcat and the Directory Server
JNDIRealm[Catalina]: Connecting to URL ldap://localhost:389 JNDIRealm[Catalina]: lookupUser(admin) JNDIRealm[Catalina]: dn=uid=admin,ou=people,dc=mycompany,dc=com JNDIRealm[Catalina]: retrieving attribute userPassword JNDIRealm[Catalina]: validating credentials JNDIRealm[Catalina]: Username admin successfully authenticated JNDIRealm[Catalina]: getRoles(uid=admin,ou=people,dc=mycompany,dc=com) JNDIRealm[Catalina]: Searching role base 'ou=groups,dc=mycompany,dc=com' for attribute 'cn' JNDIRealm[Catalina]: With filter expression '(uniqueMember=uid=admin,ou=people,dc=mycompany,dc=com)' JNDIRealm[Catalina]: retrieving values for attribute cn JNDIRealm[Catalina]: Returning 1 roles JNDIRealm[Catalina]: Found role admin
Here you can see the two steps mentioned previously. The directory server authenticates the user by looking up the user’s distinguished name, using the string built with the username. The directory server finds the user and retrieves the password attribute for comparison by Tomcat. Tomcat validates the user’s credentials and tells the directory server that it can authenticate the user, which it does.
The directory server then tries to find a role that’s associated with this user and returns the value of the cn attribute. This value is then used by Tomcat to authorize the user’s access to the resource. Note how all the attribute values in this communication were specified in server.xml.
EAN: 2147483647
Pages: 94