Form and Context Menus
|
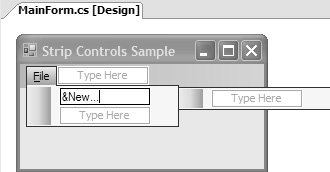
As interesting as forms themselves arewith their lifetime, adornments, transparency settings, and input optionsthey're all the more interesting when they contain controls. Apart from system-provided adornments like the control box and minimize and maximize buttons, the most likely adornment to appear on a main form is the menu strip. You can add a menu strip to your form by dragging a MenuStrip component onto it from the Toolbox. [17] The MenuStrip Designer allows you to build a menu strip interactively using MenuStrip's design surface, illustrated in Figure 2.19.
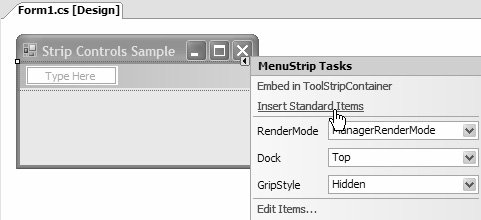
Figure 2.19. The VS05 MenuStrip Control Designer To save yourself some effort, you can use MenuStrip's handy "Insert Standard Items" smart tag option, shown in Figure 2.20. [18]
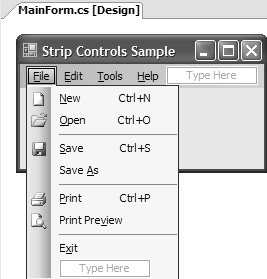
Figure 2.20. MenuStrip Smart Tag Option for Inserting Standard Items This feature automatically generates a complete set of typical menus and menu items, including File, Edit, Tools, and Help, as shown in Figure 2.21. Figure 2.21. MenuStrip with Standard Menus and Menu Items Inserted Your form can host one or more menu strips, all of which can be visible at run time. You can hide or show a MenuStrip by setting its Visible property: // MainForm.cs partial class MainForm : Form { public MainForm() { InitializeComponent(); this.mainMenuStrip.Visible = true; this.alternateMenuStrip.Visible = false; } ... } Sometimes, forms require knowledge of a particular menu strip to perform special, integrated behavior, such as MDI menu merging as discussed later in this chapter. You provide this knowledge to a form by setting its MainMenuStrip property with the appropriate menu strip, which also specifies which menu receives shortcut keys (Alt+...). The Windows Forms Designer automatically sets MainMenuStrip in InitializeComponent to the first menu strip dropped onto a form: // MainForm.Designer.cs partial class MainForm { ... void InitializeComponent() { ... this.MainMenuStrip = this.mainMenuStrip; ... } } public MainForm() { InitializeComponent(); this.MainMenuStrip = this.mainMenuStrip; }Additionally, you can set MainMenuStrip to any menu strip control either by writing code like this or by using the Properties window. The MenuStrip control can contain zero or more top-level menus via its Items property, which is of type ToolStripItemCollection. By default, the Designer automatically adds a ToolStripMenuItem. However, you can use the Windows Forms Designer to add several types of tool strip items, including ToolStripMenuItem, ToolStripComboBox, and ToolStripTextBox for the top-level menu, and the same with the additional ToolStripSeparator for drop-down menus. [19]
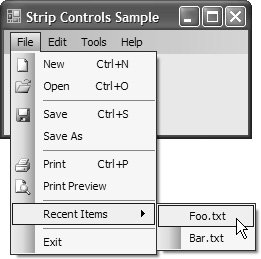
Each top-level menu that is a ToolStripMenuItem can also contain zero or more MenuStripItemTypes, which are stored in the DropDownItems property. If a menu item contains zero or more menu items of its own, they show up in a cascading menu, as shown in Figure 2.22. Figure 2.22. Cascading Menu Items Figure 2.23 shows the objects used to provide the menu strip in Figure 2.22. Figure 2.23. Internal Structure of MenuStrip, ToolStripItemCollection, and ToolStripMenuItems The MenuStrip designer transforms your menu structure into an equivalent set of initialization code, appropriately stored in InitializeComponent (something that really makes you appreciate the Designer): // MainForm.Designer.cs using System.Windows.Forms; partial class MainForm : Form { ... MenuStrip mainMenuStrip; ToolStripMenuItem fileToolStripMenuItem; ... void InitializeComponent() { ... this.mainMenuStrip = new MenuStrip(); this.fileToolStripMenuItem = new ToolStripMenuItem(); ... // mainMenuStrip this.mainMenuStrip.Items.AddRange( new ToolStripItem[] { this.fileToolStripMenuItem, ... } ); this.mainMenuStrip.Location = new System.Drawing.Point(0, 0); this.mainMenuStrip.Name = "mainMenuStrip"; this.mainMenuStrip.Size = new System.Drawing.Size(244, 24); this.mainMenuStrip.TabIndex = 0; ... // fileToolStripMenuItem this.fileToolStripMenuItem.DropDownItems.AddRange( new ToolStripItem[] { this.newToolStripMenuItem, ... } ); this.fileToolStripMenuItem.Name = "fileToolStripMenuItem"; this.fileToolStripMenuItem.Text = "&File"; ... // MainForm ... this.Controls.Add(this.mainMenuStrip); } ... }The ToolStripMenuItem type includes the following interesting properties and events: namespace System.Windows.Forms { class ToolStripMenuItem : ToolStripDropDownItem { // Properties bool Checked { get; set; } bool CheckOnClick { get; set; } CheckState CheckState { get; set; } override bool Enabled { get; set; } virtual Image Image { get; set; } ContentAlignment ImageAlign { get; set; } MergeAction MergeAction { get; set; } int MergeIndex { get; set; } ToolStripItemOverflow Overflow { get; set; } Keys ShortcutKeys { get; set; } bool ShowShortcutKeys { get; set; } string ShortcutKeyDisplayString { get; set; } bool Visible { get; set; } virtual string Text { get; set; } // Events event EventHandler CheckedChanged; event EventHandler CheckStateChanged; event EventHandler Click; event EventHandler DropDownClosed; event ToolStripItemClickedEventHandler DropDownItemClicked; event EventHandler DropDownOpened; } }Here are the major properties to focus on:
Of course, the Click event handler is the big celebrity in the menu item list of events, because it gets fired when the user clicks on a menu item: void exitToolStripMenuItem_Click(object sender, EventArgs e) { this.Close(); } void helpToolStripMenuItem_Click(object sender, EventArgs e) { MessageBox.Show("Ain't menus cool?", "About..."); } MenuStrips normally provide access to all available menu commands at once, no matter what's happening on a form. Sometimes, however, you may need to show a subset of the available menu commands that is specific to what is happening on the form, depending on the context of the current activity. For this, you use context menus.[20]
Context Menus
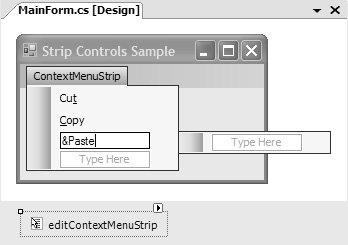
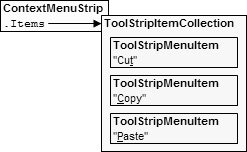
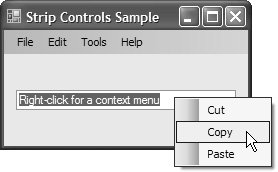
Whereas forms can have zero or more menus, forms and controls can have at most one context menu each, the value of which is stored in the ContextMenuStrip property: public MainForm() { InitializeComponent(); this.ContextMenuStrip = this.editContextMenuStrip; }Like a MenuStrip control, a ContextMenuStrip can contain zero or more tool strip items, also exposed by a ToolStripItemCollection Items property. Unlike the MenuStrip, however, ContextMenuStrip items have no concept of items "across the top"; context menus are always vertical at every level. Therefore, every ToolStripItem in the Items property is a ToolStripMenuItem, as reflected in the ContextMenuStrip Designer illustrated in Figure 2.24. Figure 2.24. ContextMenuStrip Designer As you can see, the top-level menu item, ContextMenuStrip, is only a temporary placeholder supplied by the Context Menu Designer to enable visual editing of the context menu. Figure 2.25 shows how these are arranged internally to construct the context menu in Figure 2.24. Figure 2.25. Internal Structure of ContextMenuStrip, ToolStripItemCollection, and ToolStripMenuItems The one remaining behavioral difference between MenuStrip objects and ContextMenuStrip objects is that both forms and controls have a ContextMenuStrip property to let you specify the ContextMenuStrip that appears when the right mouse button is clicked, whereas only forms have a MainMenuStrip property. After a context menu is assigned, users can display it by right-clicking over the form or control it was assigned to, such as the text box in Figure 2.26. Figure 2.26. ContextMenuStrip in Action Although many controls have their own context menusfor example, the context menu of a TextBox has things such as Copy and Pasteyou can replace a control's built-in context menu by setting the control's ContextMenuStrip property. As a rule, most of the operations available from any control's context menu are also available as methods on the control. Because of this, while you can't augment a control's context menu, you can replace it with your own and still provide the operations that the control's menu would provide, implementing those options by sending the command to the control itself: void copyToolStripMenuItem_Click(object sender, EventArgs e) { this.textBox.Copy(); } |
EAN: 2147483647
Pages: 216