Form Transparency
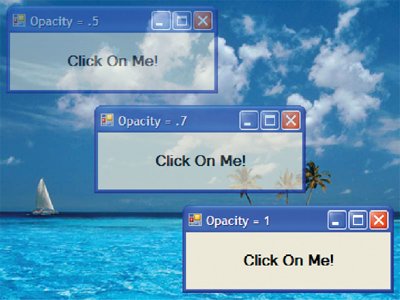
| In addition to the properties that specify how the nonclient area of a form are rendered by Windows, the Form class provides a set of properties that allow you to change the appearance of the form as a whole, including making it partially transparent or removing pieces of the form altogether. Opacity is the property that governs transparency for an entire form; it defaults to 1.0, or 100% opaque. A value between 0.0 and 1.0 denotes a degree of opacity using the alpha-blending support in more modern versions of Windows, where any number less than 1.0 results in a partially transparent form. [15] Opacity is mostly a parlor trick, but it's fun for making top-level windows less annoying than they normally are:
// MainForm.cs partial class MainForm : Form { ... void MainForm_Activated(object sender, EventArgs e) { this.timer.Enabled = true; } void MainForm_Deactivate(object sender, EventArgs e) { this.timer.Enabled = false; this.Opacity = 0.5; this.Text = "Opacity = " + this.Opacity.ToString(); } void timer_Tick(object sender, EventArgs e) { if( this.Opacity < 1.0 ) { this.Opacity += 0.1; this.Text = "Opacity = " + this.Opacity.ToString(); } else this.timer.Enabled = false; } } // MainForm.Designer.cs partial class MainForm { ... void InitializeComponent() { ... this.Opacity = 0.5; this.Text = "Opacity = 0.5"; this.TopMost = true; ... }This example shows code from a top-level form whose Opacity property starts at 50%. When the form is activated, it starts a timer that increases the Opacity by 10% on each tick, giving a nice "fade in" effect, as shown in Figure 2.16. When the form is deactivated, it is reset to 50% opaque, making it available for viewing and clicking but hopefully not obscuring too much. Figure 2.16. Opacity in Action (See Plate 4) Nonrectangular FormsOpacity affects the transparency of the entire form. You can also change the shape of the form by making parts of it completely transparent. [16] One way is to use the TransparencyKey property, which lets you designate a color to use in marking transparent pixels. When a pixel on the form is supposed to be drawn with the transparent key color, that pixel instead is removed from the form, in two senses: The pixel is not drawn, and clicking on that spot actually results in a click on what's showing through from underneath.
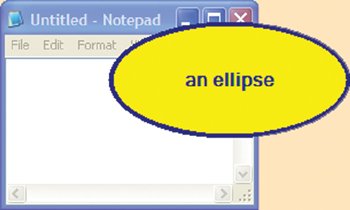
For example, setting TransparencyKey to the same as BackColor causes a form to lose its background (as well as anything else drawn with that color), as shown in Figure 2.17. Figure 2.17. Form Shown in Front of Notepad with TransparencyKey Set to BackColor The novelty of the form shown in Figure 2.17. seems limited until you combine it with FormBorderStyle.None, which removes the nonclient area altogether, as shown in Figure 2.18. Figure 2.18. TransparencyKey Combined with FormBorderStyle.None (See Plate 5) The combination of a transparent color to erase the form's background and the removal of the form border yields a nonrectangular window, which is all the rage with the kids these days. The transparency key color is used to create a region that describes the form's visible area to Windows. As easy as setting TransparencyKey is, you need to be careful. For example, you need to choose a color that you know won't appear in the parts of your form that need to show, or else they'll be made transparent, too. Also, when using TransparencyKey, you must calculate the region each time the form is drawn. Most importantly, TransparencyKey requires certain capabilities of the user's video driver. If they're missing, it fails completely. So instead of using TransparencyKey, you may want to set the form's Region property directly. This approach is slightly less convenient but much more robust. Regions are covered in detail in Chapter 7: Advanced Drawing, but here's an example of using an ellipse as the form's region: // MainForm.cs using System.Drawing.Drawing2D; partial class MainForm : Form { ... void SetEllipseRegion() { // Assume: this.FormBorderStyle = FormBorderStyle.None Rectangle rect = this.ClientRectangle; using( GraphicsPath path = new GraphicsPath() ) { path.AddEllipse(rect); this.Region = new Region(path); } } void MainForm_Load(object sender, EventArgs e) { SetEllipseRegion(); } void MainForm_SizeChanged(object sender, EventArgs e) { SetEllipseRegion(); } ... } Notice that our code sets the region both when the form is loaded and whenever the form is resized. However, as careful as we are to handle resizing, with the caption and the edges on the form missing, there's no way for the user to actually move or resize the form. When that's the case, you're on the hook to implement moving and resizing yourself. Here's an example of using the mouse events to move the form around when the user clicks in the form's client area: // MainForm.cs partial class MainForm : Form { ... Point downPoint = Point.Empty; void MainForm_MouseDown(object sender, MouseEventArgs e) { if( e.Button != MouseButtons.Left ) return; downPoint = new Point(e.X, e.Y); } void MainForm_MouseMove(object sender, MouseEventArgs e) { if( downPoint == Point.Empty ) return; Point location = new Point( this.Left + e.X - downPoint.X, this.Top + e.Y - downPoint.Y); this.Location = location; } void MainForm_MouseUp(object sender, MouseEventArgs e) { if( e.Button != MouseButtons.Left ) return; downPoint = Point.Empty; } ... }When the user clicks on the form's client area, the MouseDown event is fired, which we're handling to cache the point on the screen where the user clicked. When the user moves the mouse, the MouseMove event is fired, which we handle to move the form based on the difference between the current mouse location and the point where the user first clicked. Finally, when the user releases the mouse button, we handle the consequently fired MouseUp event to stop the move. Resizing requires a similar implementation. The details of mouse events, as well as keyboard events, are covered in Chapter 10. |

EAN: 2147483647
Pages: 216