| In the previous exercises, you've set sound levels on individual clips in the Canoe Club Mix and Team Story sequences. There are music and sound effects tracks that continue throughout the sequence. At times, you may want to fade them down, allowing the primary sound to dominate, only to fade up seconds later. There are two ways to change, or animate, the sound levels. One method involves adding an edit point and a cross fade where you want to change an audio level. The other method involves setting a keyframe directly on the volume level line. A keyframe identifies a frame in a clip where you want to change a clip property, such as audio level or, in a video clip, the opacity. 1. | In the Timeline, click the Canoe Club Mix sequence tab, and make sure clip overlays are toggled on for this sequence. Make sure all tracks can be heard that no solo buttons are on and that snapping is active.
You set a mix level for the battlesong clip on A5 and A6 in a previous exercise. To raise the music volume in the areas when the narrator isn't speaking, you can divide the music track into separate clips.
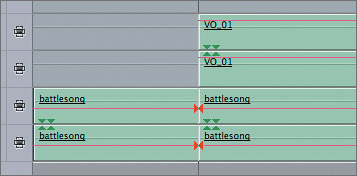
| 2. | Move the playhead to snap to the In point of the VO_01 narration clip. Choose one of the following three methods to add an edit point and divide the clip at this location:
| 3. | To change the volume of the first battlesong clip, drag the volume level line up to 0 dB. Play through the edit point to hear the change in volume.
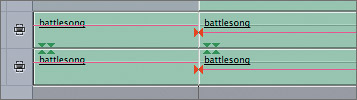
Cutting from one audio level to another makes this an abrupt transition.
| 4. | To smooth the transition, select the edit point and press Option-Cmd-T to add the default audio cross fade between these two clips.
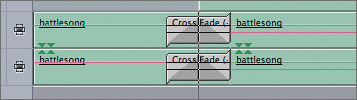
You used a cross fade in the previous lesson to smooth a transition between two sound clips. Here, since the two clips play a continuous music track, the cross fade transitions from one audio level to the next.
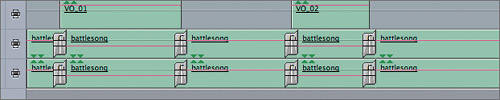
| 5. | Add edit points on the battlesong clip using the beginning and end of each narration clip as a guide. On the clips where narration is not present, raise the volume level line to 0 dB. Apply the default cross fade at each edit point, and play the sequence.
 | 6. | Click the Team Story (or Team Story Mixed) sequence tab. To prepare this sequence, turn on clip overlays and turn off the audio waveforms. Make sure no track is soloed, and mute the A5 track.
To raise and lower the music volume a different way, you will set a keyframe where you want to change the audio level.
| 7. | As a visual guide, move the playhead to the In point of the PA team owner clip. Press P to select the Pen tool, and move the pointer into the dramatic trumpet.aif clip and over the pink volume level line before the playhead.
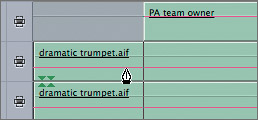
The tool looks like a pen only when the pointer is over the clip's over-lay line.
TIP You can also use the default Selection tool and hold down Option to temporarily select the Pen tool. | 8. | Click the Pen tool before the playhead position. Make sure you click on the clip overlay line.
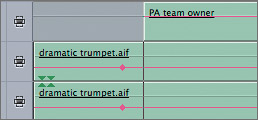
A pink diamond, or keyframe, appears on the line at the playhead position. This is where you want to begin fading the audio.
TIP To delete a keyframe, press PP to select the Pen Delete tool and click a keyframe, or Ctrl-click a keyframe and choose Clear from the shortcut menu. You can also use the Option key with either the default Selection tool or the Pen tool to delete an existing keyframe. | 9. | Move the Pen tool to the right of the playhead and again click the volume level line.
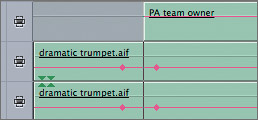
This is the point where you want the fading to stop and level off.
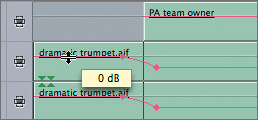
| 10. | To raise the volume of the first portion of the music, press A to return to the default Selection tool. Move the pointer over the volume line. When you see the resize arrow, drag the volume line up to 0 dB and release it. Play the audio fade.
| 11. | Play the last group on podium clip in the sequence, then zoom into it to make it larger. To create a simple fade-out on this clip, add two keyframes anywhere on the second half of the audio clip by Option-clicking the volume level overlay.
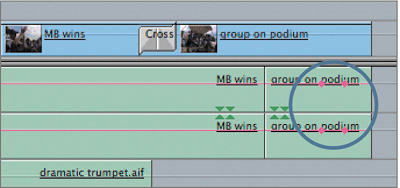
Once a keyframe has been placed on an overlay line, it can be raised or lowered to change the volume at that location, or repositioned left or right to change where the volume change starts or stops.
TIP Setting a keyframe inside the edge of the clip gives you greater control as you position it. | 12. | Move the pointer over the second keyframe. When the pointer changes to a crosshair icon, drag the keyframe down and to the right corner of the clip, but stay inside the clip's edge. Play the clip.
NOTE The crosshair is not a selectable tool. It is a part of the Pen function and allows you to move a keyframe. 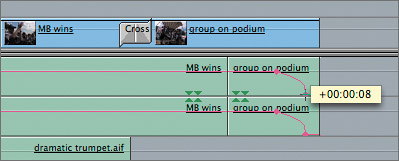
As you drag a keyframe up and down or left and right, an information box appears displaying the distance and direction you've moved the keyframe from its original position, or the dB level change.
|
NOTE You can also set keyframes in the Viewer's audio tab, either before or after editing the clip to the Timeline.
Project Practice In the Team Story sequence, continue adding keyframes to the music track around the team members In and Out points, as you did in the previous steps. Raise the music volume when no one is speaking. When you've finished mixing the music, apply either method of changing volume to the bike sfx.aif clip to fade in and out with the bikers racing video clips. You can look at the Team Story Final sequence in the Browser to see the finished version. TIP To create a video fade-up, set two keyframes at the head of the first video clip, and drag the first keyframe down into the lower left corner of the clip.
|