| Markers are location indicators that you can place on a clip or in the Timeline ruler area to help identify a specific frame while you edit. Markers can be helpful if you want to identify beats of music, moments in a narration or interview, or any specific action. Creating and Naming Markers A marker can be placed on a clip or in the Timeline ruler area. If a marker is attached to a clip, the marker will stay at that location on that clip even if the clip is moved elsewhere in the sequence. If a marker is not attached to a specific clip, it will be created in the ruler area of the Timeline and become a reference to that specific location in the sequence. 1. | In the Timeline, click the Marking sequence tab and play the sequence.
You will use markers to align specific action points in the video clips with specific music beats.
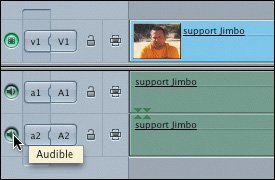
| 2. | To focus on just the video, click the A1 and A2 controls to turn off sound from those tracks.
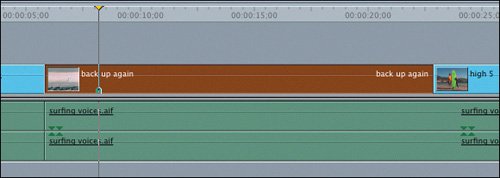
 | 3. | Play the back up again clip in the Timeline, and park the playhead where Jimbo first jumps up on the surfboard.
| | | 4. | To set a marker on this clip at this location, select the clip and press M.
 A marker appears on the clip at this location because the clip is selected. A marker appears on the clip at this location because the clip is selected.
| 5. | Press M again to open the Edit Marker dialog box. Type up on board in the Name field and click OK.
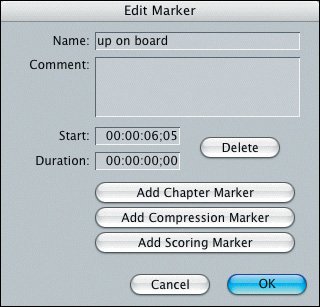 The Edit Marker dialog box has additional options to explore, such as adding a chapter marker or compression marker if you're going to be creating a DVD. You can create scoring markers if you are working with the Apple music composition application, Soundtrack. You can also delete a marker in this dialog box.
| | | 6. | Continue playing the back up again clip, and stop where Jimbo is belly down on the board, at about 13;27 in the sequence.
| 7. | With the clip still selected, press M to set a marker and M again to open the Edit Marker dialog box. Name this marker belly down.
| 8. | Play the clip and stop where Jimbo touches the wave with his hand at about 21;05. Create a marker and name it touches wave.
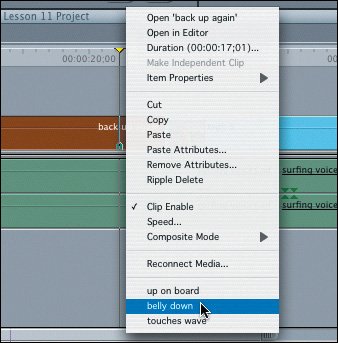
| 9. | Ctrl-click the back up again clip, and from the bottom of the shortcut menu choose "belly down" to go to the "belly down" marker location.
 | 10. | Select the high 5 clip, and set a marker where Jimbo and his dad touch hands. Name the marker high 5.
Tip You can delete a marker in the Edit Marker dialog box. Or you can go to a marker and choose Mark > Markers > Delete. Here you can also delete all the markers in the Timeline. | 11. | Deselect the high 5 clip and toggle back on the controls for the A1 and A2 tracks.
|
This time, you can play the music track and create markers on the fly by pressing M several times while the clip is playing. If you want to follow the beat of the music and place markers on the fly, just listen and mark every eight beats, which is about three seconds. Or you can simply move the playhead forward three seconds at a time, and place a mark at those locations. 12. | Mark the first strong beat of music where the voices come in, at around 9;10. Then mark every eight counts, or three seconds, after that point until the end of the clip.
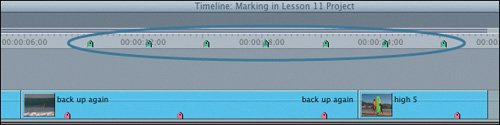 Since you did not select the clip, you should have about seven markers in the Timeline ruler area (and Canvas scrubber bar), representing the place where the strong beats occur in this music track. These markers are not attached to the music clip but to the sequence itself. Since you did not select the clip, you should have about seven markers in the Timeline ruler area (and Canvas scrubber bar), representing the place where the strong beats occur in this music track. These markers are not attached to the music clip but to the sequence itself.
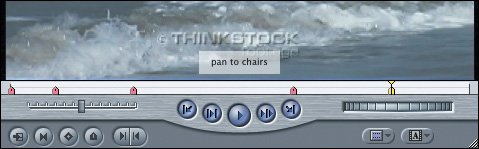
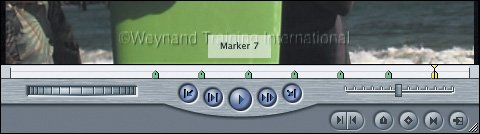 Note When the playhead is over a marker in the Canvas scrubber bar, the marker appears yellow and the name of the marker appears in the image area. |
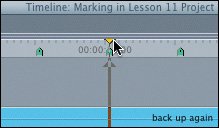
Editing with Markers Now that you have markers set in clips and in the sequence, you can begin to align some of the action points of a clip with beats of music. Since the clips are already in the sequence, you will use the Slip tool to make the adjustments. 1. | In the Timeline, drag the playhead over the sequence markers and see how it snaps to each marker in the ruler area.
 | 2. | Select the Slip tool from the Tool palette, or press S.
| 3. | Drag the high 5 clip left and right.
The clip marker moves with the clip as it is adjusted.
| 4. | Now click with the Slip tool directly above the marker in the high 5 clip, and drag left over the last sequence marker in the ruler area.
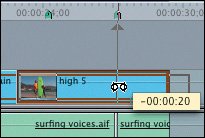 The clip marker snaps to the sequence marker.
| 5. | Play the clip to see the alignment of the two marker points.
| | | 6. | Ctrl-click one of the visible markers in the back up again clip. From the shortcut menu, choose "belly down." The playhead goes to that marker.
| 7. | With the Slip tool, click above the "belly down" marker and drag left. Snap it to the second sequence marker and play the clip.
| 8. | Press A to change the pointer back to the default Selection tool and play the sequence.
|
Project Tasks Markers can be placed in clips in the Viewer, in selected clips in the Timeline, or in the sequence in the Timeline. There are different ways you can move to a marker or delete it once it's been placed. 1. | Move the playhead to the beginning of the sequence and press Shift-Cmd-A to deselect all clips. In the main menu, choose Mark > Next > Marker, or press Shift-M. The playhead moves to the next sequence marker. Repeat this to move through the rest of the markers.
Note You can also press Shift-up arrow or Shift-down arrow to move the playhead backward or forward to a marker. | 2. | Choose Mark > Previous > Marker, or press Option-M, to move backward through the sequence from marker to marker.
| 3. | Move to the first sequence marker, press M to open the Edit Marker window, and name it voices in. Name the other sequence markers for practice.
|
Using Markers to Create Subclips You have created subclips by marking In and Out points in the Viewer. But you can also create a subclip from a marker placed in a clip in the Viewer. | | 1. | In the Browser, Ctrl-click the Thumbnail column head and choose Hide Column.
| 2. | Open the couple at beach master clip into the Viewer.
This is the clip you used to make subclips earlier in this lesson.
| 3. | In the Viewer, place a marker at the beginning of each scene change. Give each marker an appropriate name.
 | 4. | In the Browser, click the disclosure triangle next to the couple at beach master clip.
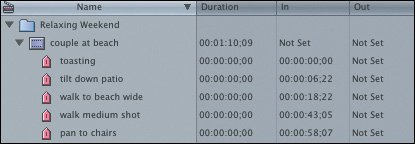 | 5. | Select one of the markers under the clip and choose Modify > Make Subclip.
A new subclip is created that begins where this marker is located in the master clip and continues to the next marker in that clip.
Tip To convert a group of markers into subclips at once, create a new bin and drag a group of subclips into that bin. Final Cut Express will automatically convert the markers to subclips. | | | 6. | Quit Final Cut Express by pressing Cmd-Q, or close this project and continue with the next lesson.
|
|