Section 12.2. Adding Pushpins with Pop-Ups to a Map


12.2. Adding Pushpins with Pop-Ups to a Map

The next step in extending the map is to add pushpins: markers on the map that when clicked on or hovered over provide additional information about a certain landmark or position on the map.

The <virtualEarthMap> component supports Atlas data binding, which means that you can use the JavaScript method set_data() to bind information to it, a technique explained in Chapter 5. This data binding is quite convenient for working with pushpins.

Adding pushpins to a Virtual Earth map requires a few steps. First of all, you need the pushpin data. Thanks to data binding, the data format can be somewhat arbitrary, as long as it is structured. Here is a snippet that uses JSON markup to define an array named pins that contains two pushpins and then uses JavaScript to instantiate them. Each has a unique identifier, a longitude and latitude value, and a text label.

Once you have this information, you can use the JavaScript set_data() method to bind it to the map.

 var pins = [   {    ID:0,     Latitude:39.800000,     Longitude:-86.228000,     Name:"Tiger Woods"   },  {    ID:1,     Latitude:39.794624,     Longitude:-86.234749,     Name:"Indy 500"   } ]; $("map").control.set_data(pins); 

Although the format of the data that defines a pushpin can be arbitrary, you must use attributes of the <virtualEarthMap> element to map elements from the data source to elements on the map. These include:


dataLatitudeField

Name of the field in the data that contains the latitude (in the example, Latitude)


dataLongitudeField

Name of the field in the data that contains the longitude (in the example, Longitude)


dataValueField

Name of the field in the data that contains the unique identifier (in the example, ID)

To make the pins visible, you'll need an image to display on the map. The example here references a graphics file named pin.gif that should contain a picture of a pushpin. The code downloads for this book include the file pin.gif, which provides a simple image that you can use to display the position of your pins. Alternatively, for purposes of this exercise, you can create your own simple pin.gif image (using Paint, for example). By setting the value of the pushpinImageUrl attribute of <virtualMap> to "pin.gif", you tell Atlas to display the pin at the position specified by the dataLatitudeField and dataLongitudeField values.

These additions to your markup are all you need to display pushpins on a Virtual Earth map. However, the ability to open a pop-up area and to display additional information about a landmark makes the technique even more useful. To add pop-ups, you need several additional steps. First, you must define the behavior of the pop-up by setting the following <virtualEarthMap> attributes.


pushpinActivation

Specifies what action the user takes to activate the pop-up (Click, Hover)


popupCssClass

Specifies the CSS class with which to style the pop-up


popupPositioningMode

Specifies where to open up the pop-up relative to the pushpin (TopLeft, TopRight, BottomLeft, BottomRight)

After you add these attributes the (still unfinished) markup looks like this:

 <virtualEarthMap   latitude="39.794624" longitude="-86.234749"   mapStyle="Hybrid" zoomLevel="15"   dataLatitudeField="Latitude" dataLongitudeField="Longitude"   dataValueField="ID" pushpinActivation="Hover" pushpinImageURL="pin.gif" popupPositioningMode="TopRight" popupCss>   ... </virtualEarthMap> 

Next, you must create a CSS class to display the pop-up. A white background is a good idea to ensure that the text is legible. Also, you need to set z-index to any positive value so that the pop-up is placed in front of the map, not behind it.

 <style type="text/css"> .popup {background-color: white;   border: solid 2px #000;   padding-left: 15px;   padding-right: 15px;   width: 150px;z-index: 123; } </style> 

Now you need to define the pop-up itself. As usual, you first have to write HTML markup to define its layout on the page. Then you reference the feature in xml-script using its assigned ID. Here is markup for a pop-up:

 <div style="display: none;">   <div >     <div>       <p>Info: <span ></span>.</p>     </div>   </div> </div> 

Using an outer <div> element ensures that the pop-up cannot be seen in the browser. To display the pop-up, Atlas uses (and copies) the inner <div> whose ID is popupTemplate. The pop-up contains a named <span> element, which will later display the landmark information.

The final step is to provide the pop-up information to Atlas using xml-script. The <popupTemplate> element of <virtualEarthMap>must be used here. In the <template> subelement, provide the ID of the inner pop-up <div> as the value for the layoutElement attribute. Then, use a <label> control and bind the data from the pushpins to it. Since the additional landmark information is buried in the Name property of the pushpins, the following xml-script is required:

 <popupTemplate>   <template layoutElement="popupTemplate">     <label >       <bindings>         <binding dataPath="Name" property="text" />       </bindings>     </label>   </template> </popupTemplate> 

You can bind pushpin data to other controls like images, and display more data than just a single line of text. A real estate agent's site, for example, might display the assessed value and floor space of a house, in addition to its address. An <image> object can be used to display a webcam feed showing the current view of the landmark, for instance.


Example 12-2 contains the complete markup for adding pushpins that display extra data on a map. In Figure 12-2, you can see the pop-up that appears when you hover the mouse over the "Indy 500" pushpin. As specified, the pop-up is displayed (more or less) with its lower-right corner aligned to the top right of the pushpin.

Example 12-2. Adding pushpins with pop-ups to a Virtual Earth map

 VirtualEarthPushpins.aspx <%@ Page Language="C#" %> <!DOCTYPE html PUBLIC "-//W3C//DTD XHTML 1.0 Transitional//EN" "http://www.w3.org/TR/xhtml1/DTD/xhtml1-transitional.dtd"> <html xmlns="http://www.w3.org/1999/xhtml"> <head runat="server">   <title>Atlas</title>   <script type="text/javascript" language="JavaScript">     function pageLoad()     {       var pins = [         {           ID:0,           Latitude:39.800000,           Longitude:-86.228000,           Name:"Tiger Woods"         },         {           ID:1,           Latitude:39.794624,           Longitude:-86.234749,           Name:"Indy 500"         }       ];       $("map").control.set_data(pins);     }   </script>   <style type="text/css">    #map {      position: absolute;      width: 640px;      height: 480px;      overflow: hidden;    }.popup {     background-color: white;     border: solid 2px #000;     padding-left: 15px;     padding-right: 15px;     width: 150px;     z-index: 123;}   </style> </head> <body>   <form  runat="server">     <atlas:ScriptManager runat="server" >       <Scripts>         <atlas:ScriptReference ScriptName="AtlasUIMap" />       </Scripts>     </atlas:ScriptManager>     <div ></div>     <div style="display: none;">     <div >     <div>     <p>Info: <span ></span>.</p>     </div>     </div>     </div>   </form>   <script type="text/xml-script">     <page xmlns:script="http://schemas.microsoft.com/xml-script/2005">       <components>         <virtualEarthMap            latitude="39.794624" longitude="-86.234749"           mapStyle="Hybrid" zoomLevel="15"           dataLatitudeField="Latitude" dataLongitudeField="Longitude"           dataValueField="ID"     pushpinActivation="Hover" pushpinImageURL="pin.gif"     popupPositioningMode="TopRight" popupCss>     <popupTemplate>     <template layoutElement="popupTemplate">     <label >     <bindings>     <binding dataPath="Name" property="text" />     </bindings>   </label>     </template>     </popupTemplate>         </virtualEarthMap>       </components>     </page>   </script> </body> </html> 

Figure 12-2. Information about the pushpin is shown


12.2.1. Using a Web Service to Access Location-Based Data

In the previous example, the data for the maps is hardcoded. In larger applications, however, the map data is dynamic and may come from a database. This section shows you how to programmatically use map data with Atlas. If you have any positioning data (for instance, a list of all stores where your company's products are sold), you can add this information to the Virtual Earth map.

To begin, create a class file named Marker.cs in the App_Code folder. The class holds the information you want to use to create pushpins on the map. (This class will later be used as a custom data type.) The class defines the DataObjectField properties Id, Latitude, Longituge, and Name. A constructor is used to set these properties. No additional business logic is included in this class. Example 12-3 shows the code for the complete class.

Example 12-3. Custom class defining a pushpin

 Marker.cs using System; using System.ComponentModel; public class Marker {   private int _id;   private double _latitude;   private double _longitude;   private string _name;   [DataObjectField(true)]   public int Id   {     get { return _id; }     set { _id = value; }   }   [DataObjectField(false), DefaultValue(0)]   public double Latitude   {     get { return _latitude; }     set { _latitude = value; }   }   [DataObjectField(false), DefaultValue(0)]   public double Longitude   {     get { return _longitude; }     set { _longitude = value; }   }   [DataObjectField(false), DefaultValue("???")]   public string Name   {     get { return _name; }     set { _name = value; }   }   public Marker() { }   public Marker(int id, double latitude, double longitude, string name)   {     _id = id;     _latitude = latitude;     _longitude = longitude;     _name = name;   } } 

Next, a web service is created that returns named an array of Markers.asmx. In the web service, create a method that returns an array of Marker objects. In a real-world scenario, this web service would retrieve data from a database, but in this simplified case, the web service will simply return some static pushpin information. (The AdventureWorks database, for instance, does not contain latitude and longitude information.) Example 12-4 shows the code for the web service, and Figure 12-3 shows the data returned by the service.

Figure 12-3. The data returned by the web service


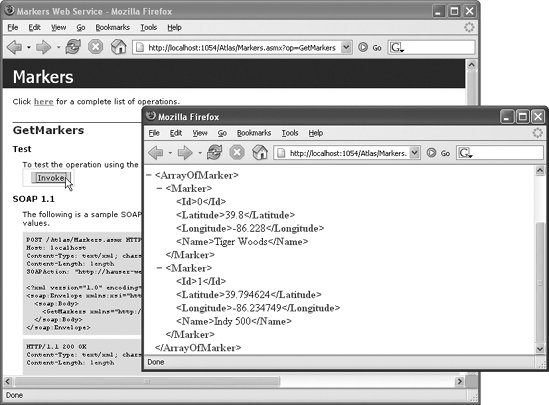
Example 12-4. The Markers web service

 Markers.asmx <%@ WebService Language="C#"  %> using System; using System.Web; using System.Web.Services; using System.Web.Services.Protocols; using System.Collections; using System.Collections.Generic; [WebService(Namespace = "http://hauser-wenz.de/")] [WebServiceBinding(ConformsTo = WsiProfiles.BasicProfile1_1)] public class Markers : System.Web.Services.WebService {   [WebMethod]   public Marker[] GetMarkers()   {     List<Marker> m = new List<Marker>();     m.Add(       new Marker(0, 39.800000, -86.228000, "Tiger Woods"));     m.Add(       new Marker(0, 39.794624, -86.234749, "Indy 500"));     return m.ToArray();   } } 

As you can see, the code in Example 12-4 uses .NET 2.0 generics. Of course you could implement it without using generics. However by using generics, the code itself is very generic and is easier to work with type-safe Marker elements in the array.


All that is left to do is to reference the web service in the ScriptManager element, using the <Services> subelement and the <atlas:ServiceReference> component. You can then make a call to the web service and get a list of pushpins, which can then be bound to the map.

Example 12-5 shows the complete markup you need to implement this map mashup. Code that is new or changed in comparison to Example 12-2 is printed in bold.

Example 12-5. The web-service driven Virtual Earth map

 VirtualEarthPushpinsService.aspx <%@ Page Language="C#" %> <!DOCTYPE html PUBLIC "-//W3C//DTD XHTML 1.0 Transitional//EN" "http://www.w3.org/TR/xhtml1/DTD/xhtml1-transitional.dtd"> <html xmlns="http://www.w3.org/1999/xhtml"> <head runat="server">   <title>Atlas</title>   <script type="text/javascript" language="JavaScript">     function pageLoad()     {     Markers.GetMarkers(callComplete);     }     function callComplete(result) {     $("map").control.set_data(result);     }   </script>   <style type="text/css">   #map {     position: absolute;     width: 640px;     height: 480px;     overflow: hidden;   }   .popup {     background-color: white;     border: solid 2px #000;     padding-left: 15px;     padding-right: 15px;     width: 150px;     z-index: 123;   }   </style> </head> <body>   <form  runat="server">     <atlas:ScriptManager runat="server" >       <Scripts>         <atlas:ScriptReference ScriptName="AtlasUIMap" />       </Scripts>     <Services>     <atlas:ServiceReference Path="Markers.asmx" />     </Services>     </atlas:ScriptManager>     <div ></div>     <div style="display: none;">       <div >         <div>           <p>Info: <span ></span>.</p>         </div>       </div>     </div>   </form>   <script type="text/xml-script">     <page xmlns:script="http://schemas.microsoft.com/xml-script/2005">       <references>       </references>       <components>         <virtualEarthMap            latitude="39.794624" longitude="-86.234749"           mapStyle="Hybrid" zoomLevel="15"           dataLatitudeField="Latitude" dataLongitudeField="Longitude"           dataValueField="ID"           pushpinActivation="Hover" pushpinImageURL="pin.gif"           popupPositioningMode="TopRight" popupCss>           <popupTemplate>             <template layoutElement="popupTemplate">               <label >                 <bindings>                   <binding dataPath="Name" property="text" />                 </bindings>               </label>             </template>           </popupTemplate>         </virtualEarthMap>       </components>     </page>   </script> </body> </html> 

12.2.2. Controlling the Map

Now that you've seen how it's possible to add location-based information to a map using Atlas, let's look at how to give a user control over its zoom level.

Because all Virtual Earth map properties have getter and setter JavaScript methods (see Appendix C), it's easy for the developer to add code that gives web programmers greater control (by separating code and content) over the way in which a map is displayed instead of using the declarative <virtualEarthMap> attributes demonstrated in the preceding examples. When you add a <virtualEarthMap> control to the page, you can create functions to get or set the property that manages a particular aspect of the map, such as its zoom level. Once you've written the function, you bind it to a link or button or some other control so the user can call it with the click of a mouse.

Example 12-6 contains code that adds links for zooming in and out of the Virtual Earth map of the Indianapolis Motor Speedway (of course, you could also use a button). The JavaScript function that performs the operation uses the get_zoomLevel() and set_zoomLevel() methods of the map control to change the view seen by the user. The function is bound to "Zoom In" and "Zoom Out" links. Here's the code for a JavaScript zoom (delta) function, where delta is the amount by which the zoom level is increased or decreased:

 function zoom(delta) {   $("map").control.set_zoomLevel(     $("map").control.get_zoomLevel() + delta); } 

When the user clicks on either the "Zoom In" or "Zoom Out" link, a JavaScript call is made to this function, and the zoom level is increased or decreased by one step (with delta equals 1-1).

Example 12-6. Zooming the Virtual Earth map

 VirtualEarthPushpinsZoom.aspx <%@ Page Language="C#" %> <!DOCTYPE html PUBLIC "-//W3C//DTD XHTML 1.0 Transitional//EN" "http://www.w3.org/TR/xhtml1/DTD/xhtml1-transitional.dtd"> <html xmlns="http://www.w3.org/1999/xhtml"> <head runat="server">   <title>Atlas</title>   <script type="text/javascript" language="JavaScript">     function pageLoad()     {       var pins = [         {           Id:0,           Latitude:39.800000,           Longitude:-86.228000,           Name:"Tiger Woods"         },         {           Id:1,           Latitude:39.794624,           Longitude:-86.234749,           Name:"Indy 500"         }       ];       $("map").control.set_data(pins);     }     function zoom(delta) {     $("map").control.set_zoomLevel(     $("map").control.get_zoomLevel() + delta);     }   </script>   <style type="text/css">   #map {     position: absolute;     width: 640px;     height: 480px;     overflow: hidden;   }   .popup {     background-color: white;     border: solid 2px #000;     padding-left: 15px;     padding-right: 15px;     width: 150px;     z-index: 123;   }   </style> </head> <body>   <form  runat="server">     <atlas:ScriptManager runat="server" >       <Scripts>         <atlas:ScriptReference ScriptName="AtlasUIMap" />       </Scripts>     </atlas:ScriptManager> <div>     <p>     <a href="javascript:zoom(1)">Zoom in</a>     <a href="javascript:zoom(-1)">Zoom out</a>     </p>     </div>     <div ></div>     <div style="display: none;">       <div >         <div>           <p>Info: <span ></span>.</p>         </div>       </div>     </div>   </form>   <script type="text/xml-script">     <page xmlns:script="http://schemas.microsoft.com/xml-script/2005">       <components>         <virtualEarthMap            latitude="39.794624" longitude="-86.234749"           mapStyle="Hybrid" zoomLevel="15"           dataLatitudeField="Latitude" dataLongitudeField="Longitude"           dataValueField="ID"           pushpinActivation="Hover" pushpinImageURL="pin.gif"           popupPositioningMode="TopRight" popupCss>           <popupTemplate>             <template layoutElement="popupTemplate">               <label >                 <bindings>                   <binding dataPath="Name" property="text" />                 </bindings>               </label>             </template>           </popupTemplate>         </virtualEarthMap>       </components>     </page>   </script> </body> </html> 

Figure 12-4 shows how the map appears in a browser after the user has zoomed out.

Figure 12-4. Zooming out of the map


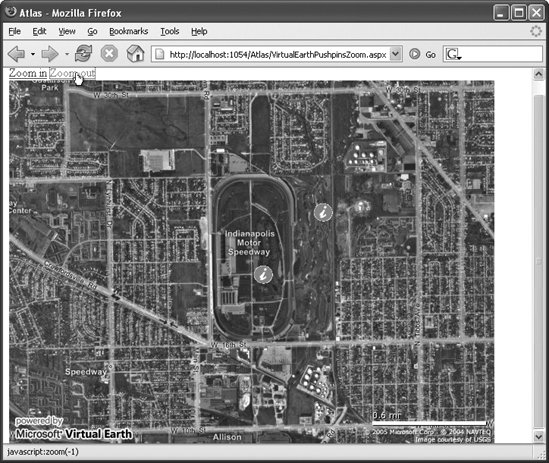
The technique shown in Example 12-6 can be used to control other aspects of the map, including moving to the left, right, top, or bottom, and selecting the map type. A complete list of methods exposed by the map can be found in Appendix C. Try using one or more of them to add more functionality to your mashup.


Programming Atlas
Programming Atlas
ISBN: 0596526725
EAN: 2147483647
Year: 2006
Pages: 146

flylib.com © 2008-2017.
If you may any questions please contact us: flylib@qtcs.net