Setting Up Client Authentication
| The basic steps for setting up Client Authentication are similar to the steps used to set up User and Session Authentication.
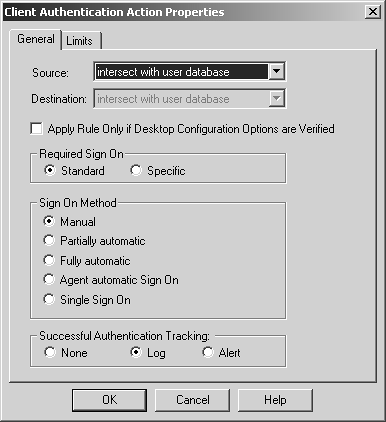
The source and destination for the rule are defined in the same way as those for User Authentication. A Client Authentication rule might look similar to the screen shown in Figure 8.36. Figure 8.36. Sample Client Authentication rule You then configure the Client Authentication action properties by right-clicking Client Auth and selecting Edit Properties. A screen similar to the one shown in Figure 8.37 appears. Figure 8.37. Client Authentication Action Properties, General tab The Source and Destination fields are defined as they were for User Authentication. Due to the nature of Client Authentication, it is not possible for the Client Authentication process to know where the client may be connecting to when the Required Sign On is set to Standard (see below), so the user's allowed destinations cannot be checked. Apply Rule Only if Desktop Configuration Options are Verified relates to SecureClient and will be discussed in Chapter 12. Required Sign On can be set to Standard or Specific. Standard allows the user to log in and be automatically authorized for all services allowed by the rule(s). The Specific selection means that the user must manually request each service and each host he or she will be trying to contact. Examples of each of these methods were provided earlier in the Explaining Client Authentication subsection. You can set the Sign On Method to one of the following options.
You can set Successful Authentication Tracking to one of the following options.
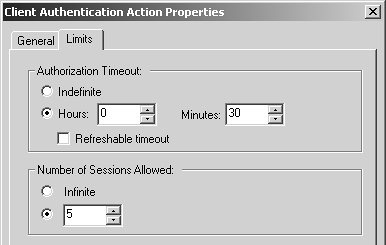
You also need to set the timeout period for the authentication in the Limits tab (see Figure 8.38). Figure 8.38. Client Authentication Action Properties, Limits tab You can set the Authorization Timeout value to a specific period of time or Indefinite. If you choose Indefinite, either the user must explicitly sign off and reload the security policy or you must stop and start FireWall-1 in order for the user to no longer be permitted. If you select Refreshable timeout, the timeout resets every time the user makes a successful connection against this rule, which means that the user has to reauthenticate only if the user has not made any new connections for a period of time. The Number of Sessions Allowed setting refers to the number of individual connections the user is allowed to make through the firewall before the authentication expires. With HTTP (or any other service that makes lots of individual connections), the default of five connections will be used very quickly. With Telnet, the user is allowed to make five Telnet connections before the authentication expires . NOTE!
Once the rules are set up to your liking, verify that the gateway properties for authentication (see Figure 8.28) and the global properties for authentication (see Figure 8.29) are defined as you wish. As promised earlier in the chapter, it's time to talk about the Enable wait mode option that appears in the Authentication frame of the Gateway Properties section. This option changes the behavior of Client Authentication via Telnet. Normally, once authentication is successful, the Telnet connection to the firewall closes . When wait mode is enabled, the connection stays open. The authentication is active as long as this connection is open. Once this connection is closed, the authentication is no longer valid. This particular option does not scale well because the firewall has to keep a connection open to each client that authenticates. At least in my experience, FireWall-1 is unable to handle more than about 20 to 30 users authenticated with this option enabled. Once the gateway and global properties are set as desired, install the security policy. |
EAN: 2147483647
Pages: 143
- Key #2: Improve Your Processes
- Beyond the Basics: The Five Laws of Lean Six Sigma
- Making Improvements That Last: An Illustrated Guide to DMAIC and the Lean Six Sigma Toolkit
- The Experience of Making Improvements: What Its Like to Work on Lean Six Sigma Projects
- Six Things Managers Must Do: How to Support Lean Six Sigma