Setting Up Session Authentication


The basic steps for setting up Session Authentication are similar to the steps described in the previous section for setting up User Authentication.

  1. Create the necessary users and groups required for authentication, then install the user database.

  2. Create the appropriate rule(s) in the rulebase.

  3. Configure the Session Authentication action properties.

  4. Configure the Rulebase Properties Authentication frame.

  5. Verify and install the policy.

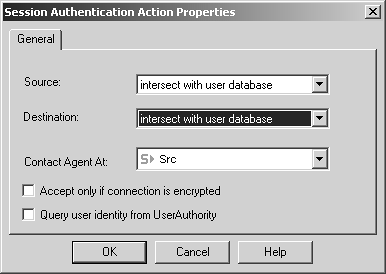
The source and destination for the rule are defined in the same way as shown in the preceding section. A Session Authentication rule might look like the one shown in Figure 8.34.

Figure 8.34. Sample Session Authentication rule

graphics/08fig34.gif

You then configure the Session Authentication action properties by right-clicking Session Auth and selecting Edit Properties. A screen similar to the one shown in Figure 8.35 appears.

Figure 8.35. Session Authentication Action Properties, General tab

graphics/08fig35.gif

The Source and Destination fields are defined as they were for User Authentication. The Contact Agent At field tells FireWall-1 on which host to attempt to contact a Session Authentication agent. The possibilities are as follows .

Src: The IP address that is originating the connection will be contacted. This is the default value and the most common.

Dst: The IP address that the connection is destined for will be contacted. Use this option for protocols where the client/server model is reversed , such as X Windows.

Other Host: You can select which workstation will receive the authentication request.

Two other options are also available on the General tab.

Accept only if connection is encrypted: If this is checked, Session Authentication will take place only if it is able to establish an SSL connection to the agent.

Query user identity from UserAuthority: If this is selected, the user identity will be checked with a UserAuthority server when authenticating the user.

Once the rules are set up to your liking, verify that the Authentication Failure Track is set appropriately in the Policy Properties Authentication tab, and install the security policy.

NOTE!

graphics/brain_icon.gif

Because the firewall will be originating a connection to port 261 on a remote host, make sure that your outbound security policy does not prohibit this.


Essential Check Point FireWall-1 NG
Essential Check Point FireWall-1 NG: An Installation, Configuration, and Troubleshooting Guide
ISBN: 0321180615
EAN: 2147483647
Year: 2004
Pages: 143

flylib.com © 2008-2017.
If you may any questions please contact us: flylib@qtcs.net