Adding HTML Tags to the Page
As I mentioned before, you can use three different Web settings to add your own HTML for adapting the application to your environment and hiding the green-screen heritage in your Web user interface.
Inserting HTML
You can insert additional HTML code before, inside, and after the DDS 5250 control that is generated by the WebFacing Tool. A popular use of this capability is to add a button behind a field for use of an extra function not available in the 5250 panel. Adding something extra to the generated Web page, however, can sometimes cause problems, especially if your original 5250 panel is very crowded. In that case, there is no space to place these additional controls into the table grid the WebFacing Tool creates, and the addition completely misaligns the resulting Web page.
You can use the insert html Web setting to place a graphic on your Web page without using extra space. The graphic in the sample that I use here displays behind the customer number field and provides an additional capability when the user clicks on this graphic. This Web setting also gives you a chance to write some JavaScript. I will guide you through three different scenarios to show you how to use this capability.
Adding a Graphic with a Link to the Page
First you will add a graphic after the Customer number input field; clicking on this graphic will simply send a request to a fixed URL.
-
In the WebFacing Projects view of the WebFacing perspective, find the DDS directory. Select the ORDENTD source member and start CODE Designer.
-
Select the SCREEN2 group tab, as shown in Figure 17.1.
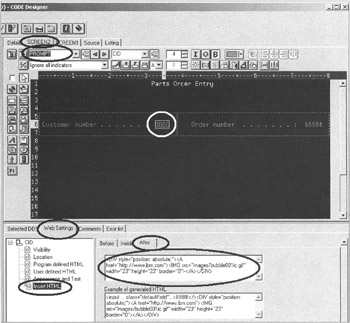
Figure 17.1: Code Designer with Web settings to display an image -
Select the PROMPT record format in this group.
-
Select the Customer number (CID) field in the design pane.
-
Select the Web Settings tab below the design pane.
-
Select the Insert HTML node from the Web Settings list.
-
Select the After tab in the notebook for the Insert HTML Web setting.
Add the following HTML into the entry field on the After page:
<DIV "style=position: absolute;"><A href="http://www.ibm.com"><IMG src="images/bubble001ic.gif" width="23" height="23" border="0"></A></DIV>
You can copy and paste this code from file ![]() sample_graphic_web_page.txt on the CD that accompanies the book.
sample_graphic_web_page.txt on the CD that accompanies the book.
| Tip | CODE Designer has a bug and sometimes doesn't accept the text in the Insert HTML entry fields. Click on the Before tab and the After tab to make sure the text is accepted by CODE Designer. |
This will add the bubble00lic graphic after the customer number input field. When the user clicks the graphic, the browser will request the URL www.ibm.com .
-
Save the member in CODE Designer.
-
Convert the member in the WebFacing project.
You need to copy the bubble00lic.gif file to the WebFacing project directory structure in the workspace so it can be found during run time.
-
In the Navigator view, expand wflabxx, then Web Content, then images, as shown in Figure 17.2.
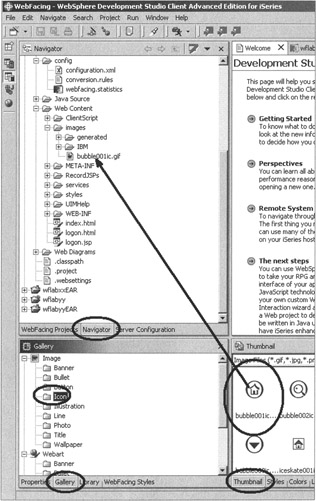
Figure 17.2: Adding the bubble001ic.gif file to the Web project images directory -
Select the Gallery tab in the pane below the Navigator view.
-
Select the Icon directory in the Gallery tree view.
-
Select the Thumbnail tab in the bottom right workbench pane.
-
Drag the bubble001.gif from the Thumbnail page to the images directory in the wflabxx project.
Run the WebFaced application (Figure 17.3).

Figure 17.3: The Order Entry page with an additional graphic beside the customer number entry field
Clicking on the graphic will request the IBM home page (Figure 17.4).

Figure 17.4: Browser after clicking on bubble001ic graphic
This capability might come in handy. The next sample shows the same idea but now, instead of a link, you will invoke the submit command key.
Adding a Graphic to Invoke the Submit Command Key to the Program
Rather than just invoking a static Web page, a more useful feature might be to invoke the Customer list window when the user clicks the graphic beside the Customer number field. Here is a code sample to invoke CA04; this will send a request back to the program when the user clicks the graphic.
<DIV style= "position: absolute;"><A href=# onclick ="validateAndSukmnt('CA04');"><IMG src="images/bubble001ic.gif" width="23" height="23" border="0"></A></DIV> This code uses the WebFacing JavaScript validateAndSubmit function. WebFacing JavaScript functions are stored in your WebFacing project under Web Content > ClientScript > webface.js. You can look at what kind of WebFacing JavaScript functions are available by double clicking the webface.js file and then using the editor to browse through the source. You can recognize JavaScript functions by the keyword "function" in front of their names .
Using the validateAndSubmit function, you can send a function key name as a parameter to the iSeries program based on an event in the browser. Here is a sample where you use the onclick event to trigger the action. Go ahead and try this out in the WebFacing Project view.
-
Open CODE Designer for the ORDENTD member (Figure 17.5).
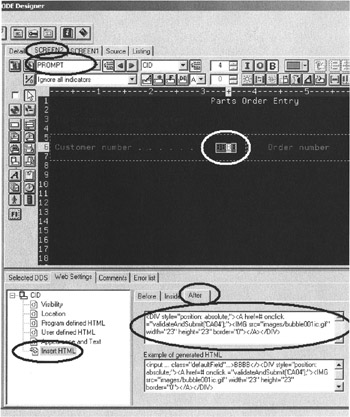
Figure 17.5: Adding HTML to submit request faking command key four
As in the previous example,
-
Bring up the SCREEN2 group in the design pane.
-
Select the Customer number field.
-
Select the Web Settings tab underneath the design pane.
-
Select the Insert HTML node.
-
Select the After tab.
-
Add the HTML code sample from above into the entry field. You can copy and paste this sample from the
 sample_graphic.txt file in the CD accompanying the book.
 -
Position the cursor after the text and press the Enter key.
Tip CODE Designer has a bug and sometimes doesn't accept the text in the Insert HTML entry fields. Click on the Before tab and the After tab to make sure the text is accepted by CODE Designer.
-
Save the source member.
-
Reconvert this member.
-
Run the application.
Now on the first screen (Figure 17.6),
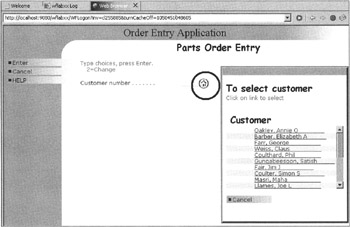
Figure 17.6: Customer selection list displays after clicking the graphic
-
Click on the graphic behind the Customer number field.
This time the customer selection list pop-up window appears, the same behavior as if you clicked the Prompt push button, or pressed the F4 function key on your keyboard.
This implementation has one side effect, however. When you return to the Order Entry with a selected customer, you can still see the graphic on the Web page, as shown in Figure 17.7.
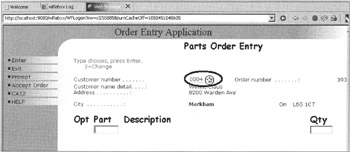
Figure 17.7: Order entry page with graphic showing on output-only field
The graphic should really not display, since you cannot select a customer on this page. I'll show you how to add JavaScript that sets the proper conditions for when the graphic displays. Here is the code:
<script type= "text/javascript"> var order_number = 0; order_number = "<%=PROMPT.getFieldValueWithTransform("ORDNBR", QUOTED_TRANSFORM)%>"; // if order number is not filled then display icon for customer prompting if (order_number < 1 ) document.write(" <DIV style=\"position: absolute;\"><A href=# onclick =\"validateAndSubmit('CA04'); \"><IMG src=\"images/bubble001ic.gif\" width=\"23\" height=\"23\" border =\"0\"></A></DIV>"); </script> If you have performed some JavaScript programming, then you already know what the code is doing. If you are new to JavaScript, here are some hints about what is going on.
First I identify that this piece of code is JavaScript so the browser knows how to interpret it (and that it is not plain HTML). In the second line, I define an order_number variable and initialize it to zero. JavaScript is loosely typed, so no type definition is needed. Because the order_number variable contains an order number after a customer has been selected, I get the value from the ORDNBR variable and copy it to the order_number variable (which I just defined).
The condition in line 4 just checks whether an order number has been assigned or not. If one is not assigned, the graphic displays. The statement inside the if structure is the same as I used in the previous example. The output from JavaScript is interpreted and rendered by the browser. Therefore, I use the write method to output the HTML I used previously to show the graphic. Also note that you need to use a special escape sequence in the HTML to display the quotation marks ("). The escape sequence \"will output a single". The /script just indicates that the JavaScript section ends here and regular HTML code resumes.
You can find the code sample on the CD in file ![]() sample_graphic_conditioned.txt .
sample_graphic_conditioned.txt .
To complete this exercise, switch to the WebFacing Projects view and open the ORDENTD member in CODE Designer. Then go through the same steps explained in the previous example, except this time, just delete the code that you added in the Web Settings page and insert the JavaScript for this example instead.
Again make sure CODE Designer recognizes the new text in this entry field.
-
Save the member.
-
Reconvert the DDS source.
-
Run the application.
-
Select a customer.
Now the graphic on the Order Entry screen with a selected customer is hidden, since the order entry number contains a value and the write method is not run, so that this HTML does not display in the browser (Figure 17.8).

Figure 17.8: Order entry page, graphic is not visible
After this short side step into JavaScript, you might be ready for some more. In the next exercise, you can add a pop-up calendar to a date input field.
Adding a Pop-Up Calendar
Pop-up calendars for Web pages are very popular, and it would be an ideal feature for some of your date fields on a WebFaced application. In this example, I am using a calendar downloaded for free from the Internet, under the following URL and navigation structure: www.hotscripts.com/JAVASCRIPT / ’ Script and Programs ’ Calendars.
You will find several pop-up calendars to download. I selected the JS calendar for this example. You will need to download this calendar if you want to follow the example in this exercise. Also note that the helper JavaScript file that I use is valid only for the JS calendar, but other calendars will work as well with their specific scripts.
I have added a different program, ORDENTRCAL, for this exercise. It contains an additional record format that requests the user to enter a date for the Order Entry application.
I suggest that you build a new WebFacing project called wflabcal. First, however, you need to switch to the Remote System Explorer perspective.
-
Copy the ORDENTDCAL member from QDDSSRCP to QDDSSRC. ORDENTDCAL contains one more record format that is displayed when accepting an order; a delivery date must be specified in this record format. Remember that in the RSE you may use clipboard copy/paste to copy a source member from a source file into another one.
Now create the new WebFacing project and call it wflabcal.
-
On the first page of the project wizard, specify to create a new EAR file for this project called wflabcalEAR.
-
On the second wizard page, specify J2EE level 1.3.
-
On the third page, select the following members from the QDDSSRC folder: ORDENTDCAL, SLTCUSTD, SLTPARTD.
-
Skip the UIM help panel page.
-
On the CL command page specify that you want to use the following command: CALL ORDENTRCAL.
-
Specify to use your iSeries host user ID and password.
-
Add this information to the list of CL commands.
-
On the next page, select a style that you like.
-
On the last page, select create the project and progress with conversion.
After a little while, the conversion completes, and you are ready to add the calendar. Before you do this, however, run the application and inspect the new panel.
To get to this page shown in Figure 17.9,
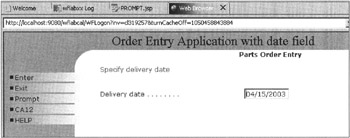
Figure 17.9: New page with delivery date input field
-
Select a customer.
-
Add a part to the order.
-
Press command key 6 to accept the order.
The new page displays.
Now you can add the calendar. You first need two JavaScript files and a cascading style sheet that you downloaded with the JS calendar. You also need some JavaScript helper functions; I extracted these out of the calendar examples and included them on the CD that is part of this book.
The JavaScript files are all copied into the Client Script \usr directory. From there they are automatically picked up by the WebFacing Tool and added to the WebFacing JSP files. Figure 17.10 is a sample of the directory structure and the files added.
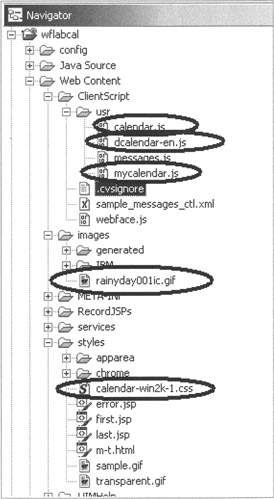
Figure 17.10: Added files for the pop-up calendar
Remember that these files are specific to the JS calendar that I use; if you pick a different calendar, you need to copy different files.
The ![]() mycalendar.js file is on the CD that comes with this book. I just extracted the helper functions needed for this example from the very elaborate sample that comes with the JS calendar. The calendar.js and dcalendar-en.js are part of the JS calendar package. In fact, dcalendar-en is named calendar-en in the package, but it must be imported into the HTML stream for the browser after the calendar.js. Because the automatic import generator goes by alphabetic sequence, I gave this js file a name that forces the import generation to occur after the calendar.js import; otherwise you would encounter a JavaScript error at run time.
mycalendar.js file is on the CD that comes with this book. I just extracted the helper functions needed for this example from the very elaborate sample that comes with the JS calendar. The calendar.js and dcalendar-en.js are part of the JS calendar package. In fact, dcalendar-en is named calendar-en in the package, but it must be imported into the HTML stream for the browser after the calendar.js. Because the automatic import generator goes by alphabetic sequence, I gave this js file a name that forces the import generation to occur after the calendar.js import; otherwise you would encounter a JavaScript error at run time.
The cascading style sheet, calendar-win2k-I .css, is also part of the JS calendar package. I copied it into the WebFacing project's styles directory.
I use a graphic beside the date field so that the user can click on the graphic and invoke the calendar. I chose one of the sample icons in the workbench gallery and copied that to the images directory in the WebFacing project.
You need to perform one last step before you add the calendar JavaScript to the Web settings for the Delivery date field: You need to add the cascading style sheet information for the calendar style sheet. You use the PageBuilder.jsp, inside the Chrome directory in your WebFacing project. In this JSP, you need to add the following tag:
<link rel="stylesheet" type="text/css" media="all" href="styles/calendar- win2k-1.css" title="win2k-1" />
This information is also copied from the calendar examples. Figure 17.11 shows how it looks in the PageBuilder.jsp file. I added it underneath the link tag for the WebFacing style sheet.
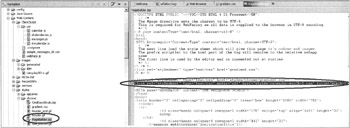
Figure 17.11: Cascading style sheet information in PageBuilder jsp
Now you need to invoke CODE Designer from the WebFacing Project view for the ORDENTDCAL member (Figure 17.12). In CODE Designer, you work with the SCREEN2 group, which for this scenario contains record formats PROMPTDATE and FKEY.
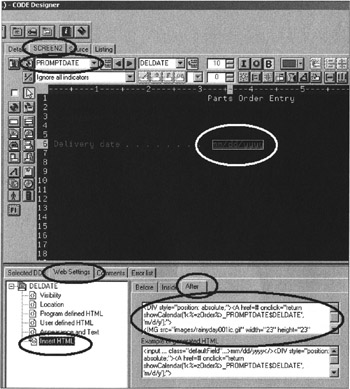
Figure 17.12: CODE Designer with Web settings to invoke pop-up calendar
-
Select the PROMPTDATE record format in this group.
-
In the Design pane, select entry field DELDATE.
-
Click the Web Settings tab.
-
Select the Insert HTML Web Settings node.
-
Select the After tab.
-
Enter the following code into the entry field for this Web setting. You can find this code in the
invoke_calendar.txt file on the book's CD to copy and paste it.
<DIV style="position: absolute;"><A href=# onclick="return showCalendar('l<%=zOrder%>_PROMPTDATE$DELDATE', 'm/d/y');"> <IMG src="images/rainyday001ic.gif" width="23" height="23" border="0"></A></DIV> The code will display an icon beside the delivery date field, the same way the graphic displays in the previous example. The calendar needs to get the ID for its associated control, which is the delivery date entry field DELDATE. The showCalendar function takes the ID and displays the calendar underneath the associated control. It also retrieves the current value from this control and moves the selected date value into this control when a date is selected. The entry field ID is ('1<%=zOrder%>_PROMPTDATE$DELDATE') for this entry field with the name DELDATE in the record format PROMPTDATE.
You can gather this information from the recordformat jsp when you need it for your own applications. Figure 17.13 shows a sample from the promptdate.jsp, which comes from the wflabcal project in the RecordJSPs directory.

Figure 17.13: Sample of recordformat jsp and the IDs generated by WebFacing conversion
The second parameter for the showCalendar function is the date format. I selected m/d/y, but the calendar supports many more formats in case you need a different one.
-
Save the member.
-
Reconvert the member.
-
Run your application.
-
Select a customer, order a part, and accept the order.
On the new delivery date page, you can try the new feature. First click the calendar icon: The calendar will appear with today's date; it picks up this value from the DELDATE entry field and initializes itself with that date. You can now pick a date from the calendar and it is automatically filled into the delivery date entry field, as shown in Figure 17.14.
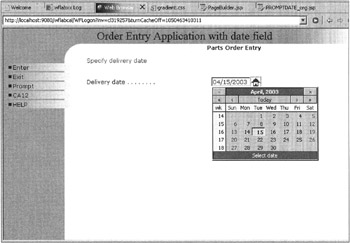
Figure 17.14: WebFaced application with added pop-up calendar
I hope that this excursion into JavaScript and downloadable JavaScript controls has encouraged you to apply these techniques to your own WebFaced applications.
User-Defined HTML
In the previous chapter, I showed you how to use program-defined HTML by adding logic to your RPG program. You used the program defined HTML Web settings to indicate to the WebFacing conversion that you would provide HTML inside the field. This enabled the WebFacing conversion routine to generate the correct HTML and ensure that the actual HTML code does not display as data. Refer to Chapter 16 for the full example.
For user-defined HTML, you can add your own HTML to replace the HTML normally generated by the WebFacing Tool. I provide an example that shows you how to add the HTML strong attribute to the customer city information.
In the wflabxx WebFacing project, open the ORDENTD member with CODE Designer, as shown in Figure 17.15.
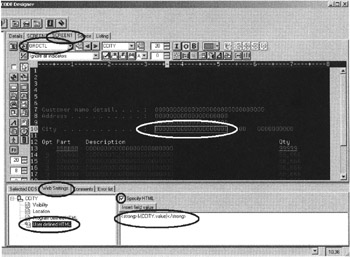
Figure 17.15: Specifying the User defined HTML Web Settings in CODE Designer
-
Select the group tab SCREEN1.
-
Select the ORDCTL record format in this group.
-
Select the CCITY field in the design pane.
-
Select the Web Settings tab below the design pane.
-
Select the User defined HTML node from the Web Settings list.
-
Select the Specify HTML check box.
If the entry field does not contain the string &(CCITY).value),
-
Click the Insert field value push button.
Before the string &( CCITY).value),
-
Enter the HTML tag <strong> .
After the string &( CCITY).value),
-
Enter the HTML end tag </strong> .
-
Save the member in CODE Designer.
-
Convert the ORDENTD member in the WebFacing project.
-
Run the WebFaced Order Entry application.
-
Start the order and select a customer. Your screen should be similar to Figure 17.16.
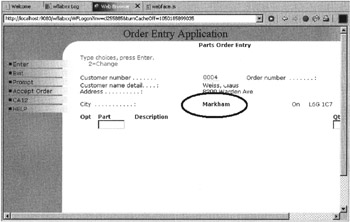
Figure 17.16: City text displays in bold font
With this option, you can ignore the HTML that is generated by default and take control over this part of the Web page.
| Tip | When you use this option, the WebFacing HTML for this field is not generated, so you will have to supply all the necessary code. For example, if you use this Web setting for an input field, none of the HTML is generated to make this an input field. You need to supply the necessary HTML to make this an input field in addition to the other changes you want to make, or this field loses its input capabilities. |
The advantage of Web setting capabilities is that you can add the HTML directly into your record formats, and none of it is lost when you reconvert. This saves you from having to add the HTML and JavaScript directly to the generated JSP every time you reconvert. The Web settings are captured in the DDS source as comments and are reapplied during WebFacing conversion.
EAN: 2147483647
Pages: 153