Using the Appearance and Text Web Setting
In this section, I want you to highlight the Order number field on the first screen. To accomplish this, you add your own style class, and then you can apply it to any other similar field in your WebFaced application. The WebFacing styles are located in the styles directory, inside the WebFacing project. You will use the Appearance and Text Web setting to indicate that this field belongs to the new style class.
Adding a New Style Class
In the WebFacing perspective switch to the Navigator view and expand the wflabxx WebFacing project. Inside the project expand the Web Content and the styles directories. In directory styles you will see subdirectory apparea, which contains the apparea.css file.
-
Double-click the apparea.css file to open the style sheet editor.
Tip If line numbers do not display in the editor, use the workbench preferences under the Windows menu option. Expand the Web and XML files node; expand the CSS Files node; select the CSS Source node; and select the show line numbers check box.
-
In the editor, scroll to the bottom and add the new style class order_Number, as shown in Figure 17.17. File
 order_Number.txt on the book's CD contains this style class if you would rather copy/paste it in.
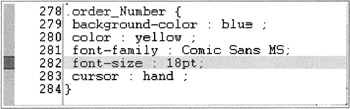
Figure 17.17: Style sheet editor with new class order_numberNote You need a period before the class name to indicate it is a class. Also, do not forget the semicolons at the of the lines.
Tip You can always check how your object will appear in the browser by clicking the Preview area on the right side of the editor window.
-
Save the apparea.css file.
-
Close the editor.
You now need to invoke CODE Designer to apply the Web setting.
In the WebFacing Projects view, expand the WebFacing project and expand the DDS folder.
-
Right-click the ORDENTR member.
-
Select the CODE Designer option.
In CODE Designer,
-
Select the SCREEN2 group tab.
-
Select the Prompt record format as the active record format.
-
Select the Order number field ORDNBR in the design window.
-
Select the Web Settings tab underneath the design window.
-
Select the Appearance and Text node in the Web Settings list.
-
Select the Change style class check box.
-
Enter order_Number in the style class entry field, as shown in Figure 17.18.
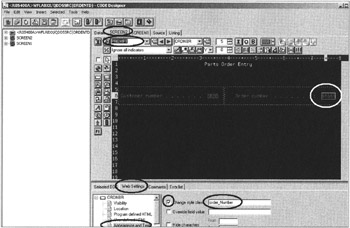
Figure 17.18: CODE designer with Appearance and Text Web Settings applied -
Save the member.
-
Close CODE Designer.
In the WebFacing Projects view:
-
Convert the ORDENTD member.
-
Run the application.
-
Select a customer.
Your screen should look similar to Figure 17.19.
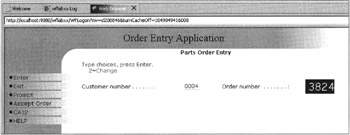
Figure 17.19: Order number formatted according to new style class definition
For any other field that you want to format similarly, you can just change its style class of this new class using Web settings.
Options for Values
For entry fields associated with the Values DDS keyword, the WebFaced UI creates radio buttons by default. You have seen these used in the Order Entry application for subfile option fields.
To make these radio buttons more usable, the WebFacing Tool provides options for the Values Web setting.
You can use the main order screen to try it out.
In the wflabxx WebFacing project, open the ORDENTD member with CODE Designer.
-
Select the SCREEN1 group tab.
-
Select the ORDSFL record format in this group.
-
Select the Option field in the first row of the subfile list.
-
Select the Web Settings tab below the Design pane.
-
Select the Options for VALUES node from the Web Settings list.
-
Select the Options texts for VALUES keyword radio button.
-
Select the 2=2 record from the list of valid values.
-
Enter Change order detail in the New Label entry field, as shown in Figure 17.20.
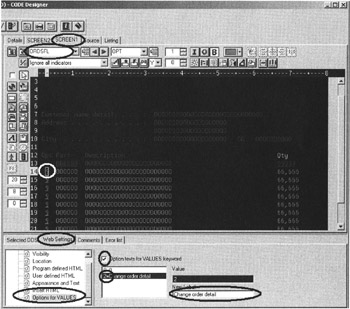
Figure 17.20: Specifying the 'Options for Values' Web settings in CODE designer -
Save the member in CODE Designer.
-
Convert the member in the WebFacing project.
-
Run the application.
-
Add an order detail to the order.
-
Specify a customer, then select a part and specify the ordered quantity for this part.
Your screen should look similar to Figure 17.21.
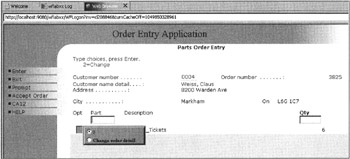
Figure 17.21: Radio button with text from Web settings
This adds the part to the order, and the radio button list displays when the cursor is moved on top of the option field. The Web settings text now replaces the number 2. To improve the appearance, you could also specify text for the 0 value.
Adding Graphics to the WebFaced User Interface
In this exercise, you add graphics to enhance your user interface. You have two choices for adding a graphic:
-
Display a static picture that you specify at design time.
-
Display a dynamic graphic and have your program supply the actual file name to display at run time.
Adding a Static Graphic to the User Interface
Let's first use a static picture, since that method is pretty straightforward. In the customer list, for example, you might want to add a picture to animate the screen a bit more. You previously hid the text 1=Select. Now you want to display a picture instead. You can do this very easily by selecting a .gif file from one of the Windows installation directories.
-
Select the SLTCUSTD member in the WebFacing project and open it with CODE Designer (Figure 17.22) to change the Web settings.
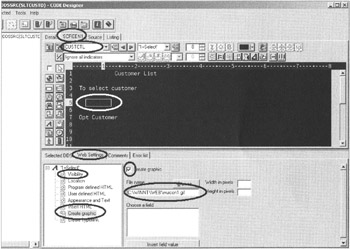
Figure 17.22: Code Designer with Web settings to display graphic -
Select the SCREEN1 group tab.
-
Select the CUSTCTL record format in this group.
-
Select the 1 = Select text.
-
Select the Web Settings tab below the design pane.
-
Select the Visibility node from the Web Settings list.
-
Select the Show field radio button.
-
Select the Create Graphic node from the Web Settings list.
-
Select the Create Graphic check box.
-
Browse for a picture file. In the sample I use C:\WINNT\WEB\wuicon 1.gif.
-
Save the picture file in CODE Designer.
-
Convert the picture file in the WebFacing project.
The picture file is in fact copied into the WebFacing project environment so that it is available during run time in the application server.
-
Run the WebFaced application.
The picture is displayed on the customer selection list window, as shown in Figure 17.23.
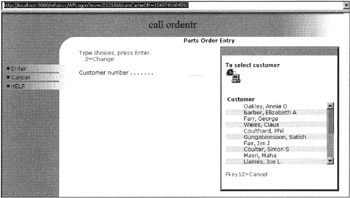
Figure 17.23: Customer list with graphic
Adding Dynamic Graphics to the User Interface
Now you might want to add a dynamic picture and choose a file to display during run time. You can accomplish this for the parts subfile in the sample application. You will replace the part number in the parts list with a corresponding graphic. The graphic files names are the part numbers with the extension .gif; for example, the graphic for part number 000005 is stored in file 000005.gif.
-
Select the SLTPARTD member in the WebFacing project and open it with CODE Designer to change the Web settings (Figure 17.24).
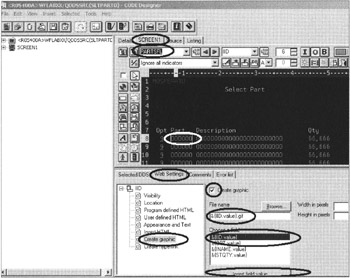
Figure 17.24: Code Designer with Web settings to display dynamic graphic -
Select the SCREEN1 group tab.
-
Select the PARTSFL record format in this group.
-
Select the part field IID in the subfile.
-
Select the Web Settings tab below the Design pane.
-
Select the Create Graphic node from the Web Settings list.
-
Select the Create Graphic check box.
All output fields in the record format are listed in the Choose a field list box.
-
Select the &{IID.value} field in this list box (IID is the name of the part number field).
Click the Insert field value push button. This will move the field name into the entry field File name. Since the part number is the name of the picture file, you just have to add the extension .gif to the File name and you are done.
The value that should be in the file name entry field is &{IID.value}.gif.
-
Save the member in CODE Designer.
-
Convert the member in the WebFacing project.
You need to copy the picture files to the WebFacing project directory structure in the workspace so that they can be found during run time. On the book's CD, the directory wf_book_pictures contains the picture files.
-
Use Windows Explorer to display the content of directory wf_book_pictures on the book's CD.
-
Select the Edit option from the Windows Explorer menu bar.
-
Select the Select All option from the pull-down menu.
-
Right-click one of the selected .gif files.
-
Select the Copy option from the pop-up menu.
-
In the workbench, in the Navigator view, expand the wflabxx project to wflabxx ’ Web Content ’ images ’ generated.
-
Right-click the generated directory.
-
Select the Paste option from the pop-up menu to paste the files into this directory.
-
Run the WebFaced application.
Your page should look like Figure 17.25.
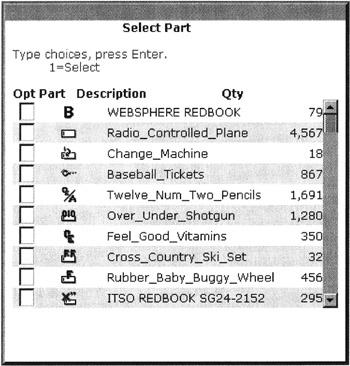
Figure 17.25: Part list with pictures instead of part numbers
If the picture files cannot be found, the page will look like Figure 17.26.
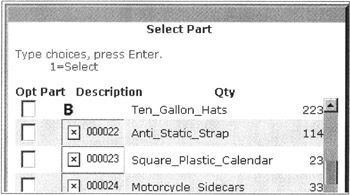
Figure 17.26: List with picture files not found
I hope you can use this feature to enhance your WebFaced applications.
EAN: 2147483647
Pages: 153