| Now that we have set up Illustrator's color settings, we can create, edit, and output artwork in a color-managed environment. The color workflow in Illustrator uses the same concepts and features as that in Photoshop, with a few exceptions. Creating Color-Managed Illustrations When you create a new document in Illustrator, you can choose either RGB or CMYK as the color mode, which in turn defines the color management that's applied to the file. 1. | Launch Illustrator if it is not still open.
| 2. | Choose File > New. The New Document dialog box appears.
Figure 7.2. 
| 3. | Notice the CMYK Color and RGB Color radio buttons.
When you choose CMYK Color as your new document's color mode, Illustrator uses the CMYK working space you've defined in Color Settings for that CMYK document. When you choose RGB, Illustrator uses the RGB working space you've defined for the new RGB document.
| 4. | Click Cancel.
|
Defining the working space of new documents is easy enough, but what happens if you're working in one color space, such as CMYK, but accidentally (or even intentionally) define a color from a different color space, such as RGB, while you're editing? When you select a color from a color space that is different from the document color space, Illustrator uses the default profiles (as defined in Color Settings) to convert the color to the working space. For example, if you define an RGB color in a CMYK document, Illustrator automatically converts the RGB values to CMYK, using the RGB Working Space profile as the source, and the CMYK Working Space profile as the destination. Keeping everything in the document working space ensures accuracy and portability. Color Managing Existing Illustrations When you open an Illustrator or EPS file, Illustrator applies the Color Management Policies settings from the Color Settings file to your file. If the file is already tagged and its working-space profile is the same as the one you've selected in Illustrator, there's no problem. Sometimes, however, you'll encounter one of two situations: the files will be untagged (not color managed), or they'll be color managed but there will be a conflict, and you may or may not know the source data and profiles used. Let's explore how to handle these two situations. Opening Untagged Illustrations 1. | Launch Adobe Illustrator CS2.
| 2. | Choose File > Open and the file Yellowstone Map.ai, which comes with Adobe Illustrator CS and is located in the C:\Program Files\Adobe\Adobe Illustrator CS2\Cool Extras\Sample Files\Sample Art folder.
Illustrator presents the Missing Profile dialog box.
Figure 7.3. 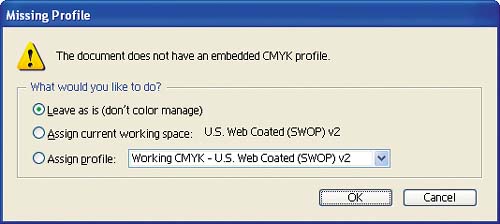
Like Photoshop, Illustrator presents you with three choices for handling the data:
Leave As Is (Don't Color Manage) uses the working-space profile (CMYK in this case) as the source of the data but does not tag the file. Assign Current Working Space uses the working-space profile (a CMYK SWOP profile in this case) as the source of the data and tags the file with the profile. This is generally the best option if you don't know the source of the data. Note  | If you choose Assign Profile and then select a different profile from the working space, Illustrator displays the Assigned Profile Mismatch dialog box, which asks whether you want to convert to the working space or leave the current document space. You should select the embedded profile. |
Assign Profile lets you select a profile for the document. If you know the source of the data, you should select the appropriate profile.
| 3. | Since we don't know the source of this data, select Assign Current Working Space and then click OK to open the file.
Once the file is open, Illustrator color manages the document using the current working space.
| 4. | Close Yellowstone Map.ai.
|
Working with Files That Have Embedded Profiles 1. | Choose File > Open and then navigate to and open the file Logo.ai, located in the Chapter 7 folder of the book's project files, located on the Web site.
This file has an embedded profile that is different from the working-space profile we have defined for Illustrator, so Illustrator presents the Embedded Profile Mismatch dialog box.
Figure 7.4. 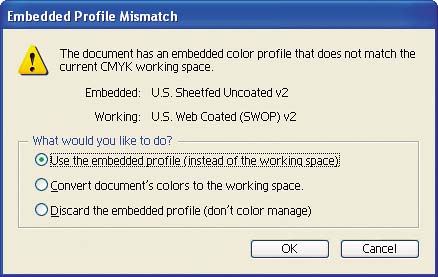
Like Photoshop, Illustrator's Embedded Profile Mismatch dialog box offers three choices for handling the data:
Use the Embedded Profile (Instead of the Working Space) uses the embedded profile as the working space. When artwork contains an embedded working-space profile, it is best to use this profile as the working space, rather than convert it to a different working space. If you configured Illustrator's color settings according to the exercise earlier in this chapter, this option will be selected by default, and in general it is the best option. Convert Document's Colors to the Working Space converts the image from the source space, in this case U.S. Sheetfed Uncoated v2 to the selected working space, which is U.S. Web Coated (SWOP) v2. There is no benefit to converting it to a different working space. When the file is output (printed, separated for press, or converted to a Web graphic), it will be converted to the appropriate destination profile. Discard the Embedded Profile (Don't Color Manage) ignores the embedded profile and opens the image in Illustrator, using the working-space profile to interpret the color values. The file will not be tagged with a profile.
| 2. | Make sure Use the Embedded Profile (Instead of the Working Space) is selected and then click OK to open the file.
Figure 7.5. 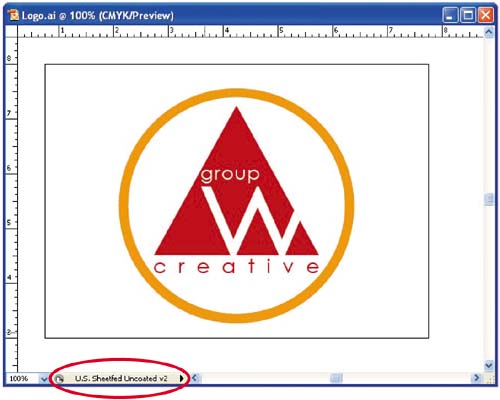
Once the file is open, Illustrator color manages the document using the embedded profile, as illustrated in the information area at the bottom of the document window.
| 3. | Close Logo.ai.
|
Working with Placed Artwork Color management of vector artwork gets more complicated when you place artwork or images in Illustrator from another application. When you place an image into an Illustrator illustration, it includes a linked copy of the image in the file. How Illustrator color manages the placed art depends on the color state of the file: If the placed file does not contain an embedded profile and is in the same color mode as the Illustrator document, no color conversion is performed on the placed file. If the placed file does not contain an embedded profile and is in a different color mode from the Illustrator document, the file is converted using the working-space profile as the source. For example, if you place an RGB image in a CMYK illustration, the default RGB working-space profile is used as the source and the default CMYK working-space profile is used as the destination. If the placed file contains an embedded profile but is in a different color mode from the Illustrator document, the color values are converted using the embedded profile as the source and the document's working space as the destination. If the placed file contains an embedded profile and is in the same color mode as the Illustrator document, the conversion is dictated by the Color Management Policies settings in Illustrator's Color Settings, which we have set to query us when a mismatch or missing profile occurs. In this case, Illustrator will ask if we want to perform the conversion according to the policy settings.
The best solution to simplify the process of compositing artwork with different source profiles is to first convert each file to the same working space upon opening the file and then place or paste the artwork into an Illustrator file. Assigning Profiles in Illustrator If you have a file without an embedded profile, you can assign a profile to it in Illustrator either when opening the file (by choosing Assign Profile in the Missing Profile dialog box) or after the image is open (by using the Assign Profile command). Here's how: 1. | Launch Illustrator CS2 if it's not already open and choose File > Open and the file Yellowstone Map.ai, which comes with Adobe Illustrator CS2 and is located in the C:\Program Files\Adobe\Adobe Illustrator CS2\Cool Extras\Sample Files\Sample Art folder.
Illustrator presents the Missing Profile dialog box.
Figure 7.6. 
| 2. | Select Leave As Is (Don't Color Manage), which instructs Illustrator not to assign a profile to the file, and then click OK.
| 3. | In the information area at the bottom of the document window, choose Document Color Profile.
Figure 7.7. 
The Information window should display Untagged CMYK, indicating that the file has no embedded profile.
Figure 7.8. 
| 4. | Choose Edit > Assign Profile. The Assign Profile dialog box appears.
Figure 7.9. 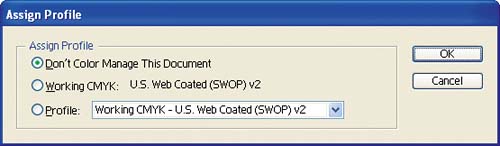
Assign Profile functions much like the Missing Profile dialog box that is presented when you open a file that doesn't have a profile. Assign Profile lets you choose either the current working-space profile or a different profile for the file.
Note | The Don't Color Manage This Document option removes a profile embedded in an image. It doesn't apply when we're trying to assign a profile to an untagged file. |
| 5. | Select Working CMYK and click OK. The file is tagged with the working-space profile, as reflected in the information area at the bottom of the document window.
Figure 7.10. 
| 6. | Choose File > Save as.
| 7. | In the Save As dialog box that appears, change the filename so that you don't overwrite the original. Then choose Adobe Illustrator from the Save As Type drop-down menu and click Save.
Figure 7.11. 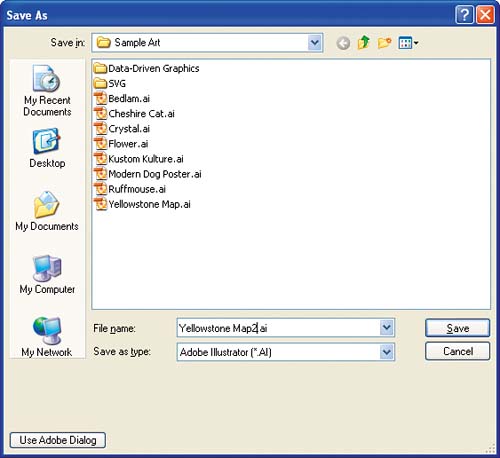
The Illustrator Options dialog box appears with the Embed ICC Profiles option selected by default.
Figure 7.12. 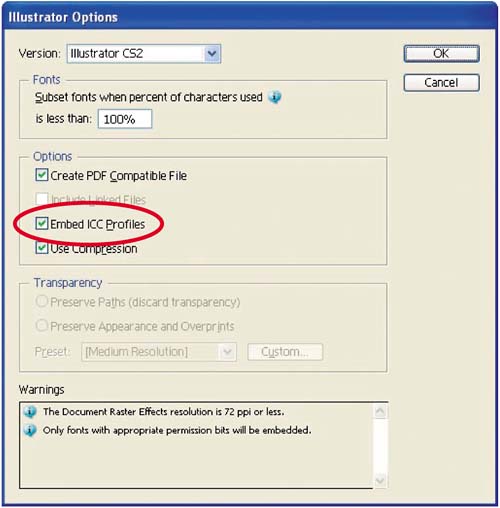
The Embed ICC Profiles option instructs Illustrator to embed the current working-space profile in the file. Illustrator supports embedding profiles in the Adobe Illustrator Document and Adobe PDF formats. It does not support embedding profiles in EPS files. The only way to embed a profile in an EPS file is to use Photoshop to convert the EPS to a bitmap image and embed a profile when saving.
Alternatively, you can embed profiles in a bitmap file format such as TIFF via Illustrator's Export command. Illustrator also lets you embed profiles in JPEG files via the Save for Web command.
| 8. | Make sure that Embed ICC Profiles is selected and then click OK to save the file.
|
|