Hands On 1: Creating your Own Custom Panel Layout
Overview
Even though the Web is becoming an increasingly more visual medium by the second, the majority of the information is still textual.
Beyond the textual content that you can transmit, however, the type itself is an extremely powerful tool for giving your digital creation extra life and meaning. Because of Flash's vector animation tools, text ” especially if it's properly crafted ”can have an incredible impact on your visitors . Taking the time to choose the right type for your textual content can turn a good Flash site into a great Flash site.
Understanding Text, Type, and Fonts
When you work with text in Flash MX 2004 and Flash MX Professional 2004 (or any other graphics program for that matter), you'll find that the words text, font, and typeface are often used interchangeably. Don't be fooled, however; there is a big difference among the three.
Text refers to any combination of characters that make up a written document of some sort (whether a word, a sentence , or a book). A font, on the other hand, is a complete set of characters in a particular size and style. This includes the letters , the numbers , and all of the special characters that you get by pressing the Shift, Option, or Cmd/Ctrl keys. A typeface contains a series of fonts. For example, the typeface Arial contains the fonts Arial, Arial Bold, Arial Italic, and Arial Bold Italic.
|
| Tip | For more information about the art of text, type, fonts, and just about anything else typographic, try these great resources: www.rsub.com/typographic and http://counterspace.motivo.com . |
Working with Flash's Font Limitations
Although Flash has some font-related issues that need to be discussed, they are nowhere near as complicated (and limiting) as those related to fonts and HTML-based design. However, they are important and ultimately will impact your Flash creations.
Flash movies can use Type 1 PostScript fonts, TrueType fonts, and bitmap fonts (on the Macintosh only). To use PostScript fonts, you must have Adobe Type Manager (ATM) installed on your system.
|
| Tip | If you're using Windows 2000, you don't need to install ATM to use Type 1 PostScript fonts. |
For the most part, when you publish your final product, Flash embeds the necessary information about fonts, thereby allowing your audience's computers to display them properly. However, in some cases, fonts might still appear incorrectly in your Flash creation when your audience views it because they many not have that font installed on their machine.
You can avoid this problem in two ways. First, if you are not picky about the actual font you use, employ the _sans, _serif, or _typewriter fonts available in the Font drop-down menu of the Property Inspector (see the "Using the Property Inspector to Manipulate Text" section later in this chapter). Essentially, when you use these fonts (which are called device fonts ), you are telling the Flash movie to use the equivalent fonts installed on your audience's computers. This way, you always know that your text will appear correctly. Essentially, device fonts are the fonts that your operating system employs to display its textual information.
Second, to keep your fonts from displaying incorrectly when your Flash creation is viewed , you can break apart the given text and turn it into shapes instead of text. The process for breaking apart text will be covered later in this chapter in the "Breaking Apart Text" section.
Besides the problem of users not having a certain font installed, there are some other specific font issues of which you should be aware. When it comes to Windows machines, PostScript fonts are prone to display incorrectly. As a result, it is strongly suggested that Windows users limit themselves to TrueType fonts.
Mac users need to be cautious when employing Adobe PostScript fonts. For the most part, PostScript fonts function properly, but there are situations where they cause problems. Sometimes, PostScript fonts will display properly while you are creating your Flash movie but will display incorrectly when the movie is actually published.
Creating Type with the Text Tool
Now that you've explored the limitations of Flash-based text, you can explore the process of creating text by using the Text tool ![]() , which is located in the Tools section of the Toolbox.
, which is located in the Tools section of the Toolbox.
Although the vast majority of your text editing in Flash will be facilitated by the Property Inspector (which you'll explore later in this chapter), you always need to start off by actually creating some text ”a process made possible by the Text tool.
To use the Text tool, select it from the Toolbox, click anywhere on the Stage, and begin typing. Don't worry too much about how the text appears at this early stage of creation; you'll learn how you can get it to look exactly how you want in the "Using the Property Inspector to Manipulate Text" section later in this chapter.
|
| Tip | To edit text, simply click a text block with the Text tool (or double-click it with the Arrow tool) and make the changes that you want. When finished, click anywhere outside of the text box. |
Understanding Text Boxes
Flash creates text in blocks called text boxes (see Figure 5.1). The text blocks themselves become editable objects that you can move about the Stage at will.
![]()
Figure 5.1: As you're typing the text, notice that it is contained in a rectangle with a small circle in the upper-right corner. This is a text box.
There are actually three distinct types of text boxes (see Figure 5.2), each with a particular function within the process of creating and manipulating text in Flash.
![]()
Figure 5.2: There are three distinct types of text boxes: Extending (left), Input (center), and Fixed (right).
§ An Extending text box extends as you type. You can easily recognize these by a small circle in the upper-right corner. The Extending text box is the default type of text box in Flash.
§ An Input text box contains Dynamic Text that can be changed by anyone viewing your Flash movie.
|
| Note | For more information on how to create and work with Dynamic Text, see the section "Working with Dynamic Text" later in this chapter. |
§ A Fixed text box doesn't increase horizontally. To create a Fixed text box, which is recognizable by a small square in its upper-right corner, choose the Text tool from the Toolbox, click anywhere on the Stage, and drag the text block to the desired size. Notice that you can only drag horizontally. When you type, your text will automatically wrap, extending the size of the text block vertically, but not horizontally.
Say, for instance, that you wanted to create a field where someone types a password to access a restricted area of your site. You would accomplish this (at least in part) by creating an Input text block. Unlike the other two types of text boxes, the Input text box, which is recognizable by a small circle in the lower-right corner of the text box, is not, strictly speaking, created with the Text tool. Instead, you need to choose Dynamic Text or Input Text from the Text Type drop-down menu in the Property Inspector (see the following section).
Using the Property Inspector to Manipulate Text
The Text tool is the primary method for creating text, and the Property Inspector is the primary tool for editing and manipulating it. Unlike pre-MX versions of Flash, which used several different panels to control various aspects of Flash text, Flash MX 2004 and Flash MX Pro 2004 use the all-powerful Property Inspector to manipulate text. You can access it by choosing Window Properties.
Before learning how to manipulate text with the Property Inspector, however, there is a single detail that needs to be discussed. In Flash MX 2004 and Flash MX Pro 2004, there are three distinct types of text: Static Text, Dynamic Text, and Input Text. Each type, which will be discussed in the following sections, has its own place and function within a Flash creation.
Let's take a look at the process that you need to follow to create and edit each of the three types using the Property Inspector:
1. If you haven't already, insert some text onto the Stage using the Text tool.
2. If the text box that you've just created is still "live" (or, still editable), select the text using your cursor. If you've deselected the text box, simply reselect it with the Arrow tool (a light blue box will appear around the selected text block).
3. If it isn't already, open the Property Inspector by choosing Window Properties.
4. Select the specific type of text that you want to create from the Text Type drop-down menu (see Figure 5.3).

Figure 5.3: The Text Type drop-down menu in the Property Inspector lets you select the type of text that you want to work with.
From here, the Property Inspector will change to reflect that text type's specific properties, all of which are described in the following sections.
|
| Tip | This step-by-step process describes how you can manipulate text after it's already been created. If you want to create some text with the Text tool whose properties have already been set, just select the Text tool from the Toolbox, open the Property Inspector, set the text properties (all of which are described next ), and then insert the text onto the Stage. The inserted text will automatically have all the properties (font, color, size, and so on) that you set with the Property Inspector. |
Working with Static Text
Although you are going to spend time exploring and discussing Dynamic Text and Input Text a little later in this section, it's important to recognize that Static Text, which is automatically created when you insert text using the Text tool, is the default type of text in Flash. In other words, when you create text with the Text tool, it is automatically Static Text.
|
| Tip | When you want to work with Static Text, you really don't have to follow the steps in the previous section because Static Text is already chosen in the Text Type drop-down menu. |
Beyond its innate ability to convey textual information, Static Text doesn't do anything special. As a result, you'll find that you'll probably use it the most. As a result, it's good that you become intimately familiar with all the following Static Text options accessible through the Property Inspector (see Figure 5.4).

Figure 5.4: Static Text properties displayed in the Property Inspector
The options are as follows :
Font drop-down menu Displays the current font when the Text tool is active. The list shows every font currently installed on your computer. You can either choose a font with the Font drop-down menu before you begin typing or select existing text within a text block (or the text block itself) and change its font with the Font drop-down menu.
|
| Tip | You can also change the font of selected text by choosing Text Font and then picking from the list of fonts installed on your machine. |
Font Size field Sets a font's size. You can either enter a value (in point size) into the Font Size field or use the Font Size slider (which is accessible by clicking the small Down arrow to the right of the field).
|
| Tip | You can also change the font size by choosing Text Size and picking from the list of sizes available. |
Text style buttons Sets the text to either bold or italic. As with the rest of the options in the Property Inspector, you either select a block of text with the Arrow tool or use the Text tool to select the text when the text block is "live." Then click one of the style buttons. You can also click either of the style buttons before you create a new string of text.
|
| Tip | Unfortunately, the Property Inspector offers a limited array of style options. For more (though not much more) options, select Text Style and choose a style from the list. |
Text Color swatch Opens the Text Color palette so you can set your text's color. If you are unhappy with the available color choices, mix your own using the Color Picker (accessible by clicking the small color wheel in the top-right corner of the Text Color palette).
Character Spacing value Represents the distance between characters in a string of text. The higher the Character Spacing value, the farther apart the characters will be. Figure 5.5 illustrates different Character Spacing values, also referred to as tracking.

Figure 5.5: The top line of text has a character spacing of 0, the middle line has a character spacing of 2, and the bottom line has a character spacing of 5.
The Property Inspector lets you set the Character Spacing for any given text block (either before or after it has been created). If the text has already been created, all you need to do is select the text block or the actual text and enter a value in the Character Spacing field. Alternatively, you can use the Tracking slider, which is accessible by clicking the small Down arrow just to the right of the Tracking field, to adjust the amount of tracking.
As with all of the other options in the Property Inspector, you can also set the tracking before you create text with the Text tool.
Character Position value Character Position, which is also referred to as baseline shift in graphic design, refers to how closely the text sits above or below its natural baseline (the bottom of the letters). By changing a text block's Character Position value, you can create superscript or subscript characters. Unlike most graphic design programs that allow you to set an exact baseline shift value, Flash gives you only three default settings: Normal, Superscript, and Subscript (see Figure 5.6).
![]()
Figure 5.6: The three baseline shift presets
To set the character position, select a string of already created text, and choose one of the three baseline shift options from the Character Position drop-down menu. As with all of the other options in the Property Inspector, you can also set the baseline shift before you create text with the Text tool.
|
| Note | In addition to changing some text's Character Position value, you can also create superscript or subscript by choosing Text Style Superscript or Subscript. |
Auto Kern option Evens out the spacing between individual characters in a string of text. When you select the Auto Kern option, you activate the built-in kerning option of many (but not all) fonts.
|
| Tip | If you want to apply the Auto Kerning feature, a font must have kerning information built into the file; this is why some fonts will auto kern and others won't. |
Change Orientation of Text button Accesses a drop-down menu with a series of options that change the direction of the selected text. The default Horizontal option makes the text flow from left to right horizontally. The two remaining options ”Vertical, Left to Right and Vertical, Right to Left ”make the text flow vertically. The difference between the two is that if you apply the Vertical, Left to Right option to a block of text with more than one line, the first line will remain the first vertical line. However, if you choose the Vertical, Right to Left option, the last line in a text block with more than one line of text will be the first vertical line.
Rotate Text button Changes the text's orientation (only on vertical text). With rotation turned off, individual characters will face to the right.
On the other hand, if you turn the rotate option on, the individual characters will face downward. The differences between text with the rotation turned on and text with the rotation turned off is illustrated in Figure 5.7.
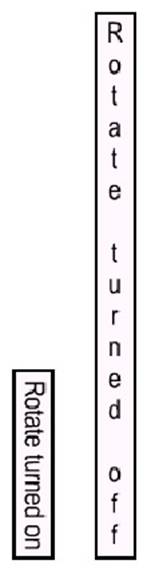
Figure 5.7: The text on the left has the rotation turned on, while the text on the right has the rotation turned off.
URL Link field Flash offers several different ways in which to link to a URL. The easiest method uses the URL Link field in the Property Inspector.
|
| Note | Any Flash text to which you've attached a URL will appear on the Stage with a dotted underline. |
Simply select a string of text that you want to turn into a link, and type a URL into the URL Link field.
|
| Note | You can add a URL only to horizontal text. |
URL Target field Because it's entirely possible that your Flash movie be delivered in a framed HTML document, the Target drop-down menu lets you set the location in which the URL loads. There are four default options:
§ Choosing blank loads the link in a new browser window, maintaining the window in which the hyperlink was located just below the newly opened window.
§ If you choose parent , the document, when loaded, will occupy the entire area of the frameset document in which the link resides.
§ Choosing self (which is the default link target) simply opens the document in the frame where the link resides.
§ If you choose top , the document will be loaded into the uppermost (hierarchically speaking) frameset ”wiping out all frames and nested framesets.
You can also manually enter a frame name into the Target drop-down menu/field if you want to target a specific named frame in the HTML document.
Selectable button Under normal circumstances, Static Text is part of the Flash movie and is therefore not selectable as text would be in an HTML document, for example. However, if you want your audience to be able to select the Static Text in your movie (and therefore copy and paste it), make sure the Selectable button is toggled.
Use Device Fonts option By selecting the Use Device Fonts option, you tell Flash not to embed the font used in a given text block. Instead, Flash will look at the user 's computer and employ the most appropriate font on their system to display the text. Ultimately, because the font information is not embedded, the SWF file's size will be slightly smaller.
|
| Note | You can evoke the Use Device Fonts option only when you're working with horizontal text. |
Alignment buttons The right side of the Property Inspector offers you four alignment options: Align Left, Center, Align Right, and Justify (see Figure 5.8). To align text, select a text block (or a string of text within a text block) and click one of the alignment buttons.

Figure 5.8: The results of the four alignment options from left to right: Align Left, Center, and Align Right.
Formatting options By clicking the Edit Format Options button, you get access to a Format Options dialog box (see Figure 5.9), which contains a series of options that affect the way in which an entire text block looks (opposed to individual characters within the text block).
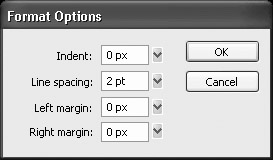
Figure 5.9: The Format Options dialog box
When you set the left margin of a text block, you set the distance, in pixels, between the left side of the text box and the text itself. Enter a value numerically into the Left Margin field or use the Left Margin slider (accessible by clicking the small Down arrow to the right of the Left Margin field).
When you manipulate the right margin, you set the distance, in pixels, between the right side of the text box and the text itself. Enter a numerical value into the Right Margin field or use the Right Margin slider (accessible by clicking the Down arrow to the right of the Right Margin field).
The Indent setting changes the distance, in pixels, between the left side of the text box and the first line of text.
The Line Spacing setting represents the vertical distance, in points, between lines in a text block. To set the line spacing, enter a value numerically into the Line Spacing field, or use the Line Spacing slider.
New to MX 2004 Alias text The Alias text feature, which is new to Flash MX 2004 and Flash MX Pro 2004, is ideal for use on mobile devices as it produces crisp and legible text optimized for small size representation (Figure 5.10). Text is first rastered to a non-anti-aliased state, and then converted to a vector representation, thus ensuring a highly legible font at small display sizes.
![]()
Figure 5.10: The text on the left is an example of aliased text, while the text on the right is an example of anti-aliased text.
Working with Dynamic Text
When you create Dynamic Text, you produce a text box with content dynamically updated from another source, say, a database or text file on your server. So, Dynamic Text is not really fixed or unchanging per se , even though it's created in the same way as Static Text. Instead, it's sort of like a text container with contents that can change. With this in mind, one can easily come up with some genuinely interesting uses. You could create a constantly changing list of your favorite jokes or your daily itinerary ”the possibilities are endless.
|
| Tip | If you are interested in using Dynamic Text to create dynamic content, see Bonus Chapter 1 (on this book's accompanying CD). |
If you want to create and manipulate Dynamic Text, you have to go through an extra step that you wouldn't normally have to go through if you were working with Static Text: You'll need to manually select Dynamic Text from the Property Inspector's Text Type drop-down menu.
From there, you'll get access to the specific Dynamic Text properties in the lower-right corner of the expanded Property Inspector (see Figure 5.11), each of which is described next:

Figure 5.11: Dynamic Text properties displayed in the Property Inspector
Line Type drop-down menu Displays three choices: Single Line, Multiline, and Multiline No Wrap. Single Line displays the text as one line, and both Multiline and Multiline No Wrap display it as more than one line. The difference between the two Multiline options is that Multiline No Wrap will break a single line into more than one line only if the last character is a breaking character, such as Return/Enter.
Instance Name field Contains the name of the text block so that dynamic content intended for that specific text block will know exactly where it needs to go.
|
| Note | Make sure that the name you enter into the Instance Name field is unique. |
Variable field Introduced in Flash 5, the Variable field allows you to enter the name of the ActionScript variable associated with a particular string of Dynamic Text. Since the introduction of the Instance Name field, however, this field has seen less and less use for reasons that will become more apparent as you become more familiar with Flash.
|
| Note | For more information on Variables, check out Chapter 18. |
Selectable Text button Allows your audience to select the text within the Dynamic Text box, much as in the case of the Static Text option.
Render Text as HTML button Tells Flash to allow you to use certain HTML tags in the text box for formatting its contents. Now, don't get all wild and crazy, thinking that you can use every HTML tag under the sun. Unfortunately, there are only a limited number of HTML tags (including bold, italic, underline, font face, font color, paragraph break, and font size) that are supported.
Show Border around Text button Tells Flash that you want the text box to be surrounded by a visible border.
Edit Character Options button When you click the Edit Character Options button (shown as Character), the Character Options dialog box opens (see Figure 5.12).
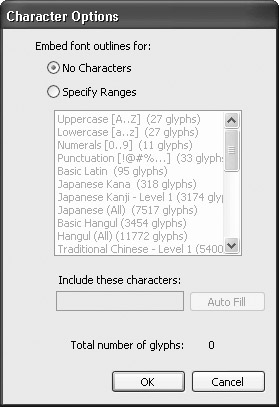
Figure 5.12: The Character Options dialog box
From here, you can determine exactly how many characters of the font are embedded in the file. Embedding a character in the file allows Flash to "remember" how to render it when the movie is played back on a system that does not have the specific font you specified for the text box. The Edit Characters dialog box refers to characters as glyphs to remind us of the fact that elements of a font are not necessarily characters (after all, they could be ideograms from a Chinese font or Elvis heads from a clipart font).
By selecting the No Characters option at the top of the Character Options dialog box, you are instructing Flash not to store the shapes of any characters. The option beneath it, Specify Ranges, enables the other fields in the Edit Characters dialog box, which you can use to specify which characters you would like to have embedded into your Flash movie. The list box in the center of the Edit Characters dialog box contains several pre-defined sets of characters that allow you to quickly embed groups such as Numerals and Uppercase Letters. You can also include specific characters by typing them into the Include These Characters field. If you press the Auto Fill button, Flash reads all the text inside the text box and files each character appearing in its contents in the Include These Characters field. At the bottom of the Edit Characters dialog box, you will find a running total of the number of characters that you have instructed Flash to store within the Flash movie. The fewer characters of a font you embed, the smaller the resulting Flash movie file will be, so keep an eye on this number!
Working with Input Text
Input Text is almost exactly the same as Dynamic Text. The only real difference lies in the fact that data is traveling in the other direction ”from the user's computer to a server, rather than from the server to the computer. Simply put, while you can't enter text into a Static text box or a Dynamic text box, you can enter text into an Input text box. As a result, most of the options available once you select Input Text from the Text Type drop-down menu in the Property Inspector (see Figure 5.13) are exactly the same as described previously.

Figure 5.13: Input Text properties displayed in the Property Inspector
There are, however, two additional options:
Password option Beyond the Single Line, Multiline, and Multiline No Wrap options in the Line Type drop-down menu, you have a fourth option: Password. Use the Password option to display the on-screen text as asterisks to maintain password security.
|
| Tip | Selecting the Password option affects only the display of the text entered by the user. To make the password work, you are going to have to use ActionScript to pass the information to a server-side application. For more information about integrating database-driven applications and Flash, see Bonus Chapter 1 (on this book's accompanying CD). |
Maximum Characters field Entering a numerical value into the Maximum Characters field limits the number of characters that a user can enter into a given text field.
Breaking Apart Text
As you've probably noticed, when you create text, it's inserted onto the Stage as a block. Whether a letter, a word, or an entire Shakespearean soliloquy, you can't independently manipulate (scale, skew, move, and so on) individual portions of the text block.
|
| Note | You need to be aware of two problems when you break apart text and turn it into shapes. First, broken-apart text increases your Flash creation's file size considerably. Second, once text is broken apart, you can no longer edit it as you would other text. |
Although this is especially irksome, there is a rather easy way around the problem. Essentially, you break the text block down into its parts . Let's take a look at how:
1. Select a text block with the Arrow tool.
2. Choose Modify Break Apart.
3. The result will be that the text block will be broken into its individual characters, each of which can be edited, moved, and manipulated independently of the others (see Figure 5.14).

Figure 5.14: The same block of text as it appears normally (left) and after it has been broken apart (right)
|
| Tip | Breaking apart text is especially handy if you want to animate individual characters of a larger text block. |
Manipulating Text Shape
One of the really neat things that you can do with Flash is manipulate the shape of the individual characters of a given font. If you don't like how the G looks in Arial, you can change it to look exactly how you want. The process involves taking the text and breaking it apart several times. To accomplish this, follow these steps:
|
| Note | When you use the Break Apart command, you can affect only TrueType fonts. Bitmap fonts disappear when you break them apart. PostScript fonts can be broken apart only on Mac systems running ATM. |
1. Make sure the Stage has some already created text.
2. Select the text box with the Arrow tool.
3. Choose Modify Break Apart. At this point, the text should break down into a group of several selected items, each of which is composed of one character.
4. Without deselecting anything, again choose Modify Break Apart.
5. Deselect the shape by clicking anywhere else on the Stage or by choosing Edit Deselect All.
6. By doing this, you convert the text into a shape like any other. From here, you can use the Arrow tool to manipulate the shape of the character(s), as illustrated in Figure 5.15.

Figure 5.15: Once you've completely broken apart the text, you can manipulate the shape of the individual characters with the Arrow Tool.
|
| Tip | One of the coolest things about text that has been broken apart is that you can use the Ink Bottle to add an outline around the individual characters. |
Creating a Font Symbol
If you are planning on creating and using a Shared Library (discussed in Chapter 7), you would do well to become familiar with Font symbols. Essentially, a Font symbol allows you to stick any font into a Shared Library, which sits on a server somewhere. From there, any number of Flash movies can link to the Shared Library and use the font without it having to be embedded in their files, thereby reducing their overall sizes.
To create a Font symbol, follow these steps:
1. Open the movie that you want to house the Shared Library.
2. If it isn't open already, choose Window Library to open the Library.
3. Choose New Font from the Library Options menu. The Font Symbol Properties dialog box opens (see Figure 5.16).

Figure 5.16: The Font Symbol Properties dialog box
4. Enter the name for the font that will appear in the Library into the Name field.
|
| Note | The name that you give isn't the official name of the font itself, just an identifier that you assign for your own purposes. |
5. Select the actual font from the Font drop-down menu.
6. Choose whether you want the Font symbol to be bold or italic.
7. When you are finished, click OK.
|
| Note | For more information on Shared Libraries, see Chapter 7. |
Checking Your Movie's Spelling
New to MX 2004 Easily one of the most underrated , but extremely powerful, new tools in Flash 2004 and Flash 2004 Pro is the spell checker. It's completely mind-boggling why Macromedia didn't introduce a spell checker into Flash before this version. Just because Flash doesn't produce reams and reams of text doesn't mean that the text that it does produce can't be misspelled . Hey, even the best spellers among us misspell a word or two now and then, and need the occasional help of a spell checker. For those of us who can't spell our way out of a paper bag ( myself included), the spell checker is that much more of a blessing.
The process by which you check your document's spelling involves two steps. First, you've got to set the properties of the spell checker. Then you actually run the spell checker, which involves dealing with any misspelled words that don't appear in your chosen dictionary.
Setting Up the Spell Checker
Before you can actually run the spell checker, you need to set its properties. Let's take a look at how:
1. Choose Text Spelling Setup. The Spelling Setup dialog box opens (see Figure 5.17).

Figure 5.17: The Spelling Setup dialog box
2. Set the scope of the spell check by selecting one (or more) of the options from the Document Options section (in the top-left corner of the dialog box).
3. Select the dictionary to be used during the spell check from the Dictionaries list box.
|
| Note | While you can choose as many dictionaries as you like, you need to choose at least one for the spell checker to work. |
4. To use a personal dictionary (a text file composed of words that you have designated), click the Browse for Personal Dictionary File button ![]() next to the Path field. When the Open dialog box displays, navigate to where the text file you would like to use as the designated personal dictionary is located, select it, and click the Open button.
next to the Path field. When the Open dialog box displays, navigate to where the text file you would like to use as the designated personal dictionary is located, select it, and click the Open button.
|
| Tip | Creating a personal dictionary is a very handy thing if your Flash movie uses specialized words that aren't normally found in the generic dictionaries that are available. |
5. To add words to your personal dictionary, click the Edit Personal Dictionary button. When your personal dictionary is open in the Edit Personal Dictionary dialog box (see Figure 5.18), you can change the spelling of existing words and add new words. When you've finished editing your personal dictionary, click the OK button.
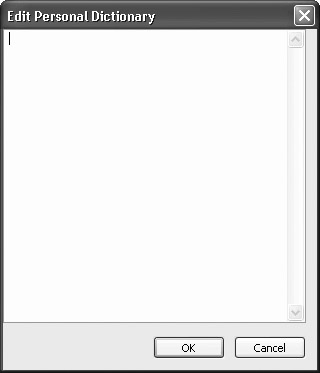
Figure 5.18: The Edit Personal Dictionary dialog box
6. To specify how the spell checker checks your document, select any of the choices in the Checking Options section of the Spelling Setup dialog box.
7. When you've finished setting the properties of the spell check, click OK.
Checking your Document's Spelling
Once you've used the Spelling Setup dialog box to set all the properties of the spell checker, you are free to check the spelling of your movie. To do so, just follow these steps:
1. Select Text Check Spelling.
2. If you have any misspelled words (based on the search criteria that you set in the Spelling Setup dialog box), the Check Spelling dialog box opens (see Figure 5.19).

Figure 5.19: The Check Spelling dialog box lets you decide how to deal with misspelled words that were found during the spell check.
3. From here, you have several options as to how you want to deal with misspelled words that were identified:
|
| Tip | Click the Setup button in the Check Spelling dialog box if you want to open the Spelling Setup dialog box to change the way in which your document's spelling is checked. |
§ If the word that was brought up is in fact spelled correctly (but simply doesn't appear in the dictionary or dictionaries that you selected in the spell checker's properties), you can click the Add to Personal button.
§ Click the Ignore button if you want the spell checker to ignore that single instance of the misspelled word.
§ Click the Ignore All button if you want the spell checker to ignore all instances of the misspelled word.
§ To change the spelling of the word, select one of the options from the Suggestions list box. If you want, you can manually enter a correction into the Change To field. From there, click the Change button to make the correction. If you want to correct all instances of the misspelled word, click the Change All button.
§ If you want to remove the misspelled work entirely from the movie, click the Delete button.
4. To end the spell check, you have two options:
§ If you want to cancel the spell check before it reaches the end of your document, click the Close button.
§ Continue spell checking until Flash tells you that it's finished checking your document. Click the Yes button to have Flash go back to the beginning of your movie and start checking again. If you want to close the spell checker, click the No button.
Inspirational Design Model
There is little doubt that sound digital typography gives a well-designed site that extra creative punch. Let's face it, folks: Type is power! Because of its foundation in vector technology, Flash gives you the opportunity to leverage typographic power. No site illustrates this more elegantly than typographic ( www.typographic.com ). Designed by Jimmy Chen, an astounding visual designer who lives in Los Angeles, typographic takes web design beyond the realm of the commercial, the corporate, and the everyday into something far more potent (see Figure 5.20). Every square centimeter is packed with beautiful digital typographic design. The visual subtleties of typographic are quite stunning and create a visual space that easily holds your attention for long periods of time.

Figure 5.20: Jimmy Chen's typographic
EAN: 2147483647
Pages: 54