Managing Parameters
| At this point, I expect you to understand that your reports are going to need to manage, limit, sort, filter, and focus the report rowset using parameters. Because of the nature of today's applications, users expect applications to be interactivethey rarely settle for static reports that don't reflect current or user-selectable sets of information. In order to adapt reports so they meet user requirements, you're going to need to use one or more parameters. Basically, ReportViewer parameters are organized into two basic types:
One of the challenges you'll face when working with the ReportViewer paradigm is that all parameter-management tasks fall on your shoulders. Unlike the Reporting Services BIDS development process, RDLC reports do not manage the report or query parameters for you in the context of the report. Remember Figure 14.3? The "Low Price" parameter TextBox was generated by the RDL report interfacenot by a hand-coded UI. The BIDS Report Designer is capable of managing a wealth of parameter optionsnone of which requires additional code. Even if your RDLC file is built from an imported parameter-driven RDL report definition, the report parameters section is ignored unless you build a custom Parameters structure in code to populate it. This means you're in for considerable extra work, including (but not limited to) capturing the parameters, managing pick lists, and passing the parameters into structures recognized by the RDLC compiler. Let's get startedI'm losing daylight. IMHO If wishes were horses, I would need to clean the streets more often.
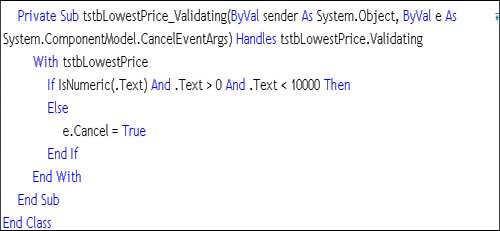
One of the tools that might make sense is a routine that generates the UI controls needed to manage parameters for any given RDL report. Perhaps, one of us will write that if we get bored. Capturing ParametersParameter values can come from anywhere (except Cleveland and parts of south Texas). They can be provided by the user punching keys or doing cut/copy/paste mouse operations, from code-generated values, from data retrieved from a pick list, from external devices like a GPS coordinate generator, or from your cat walking on the keyboard. Ideally, your report (and your application) avoids scenarios where the user is required to enter anything into TextBox controlsespecially if these are values that are concatenated into your SQL. That's because SQL injection attacks are a very common problem, and report parameters are an ideal place to enter nasty SQL. Let's walk through the typical parameter-management scenarios and how to implement them. Prompting for a Parameter ValueThe easiest (and possibly most dangerous) way to capture a parameter values is to place a TextBox in your UI and ask the user to enter the value. Figure 14.33 shows a ToolStrip containing a prompted TextBox used to supply a value to a parameter that limits the scope of the rows returned for the report. Figure 14.33. Using a prompted TextBox to capture a parameter. Here, the user can enter (almost) anythingas long as it's a number between 0 and 10,000. Behind the scenes, I've done a number of things to make sure this value is "reasonable" (falls with the specified values) and safe. These include:
Prompting with a Pick ListIn cases where the parameter can be only one or more specific items, a pick-list of some kind is the best way to capture the parameter value. Generally, you'll want to populate the pick list early in the application if the content of the list does not change that frequently. If the list changes more frequently, of course, the pick list of valid options will have to be populated more frequentlyperhaps each time it's referenced.
One of the new features of Reporting Services 2005 is the ability to expose one or more "multi-choice" parameter lists. In this case, Reporting Services knows how to present and populate a list of choices that can be populated via a static list or a query. It's this functionality that I'm implementing here with my own code and controls. If you use the query approach to populate a pick list, you'll have to make an extra round-trip to the data source to fetch the values. Alternatives to this query can be a locally persisted data store of some kind that maintains a suitable list, but this means building your own handlers, files, and many other issues. I find it's not at all onerous to simply fill the pick lists from a common command that includes SELECT statements for all of the pick-list rowsets. Of course, if you're using JET or some other lightweight database that does not support multiple SELECT commands, you'll need to find another alternative, like paper tape. For this example, I built two types of pick lists:
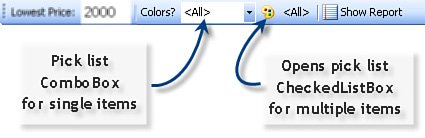
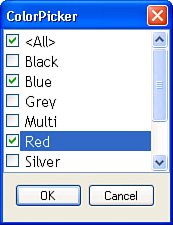
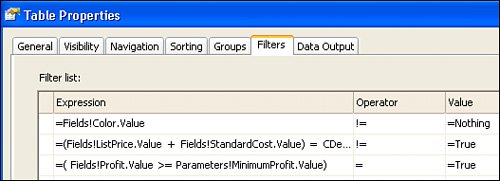
No, I did not have to use a TableAdapter to fetch the rowset used to populate these pick listsfrankly, it was almost as much trouble as using my own Connection, Command, and DataTable instancesbut I'm trying to leverage this new technology and it did take fewer lines of code. The ToolStrip control with its two pick lists is shown in Figure 14.35. I find that the ToolStrip is a pretty cool control, as it provides a clear and intuitive way to generate the needed UI elements. The problem with this approach is that it's harder to bind to the ToolStrip-hosted controls, so we ended up having to populate the lists ourselves. Figure 14.35. Using a ToolStrip to host pick lists. The populated CheckedListBox is shown in Figure 14.36. Note how both pick lists include an "<All>" item. This permits the user to indicate an ambiguous item choice. In the query that returns the filtered rowset, I include logic in the WHERE clause to ignore the pick list items and simply accept any color value when "<All>" is passed as a parameter. Figure 14.36. The populated CheckedListBox pick list. In the case of the CheckedListBox or with any ListBox-based pick list, you don't have to worry about the user entering invalid entries. However, with a ComboBox, you do. This means you still need a validation routine to make sure the entry chosen (or entered) is still valid. Creating a Pick-List QueryBy now, you should be very familiar with the techniques used to return a rowset. That's all you need to populate you pick-list control. In the example, I create a TableAdapter to return a list of the valid colors. This query is executed by creating an instance of the TableAdapter and a strongly typed DataTable, and executing the TableAdapter instance Fill method to populate the strongly typed DataTable. I extract the list of colors from the Rows collection and move it to an array of objects acceptable to the ComboBox (hosted in the ToolStrip) and the CheckedListBox (hosted in its own dialog). Figure 14.37 shows the code to generate the object array used to populate the pick lists. Note that I add "<All>" to the list (line 13) so that all color lists support the option to select all items. Figure 14.37. Fetching the list of known colors. Passing the Picked Items to a Query ParameterPassing a single value to a T-SQL query is very easy. One simply creates a parameterized CommandText and a suitable Parameter instance for each marked parameter, and sets the Value property of each Parameter to the item chosen from the pick list. That is, unless the user has selected a list of items (chosen more than one item from the list of possible choices). In this case, one needs to either generate the T-SQL WHERE clause on-the-fly (as it appears that Reporting Services is doing) and concatenate it to the rest of the SELECT query or leverage the WHERE clause IN operator. As I've discussed before, it's not possible (due to SQL syntax limitations) to pass a parameter to an IN operator. To deal with this shortcoming, I pass a table populated with the items to the IN operator. The trick is to populate this (temporary) table from the delimited list of selected items chosen by the userthat's what my CLR function DelimitedStringToTable does. I deployed this commonly used CLR function to the Common database so that it could be accessed by any database that needs it but still could be centrally managed. Of course, this assumes that your DBA will let you near the "enable CLR" switch. Most DBAs have this held in the off position with a dozen layers of packing tape. Tip I use a "common" database to host functions that can be used by more than one database. To return the "filtered" set of row for the report, I created another method (FillByColor) on the TableAdapter used in the previous (parameterless) example. The parameter-driven query is shown in Figure 14.38. Note that it uses the CLR function drawn from the Common database to convert the delimited list to a temporary SQL table used by the IN clause. Figure 14.38. The Parameter-based FillByColor used to return rows that match one or more colors.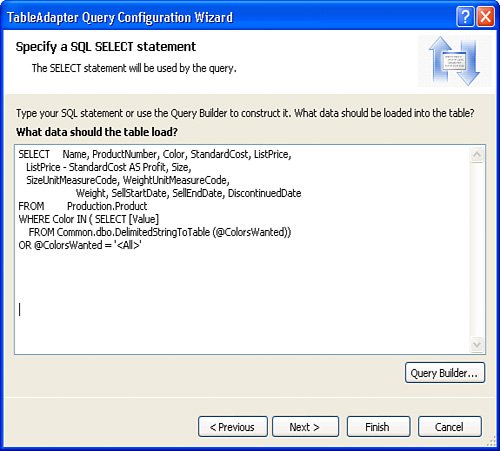 Sure, there are lots of other ways to limit or focus your report rowset query. These include (but are not limited to):
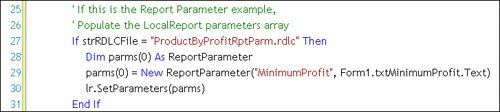
Running the Report QueryYes, unlike Reporting Services, your application code is responsible for executing the report queriesthose that populate the pick lists and, ultimately, those that return the rowset used to populate the report RDLC fields. You decide when these queries need to run, but I suggest that they not be executed in Form_Load, as this delays the painting of your form and means the user stares at a blank screen until the query is executed and the report processed. Generally, your application should collect any focusing parameters from the user before launching off on a report query that might take several minutes to the rest of the afternoon to execute. Note that all of the techniques I describe here execute code that executes the query and returns a DataTablenot just a DataReader. This operation completes rowset population of the DataTable, which is ultimately passed to the ReportViewer control while it's processing the report definition (RDLC) file. This DataTable can be created via a TableAdapter (as I've done so far), by building a DataTable from a DataReader, or by using a DataAdapter Fill to populate a DataSet with one or more DataTable objects. Later in this chapter, I'll discuss some of the advanced techniques that permit you to bind your own DataTable object to the ReportViewer. In any case, the rowset returned from the report query must contain the Fields referenced in the RDLC report definition. Sure, the DataTable can contain extra columnsbut it must return columns or expressions that match the names and types of the Fields referenced in the RDLC report definition. Report ParametersIf you recall, a bit earlier in this chapter I mentioned a second type of parameterthose used by the RDLC to filter, sort, and alter the behavior or how information is shown in the report. These are called "report" parameters. Remember, report parameters map only to expressions in an RDL report used by the ReportViewer in local mode. Yes, report parameters also map to query parameters when using the ReportViewer in remote modeas when the ReportViewer is hosting an RDL Reporting Services report. The techniques used here apply to both ReportViewer modes. Basically, report parameters are exposed via the ReportParameterInfoCollection instance exposed by the LocalReport instance. This structure contains an array of ReportParameterInfo objects that define (in infinite detail) each parameter defined for the report. With its properties, you can construct a sophisticated prompting dialog to capture the values to be passed to the reports that consume the parameters. Yes, parameters can be "multi-value" and have more than one value. For example, if you're building a dialog to capture valid state codes, but your report logic permits more than one selection, you can designate the parameter to accept several values. Creating report parameters is accomplished via the Report Parameters dialog exposed by the Visual Studio IDE when focused on an RDLC report definition. This dialog (as shown in Figure 14.39) permits you to name the parameter and set the datatype, the prompt (if needed), as well as default values. Unlike with Reporting Services, you can't automatically populate the parameter permissible values at runtimeat least, not automatically. And no, the ReportViewer control won't prompt for parametersit's up to you to add logic to your host Windows Form or ASP page to capture the values. Figure 14.39. Constructing a report parameter. Let's step through the scenario I just demonstrated to set the lowest acceptable profit and the desired list of colors, but in this example, I'll use report parameters to do the same job. This means I'll accept far more rows from the query and filter "out" those rows based on report parameter settings. The advantage to this approach is that once the report is rendered for the first time, no subsequent trips to the data source are needed to fetch subsets or to reorder data. Sure, you still might need to capture the values of the report parameters using UI elementsthat part has not changed. The only part that will change is how these values are applied to modify the behavior of the report.
Report parameters can be used in expressions all through the RDLC report definition. This means you can use them to manage the look and feel of the report, filter data in (or out), customize the text boxes used in headings, or anywhere else and expression is exposed. |
EAN: 2147483647
Pages: 227