Managing Server Reports
| I'm going to take a bit of a side trip at this point in the tour to show you how to use the ReportViewer to execute SQL Server Reporting Services 2005 reports. This is an important feature that might be overlooked by some developers or architects. In the simplest implementation, invoking an existing server report is merely a matter of knowing what to fill in when prompted by the Reporting Services Task dialog from the ReportViewer control. Let's walk through the basic steps.
Rendering the Server ReportWhen your application that references a server-based report is executed, the ReportViewer control merely addresses the report as it would be referenced from Internet Explorer (IE). It's rendered within the ReportViewer control along with all of the parameter selectors and other options afforded an IE execution. Actually, you don't have to render the report for the ReportViewer control to access the server-side report. When you reference the ServerReport object, the ReportViewer control must fetch the RDL report definition from the server so that it can expose the underlying properties. Yes, this takes a round-trip to the server to fetch, and it does so by executing SOAP protocol commands over the network. Figure 14.26 is shown by the ReportViewer when executing the server report previously specified. Figure 14.26. Using the ReportViewer to render a server-hosted RDL Reporting Services 2005 report.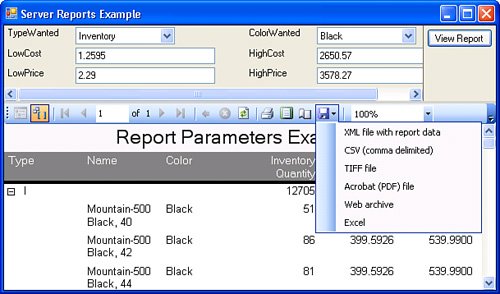 Note that when rendering any Reporting Services report, all of the output re-rendering options are available (as the drop-down list shown in Figure 14.26 illustrates). In addition, your application did not have to do anything to build pick lists or manage parameters in any way. Since the data queries execute entirely on the remote server, the ReportViewer control only needs to be invoked with the ReportViewer RefreshReport methodyou won't have to worry about building TableAdapter or DataTable objects on the client. Managing Server Report ParametersOkay, so suppose you want to handle some of this work yourself in your application. For example, you might want to capture one or more of the parameters yourself instead of giving the user the option of setting them on their own. Before you launch off and begin implementation of this, remember that the Report Manager application supported by Reporting Services can also manage report parameters, as shown in Figure 14.27. Yes, this is discussed in great detail in our Reporting Services book. Figure 14.27. Managing report parameters using the Reporting Services Report Manager.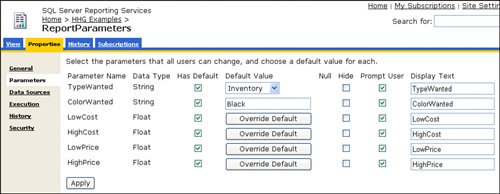 While this is cool, you still think that there are a few more things you want to do with the report parameters and perhaps other aspects of the report rendering. Well, the ServerReport instance is your pathway to the select report parameters and other options. Let's see how you can manage the ServerReport instance configured by the ReportViewer control. Exploring ServerReport ParametersTo explore the parameters used to drive this server report, I coded a routine to dump the contents of the ServerReport parameters collection as returned by the GetParameters method. It turns out that a GetParameters method is also exposed on the LocalReport. The code for the routine to explore the parameters is shown in Figure 14.28. Note that the GetParameters method returns a collectionthe ReportParameterInfoCollection, which contains ReportParameterInfo objects. Each of these objects describes the individual parameters. For example, you'll find the parameter name, the valid values, and the currently set value(s). Yes, a parameter can have more than one value, as Reporting Services 2005 and the ReportViewer support multi-valued parameters. I'll discuss this aspect of parameters later in this chapter. Sure, there are a lot more properties to explore here, and I'll leave that adventure to you and your spare time. Figure 14.28. Dumping the contents of the server report parameter definitions.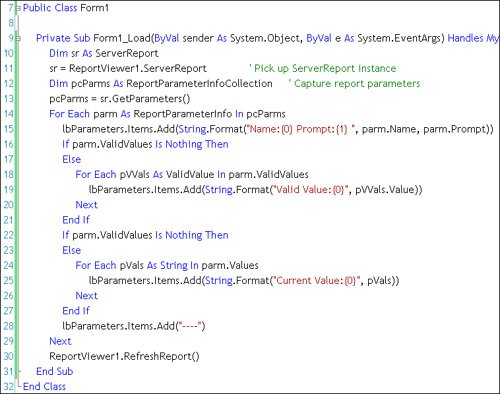 The server report I showed you earlier contains the following parameter settings (as shown in the ListBox on the left of the form in Figure 14.29). This dump tells us a lot about the parameters required for this report but also gives us a number of hints as to how to manage them in code. Remember that Reporting Services generates the UI elements used to prompt and capture values for the report parameters. Figure 14.29. Exposing the server report parameter configurations.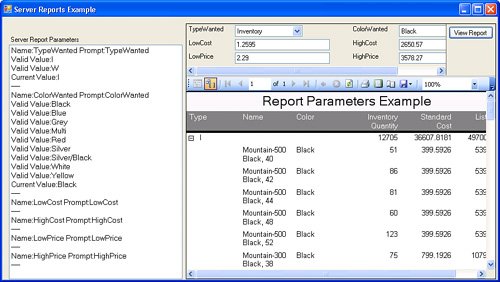 If you want to manage these parameters yourself, you might want to disable the report parameters UI section. This is easily done by setting the ReportViewer PromptAreaCollapsed property to True. However, if you don't disable the "Show Prompt Area" button, your user can simply click on the button to re-expose the parameter prompt area. This means you'll need to set the ShowPromptAreaButton property to False. No, these properties don't make much sense when you're working with a local (client-side) report unless you want to use them to show or hide your own home-grown prompt areas. Next, if you intend to manage parameters yourself, you need to add UI elements or code to set the report parameters. Given the report I'm using in the example, this could mean that your code would need to implement (at most) 12 UI elements (6 labels and 6 TextBox/ComboBox controls) to prompt for and capture the parameter values used to execute the report. This can be very tedious and expensive if you consider that you might have hundreds of reports to manage with the ReportViewer control. To deal with this issue, you might want to generate the UI elements in much the same was as Reporting Services doesgenerate the UI elements automatically from the ReportParameterInfoCollection. I've done just that in the example written for this section (prjServerReports). Figure 14.30 illustrates a simple implementation of this approach. In this case, I walked the ReportParameterInfoCollection and picked off the parameter name and value(s). These were placed into Label and TextBox controls generated on-the-fly. Figure 14.30. Generating Parameter prompts and TextBox controls to capture new values. Sure, you might want to selectively choose which parameters to display, but this code should get you started. Part of the code used to generate these UI elements is shown in Figure 14.31. It's generic enough to permit you to generate UI elements from any Reporting Services report loaded into the ReportViewer. See the example on the DVD for the rest of this routine. Figure 14.31. Building the parameter TextBox UI elements on-the-fly.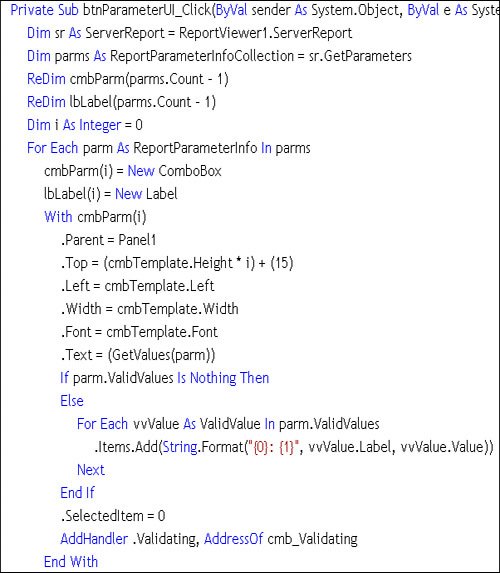 Yes, you could (and probably should) enhance this code to validate the values entered into the ComboBox controls to conform to the permissible values stored in the ReportParameterInfo objects. By using ComboBox controls, I have taken the first step toward that goalonly permissible values are listed in the control. Resetting Parameter ValuesOnce new values are set, you'll need to reset the ReportParameterInfoCollection with the values. No, you don't need to change all of the defined parameters, but you will need to set them all. That is, even though you aren't changing a specific parameter, you'll still need code to "touch" each parameter. That's because the SetParameters method accepts a fully populated array of parametersall of them, not just the ones you've changed. The routine shown in Figure 14.32 walks the array of controls I generated to display the parameters to the user and rebuilds a collection of ReportParameter objects that contain the Name and Value of each parameter. Figure 14.32. Building an array of ReportParameter objects to pass to SetParameters.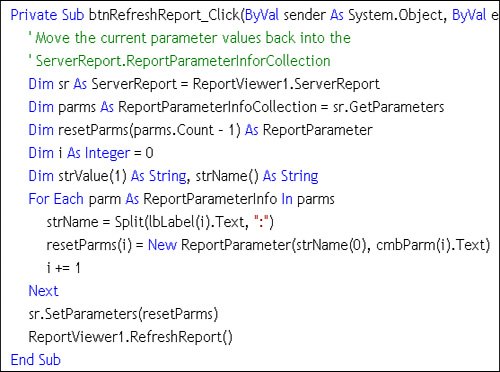 Interesting ServerReport ParametersAs I wrote this chapter, I came across any number of ServerReport properties (some of which are underdocumented) that you might find interesting or perhaps essential as you manage parameters or other aspects of the ServerReport. These include:
Interesting ServerReport Methods and FunctionsI also came across a number of (also underdocumented) ServerReport methods. While it's beyond the scope of this book to get into these in any detail, I hope to supplement the book with a few EBook chapters that dig into the inner cavities of the ServerReport class. I also found several methods and functions that were simply undocumented. However, I expect that you'll find these documented methods as intriguing as I did. Note that all of these points are discussed in depth in our Reporting Services book.
As for the ServerReport functions:
As you explore the rest of this chapter, consider that this approach can also be used when building generic parameter-management routines with local reports. |
EAN: 2147483647
Pages: 227