Objective: Monitor file and print servers. Tools might include Task Manager, Event Viewer, and System Monitor.
Disk quotas are a method of controlling the amount of space a user has access to on a file server. You can also use the Disk Quota feature to monitor the space in use by your users. As we mentioned earlier, both the Windows 2000 and Windows Server 2003 operating systems support disk quotas, which are used to track and control disk usage per user on NTFS volumes. Quotas can be configured in one of two ways: as a monitoring tool so that the administrator can track disk usage by user or as a tool to prevent the user from saving files to the disk when a specified limit is reached. There are two types of disk quotas in Windows Server 2003 starting with the release of version R2: NTFS Quotas NTFS quotas are set on a per-volume basis and are assigned to each user, but unfortunately they cannot be assigned by folder or by group. Similar to encryption and compression, quotas can be used only on NTFS-formatted partitions and volumes. When you enable disk quotas for a volume, volume usage is automatically tracked for all users from that point on. NTFS quotas have the following features and limitations: Disk quotas do not apply to members of the local Administrators account. The files contained on a volume converted from FAT to NTFS do not count against user quotas, because they are initially owned by the local administrator. Files created or moved to the volume after the conversion has been completed are owned by the user. Disk quotas cannot be applied on a per-folder basis. They can only be applied per volume. If a physical disk has multiple volumes, a quota can be applied separately to each volume. Even if a volume consists of multiple physical disks, the quota for the volume applies to the entire volume. Disk usage is based on all files that the user creates, copies, or takes ownership of. File compression cannot be used to prevent users from exceeding their quota. Disk quotas are based on the actual file size, not the compressed file size. Disk quotas affect the free size that an installed application sees during the installation process. Disk quotas can be enabled on local or network volumes and removable drives formatted with NTFS. Disk quotas are not available on any volume or partition formatted using a version of Windows prior to Windows 2000. Disk quotas are available only on NTFS volumes or partitions formatted by Windows 2000 or later. When quotas are exceeded, notification is via an entry in the event logs.
Implementing NTFS Disk Quotas Exam Alert: Which Disk Quotas? We are presenting material on the older NTFS Quotas because questions pertaining to them might appear on the exam, and your environment might include pre-R2 versions of Windows Server 2003. However, if you are using a Windows Server 2003 R2 server, you should use the new style quotas implemented via the FSRM.
NTFS Quotas are applied at the volume level from the Volume Properties dialog box of the NTFS volume. In addition to turning quotas on or off, the following options are available on the Quota Properties tab: Deny Disk Space to Users Exceeding Quota Limit This option causes users who have exceeded their limit to receive an "insufficient disk space" message when they try to save a file. They will be unable to add any more data to the volume until they free up space by moving or deleting some existing files. Limit Disk Space To This setting is used to configure the amount of space to which new users are limited. Log Event When a User Exceeds Their Quota Limit When a user exceeds his or her quota, an event is written to the System log. These events are queued and written hourly. Log Event When a User Exceeds Their Warning Level When a user exceeds his or her warning level, an event is written to the System log. These events are queued and written hourly.
The default in Windows Server 2003 is for quotas to be turned off. To set NTFS quota limits on a volume, perform the procedure outlined in Step by Step 13.7. Step by Step 13.7 Setting NTFS Quota Limits on a volume 1. | From My Computer or Windows Explorer, right-click the volume you want to enable quotas on and select Properties from the pop-up menu.
| 2. | On the Disk Properties dialog box, select the Quota tab.
| 3. | On the Quota tab, select the Enable Quota Management check box, as shown in Figure 13.14.
Figure 13.14. You can configure quotas from the Quota tab. 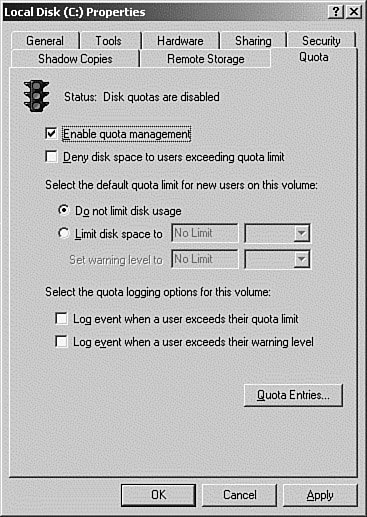
| | | 4. | In the Disk Properties dialog box shown in Figure 13.14, select the Limit Disk Space To option button and add limit and warning levels.
| 5. | Click OK.
| 6. | When you receive the warning dialog box shown in Figure 13.15, read it, and then click OK.
Figure 13.15. This warning dialog box tells you that the drive will be scanned so that the file ownership can be inventoried and the disk usage can be credited to each user. 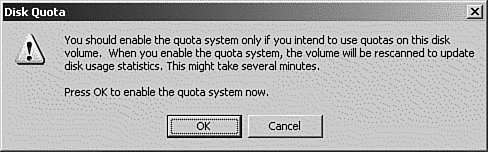
|
|
After you turn on disk quotas, the volume is scanned and the file space is calculated, depending on the Creator Owner of each file. Although all users are assigned, by default, the quota limit you just configured (see Figure 13.16), you can change the quota configuration of an existing user. Figure 13.16. The Quota Entries window from a drive that just had quotas enabled. Note that there is no limit on the administrators account. 
Managing NTFS Disk Quotas After disk quotas have been implemented on your server, most of the work required in managing them involves monitoring the disk space that the users have allocated and making adjustments when a user has a good reason to receive more disk space. A lot of this monitoring can be performed from Event Viewer if you selected the option to write an entry in the event logs when a user crosses the warning threshold or exceeds the hard limit. The applicable entries in the event logs can be found by performing a search or filtering for the event IDs 36 (for warning threshold) and 37 (for over the limit), with a source entry of NTFS. Quotas can be configured so that when users reach a preset warning level, an event is recorded in the event log. The users can continue to save files to the volume until they reach their quota limit. At that time, they will be unable to save any more files to the volume, and they will receive an "insufficient disk space" message. This will also record an event in the event log. The second major task associated with disk quotas involves monitoring the space each user has available. This can be accomplished by opening the Quota Entries window and sorting the space entries to find out which users have exceeded their limits and which users are near their limits, as shown previously in Figure 13.16. This is made easier by referring to the icons to the left of the entries. The following icons are used so that you can see the status at a glance: Green This means the user is below the warning threshold. Yellow triangle with exclamation point This means the user is over the warning threshold but under the limit. Red circle with exclamation point The user has exceeded the limit.
File Server Resource Manager Quotas Although NTFS Quotas are still available in Windows Server 2003 R2, it's much better to implement your quotas using the File Server Resource Manager (FSRM). The differences are as follows: Quotas can be set at both the folder and volume level. Quotas are calculated using the actual disk space used, so compressed files are now calculated using the actual size on disk, not the uncompressed size. Quotas can be implemented on multiple servers by copying a template between servers. Quotas can be automatically created for subfolders as they are added. Notifications have been enhanced to include not only Event Logging, but also the capability to send an email, run a file or script, or generate a storage report.
To implement a quota using the File Server Resource Manager, follow the procedure in Step by Step 13.8. Step by Step 13.8 Implementing a quota using the File Server Resource Manager 1. | From the Start menu, click Start, Control Panel, Administrative Tools, File Server Resource Manager.
| 2. | In the File Server Resource Manager MMC, right-click Create Quota in the Actions pane.
| 3. | This opens the Create Quota dialog box, as shown in Figure 13.17. Either enter the desired path in the Quota Path field, or click the Browse button to locate it.
Figure 13.17. You can either accept the defaults or create custom properties. 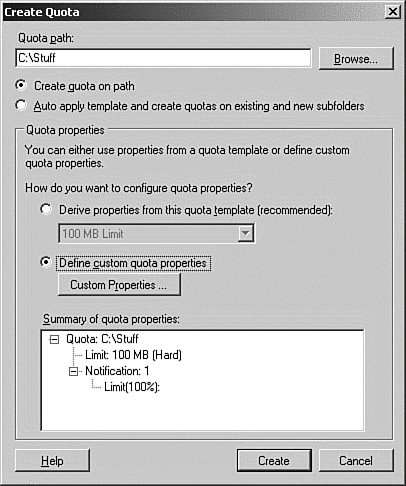
| 4. | Click the Custom Properties button.
| | | 5. | This opens the Quota Properties dialog box, as shown in Figure 13.18. Enter the desired Space Limits, and then click the OK button.
Figure 13.18. The properties dialog box allows you to configure space limits and notifications. 
| 6. | On the Create Quota dialog box, click the Create button to save your quota.
| 7. | When the Save Custom Properties as a Template dialog box appears, as shown in Figure 13.19, select the Save the Custom Quota Without Creating a Template option button, and then click the OK button.
Figure 13.19. You have the option of saving your settings as a template that can be reused and copied to other servers. 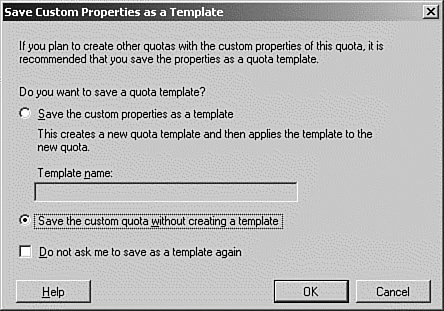
| | | 8. | The quota is displayed in the FSRM MMC, as shown in Figure 13.20.
Figure 13.20. The completed quota will apply to all users who save files in the folder. 
|
|
That was a quick example of how to set up a simple quota. However, if you have an environment with tens, hundreds, or even thousands of volumes and folders to set quotas on, that process would become tedious very quickly. Fortunately, Microsoft has included the Quota Templates feature with the FSRM. A quota template can contain the following information: Space The allowed disk space can be defined in any increment from kilobytes to terabytes. Quotas can be applied to either new or existing volumes or folders. Limits Quotas can be set to either Hard or Soft. A hard quota will prevent the user from saving any more files. Unlike some third-party software, there is no grace period; when the limit is reached, the user is effectively blocked from using any more space. A soft quota will warn users, but will let them continue to save files. The soft quotas are typically used for space monitoring purposes. Notifications You can configure notifications to let the user and/or administrator know when the users' space nears or reaches their quota limit. These notifications can be saved to the event log, emailed, or can cause a program or script to be run.
You can either use the quota templates as is, or you can use them as a basis for your own custom template. In Step by Step 13.9, we will copy an existing template and configure it for our needs. Step by Step 13.9 Implementing a quota using a quota template 1. | From the Start menu, click Start, Control Panel, Administrative Tools, File Server Resource Manager.
| 2. | In the File Server Resource Manager MMC, click the Quota Templates entry in the left pane.
| 3. | This displays a list of the predefined Quota templates, as shown in Figure 13.21. Right-click the 200 MB Limit Reports to User template and select Create Quota from Template from the pop-up menu.
Figure 13.21. The FSRM comes supplied with a selection of predefined templates that you can use as the basis for your own custom templates. 
| | | 4. | This opens the Create Quota dialog box. Enter the desired path into the Quota Path field or click the Browse button to locate it. Notice in the bottom part of the dialog box that the predefined quota properties are shown (see Figure 13.22).
Figure 13.22. The predefined properties are listed for the selected quota template. 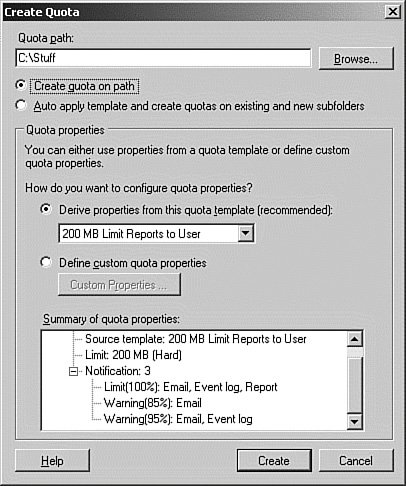
| 5. | Select the Define Custom Quota Properties option button, and then click the Custom Properties button. This opens the Quota Properties dialog box, as shown in Figure 13.23. In the Copy Properties field, select the 200MB Limit template from the drop-down list, and then click the Copy button. This copies the settings from the existing template. Enter a label as shown.
Figure 13.23. You can copy the existing settings to your custom template. 
| | | 6. | Change the Space Limit to 300MB, and then click the Add button to add another warning email notification at 90%.
| 7. | Click the OK button. When you return to the Create Quota dialog box, notice that the quota properties reflect your changes.
| 8. | Click the Create button to save your quota.
| 9. | When the Save Custom Properties as a Template dialog box appears, enter a suitable name, and then click the OK button.
| 10. | The quota is displayed in the FSRM MMC, as shown in Figure 13.24.
Figure 13.24. The completed quota will apply to all users who save files in the folder. 
|
|
Templates are handy for a couple of reasons. First, you can reuse them for other volumes or folders, without having to go to the trouble of defining a new configuration. Second, if you have a change that needs to be made to all templates, you can specify to automatically make the change to all templates that were derived from the original templates. For example, suppose we want to add an email notification at 65% to the users that we just assigned the previous template to. Follow the procedure in Step by Step 13.10 to update all the quotas derived from the original 200MB limit quota. Step by Step 13.10 Updating a quota derived from a quota template 1. | From the Start menu, click Start, Control Panel, Administrative Tools, File Server Resource Manager.
| 2. | In the File Server Resource Manager MMC, click the Quota Templates entry in the left pane.
| 3. | This displays a list of the predefined quota templates. Double-click the 200 MB Limit Reports to User template.
| 4. | This opens the Quota Template Properties dialog box. Click the Add button and add the 65% Threshold. Click OK to save.
| 5. | The Update Quotas Derived from Template dialog box opens, as shown in Figure 13.25. Select the Apply Template to All Derived Quotas option, and then click the OK button.
Figure 13.25. You can apply your changes to all the templates derived from this one. 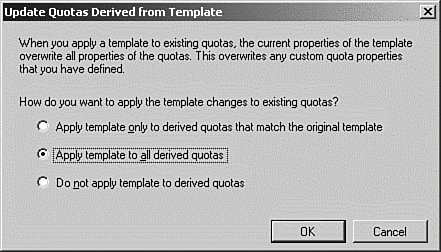
| 6. | Double-click the template that we created in the previous Step by Step and observe that the new notification has been added.
|
|
Referring to Figure 13.25, the three settings are Apply Template Only to Derived Quotas That Match the Original Template This option will push your changes to any derived quotas, but only if you haven't manually customized them since they were derived. Apply Template to All Derived Quotas This option pushes your changes to your derived templates, whether or not they have been manually edited since they were derived. Do Not Apply Template to Derived Quotas This option does exactly what it says. It saves the changes you made to the template, and then exits.
Exam Alert: Expect a Question Related to Copying/Moving Files and Disk Quotas Expect at least one exam question that deals with how quotas are affected when a file is copied or moved between folders or volumes. Remember that moving files on the same volume retains ownership, whereas copying does not.
|