| Grouping is a useful way to prevent shapes from interacting and to keep shapes together as you work with the elements on the Stage. To prevent interaction between objects on the same layer: -
In the Toolbox, choose the oval tool. -
Set the stroke color to no color and the fill color to red. -
On the Stage, draw a fairly large oval (Figure 4.10). Figure 4.10. The oval before grouping.  -
In the Toolbox, switch to the arrow tool, and select the oval you just drew. -
To make the oval a grouped element, from the Modify menu, choose Group (Figure 4.11). Figure 4.11. The oval after grouping.  Why Use Grouping? There are several reasons to use Flash's Group feature: -
Grouping makes it easy to reposition a set of shapes whose relationships must stay the same. Imagine that you've created a logo from three triangle shapes. After you've got the triangles arranged just right, turn them into a group so that you can reposition the logo without having to tweak the individual triangle's placement each time. -
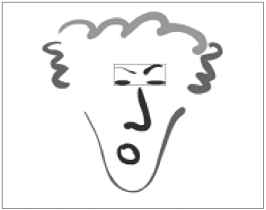
Grouping prevents individual shapes from interacting with other shapes on the same layer. Suppose that you are drawing shapes that make up a face, with eyes, nose, and mouth. You may want to move the facial features around to get just the right look, and you don't want to leave holes in your basic face oval each time. Grouping each element prevents that result. -
Grouping prevents you from editing objects inadvertently. Flash makes it easy to edit lines and fillsyou simply grab and drag them with the arrow toolbut it's also easy to reshape an object accidentally when you meant to move it. To edit grouped shapes, you must invoke a special editing mode. | -
Back in the Toolbox, choose the oval tool and a different fill color. -
On the Stage, draw a smaller oval in the middle of your first oval (Figure 4.12). Figure 4.12. Draw a second oval on top of the grouped oval.  When you finish drawing the new oval, it immediately disappears behind the grouped oval (Figure 4.13). That's because grouped objects always stack on top of ungrouped objects (see the sidebar "Understanding the Stacking Order of Grouped Shapes" later in this chapter"). Figure 4.13. The ungrouped oval stacks beneath the grouped oval.  -
Switch to the arrow tool, and reposition the large oval so that you can see the small one (Figure 4.14). Figure 4.14. Drag the grouped oval to make the ungrouped oval visible.  -
Deselect the large oval, and select the small oval (Figure 4.15). Figure 4.15. Select the small oval.  -
To make the small oval a grouped element, from the Modify menu, choose Group (Figure 4.16). Figure 4.16. After grouping, the small ovalthe most recently created grouppops to the top of the stack.  Flash puts the small oval in a bounding box and brings it to the top of the stack. Flash always places the most recently created group on the top of the stack. Now you can reposition the two ovals however you like, and they will not interact. To keep multiple items together: -
Using the drawing tools of your choice, create eight to 10 separate shapes in different locations on the Stage. -
Select three or four elements that you'd like to keep together (Figure 4.17). Figure 4.17. You can group several shapes that you want to manipulate as a group but keep in the same relationship to one another. The eyes and eyebrows in this face are a single group.  -
From the Modify menu, choose Group. -
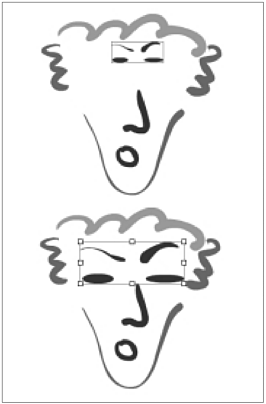
In the Toolbox, select the arrow tool, and practice moving and modifying the grouped shapes. Every action you take now affects the entire group (Figure 4.18). If you click one of the grouped shapes, you select them all. If you drag one, you drag the whole group. Modifications such as duplicating, resizing, or rotating affect the entire group. Figure 4.18. It's easy to reposition (top) or resize (bottom) the eyes and eyebrows to create new facial expressions when you've made a group out of them.   Tips Tips -
You can group grouped objects. If you want to position several items on top of one another, group them as individuals first. Position them as you like. Then group all the items to preserve their relationship. -
You can lock groups so that you don't accidentally move or modify them. Select the group that you want to lock. Then, from the Modify menu, choose Arrange > Lock, or press Opt-  -L (Mac) or Ctrl-Alt-L (Windows). You can no longer select the item. To make it available again, from the Modify menu, choose Modify > Arrange > Unlock All, or press Opt-Shift- -L (Mac) or Ctrl-Alt-L (Windows). You can no longer select the item. To make it available again, from the Modify menu, choose Modify > Arrange > Unlock All, or press Opt-Shift-  -L (Mac) or Ctrl-Alt-Shift-L (Windows). You cannot unlock locked items selectively. -L (Mac) or Ctrl-Alt-Shift-L (Windows). You cannot unlock locked items selectively.
|

