| Flash provides separate tools for drawing ovals and rectangles. The tools work quite similarly; both can draw a shape as an outline (just a stroke) or as a solid object (a fill). You can also create an object with a fill and a stroke simultaneously . To draw an oval outline: -
In the Toolbox, select the oval tool, or press O (Figure 2.13). Figure 2.13. The Toolbox with the oval tool selected. 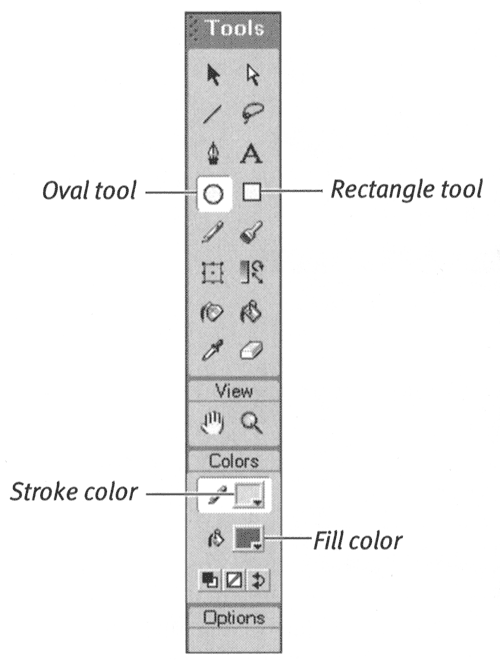 -
To activate the fill- color box, in the Colors section of the Toolbox, select the paint-bucket icon. -
To set fill color to none, do one of the following: -
Click the fill-color box, and in the set of swatches that appears, click the No Color button (Figure 2.14). Figure 2.14. The No Color button appears in the pop-up set of fill swatches. Choosing No Color as the fill color with the oval tool allows you to create oval outlines. 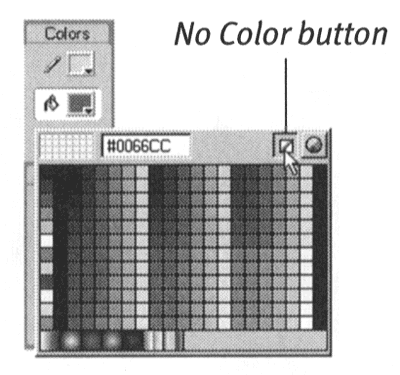 -
In the Colors section of the Toolbox, click the No Color button (Figure 2.15). Figure 2.15. When the fill-color box is selected in the Colors section of the Toolbox, clicking the No Color button allows whatever tool you select to create a shape with no fill. 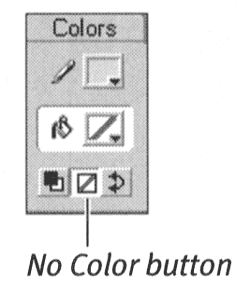 -
Use the current stroke color and line weight or select new ones (see "Setting Stroke Attributes" earlier in this chapter). -
Move the pointer over the Stage. The pointer turns into a crosshair. -
Click and drag to create an oval of the size and proportions you want (Figure 2.16). Figure 2.16. Click the Stage, and drag to create an oval. You see a preview outline of your shape (top). Release the mouse button, and Flash creates an oval outline, using the current color, thickness , and style settings. In this case, the oval tool is set to black stroke color, no fill, dotted line style, and a stroke height of 1 point (bottom). 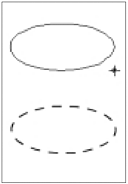 Flash displays an outline preview of the oval as you drag. -
Release the mouse button. Flash draws an oval outline.  Tip Tip
To draw a rectangular fill: -
In the Toolbox, select the rectangle tool, or press R (Figure 2.17). Figure 2.17. Select the rectangle tool in the Toolbox; the Round Rectangle Radius modifier appears. Use the modifier to create rectangles with blunt corners.  -
To set a stroke color, in the Colors section of the Toolbox, click the pencil icon. -
To set stroke color to none, do one of the following: -
Click the stroke-color box, and in the swatch window, click the No Color button. -
In the Colors section of the Toolbox, click the No Color button. -
Use the current fill color or select a new one (see "Setting Fill Attribute" earlier in this chapter). -
To open the Rectangle Settings dialog box, do one of the following: -
In the Options section of the Toolbox, click the Round Rectangle Radius button. -
Double-click the rectangle tool. The Rectangle Settings dialog box appears (Figure 2.18). Figure 2.18. Enter a value of 0 in the Rectangle Settings dialog box to create a rectangle with sharp corners. Enter a larger value to round the corners of your rectangle. 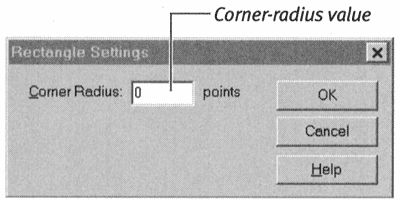 -
Enter a value of 0 points. This setting creates a rectangle with sharp 90-degree angles at the corners. -
Click OK to close the dialog box. -
Move the pointer over the Stage. The pointer changes to a crosshair. -
Click and drag to create a rectangle of the size and proportions you want. Flash displays an outline preview of the rectangle as you drag. -
Release the mouse button. Flash draws a rectangular fill, using the currently selected fill color (Figure 2.19). Figure 2.19. As you drag the rectangle tool, Flash creates an outline preview of a rectangle (top). To complete the fill shape, release the mouse button (bottom). 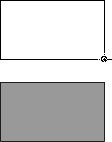 Tip
To draw a rounded rectangle with fill and stroke: -
In the Toolbox, select the rectangle tool. -
Make sure that you have selected a fill and stroke color other than No Color (see " Setting Stroke Attribute" and "Setting Fill Attribute" earlier in this chapter). -
Click the Round Rectangle Radius button to open the Rectangle Settings dialog box. -
Enter the desired corner-radius setting, and click OK. -
Click and drag on the Stage with the crosshair cursor to create a rectangle. -
Release the mouse button. Flash creates a filled rectangle, using the currently selected fill color, and gives the rectangle a stroke with the currently selected color, thickness, and style (Figure 2.20). Figure 2.20. A rounded rectangle with stroke and fill. 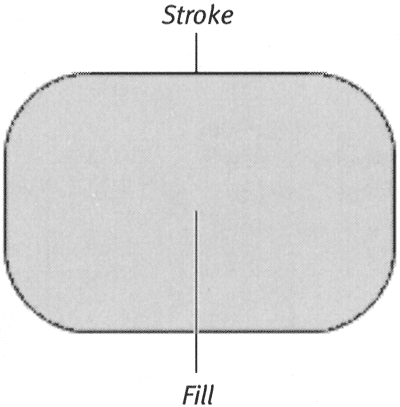 Tips -
Flash accepts corner-radius settings ranging from 0 to 999 points (integers only). This value equals the radius of the imaginary circle that creates the rounded corner. A larger value creates a more-rounded corner (Figure 2.21). Figure 2.21. With a higher corner-radius setting, the rectangle tool creates a more-rounded corner. 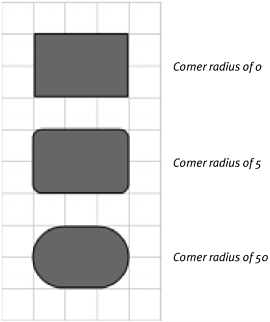 -
To reset the rectangle tool's corner radius to 0 quickly, Shift-double-click the rectangle tool or Shift-click the Round Rectangle Radius button. -
You can change a rectangle's corner radius as you draw. Drag on the Stage with the rectangle tool to create your shape. Before releasing the mouse button, press the up-arrow key to reduce the corner-radius value; press the down-arrow key to increase it. The preview rectangle changes interactively as you press the arrow keys. Release the mouse button to complete your shape. -
The Round Rectangle modifier of the rectangle tool makes it easy to draw capsule shapes in Flash. Use a large corner-radius settingsay, 300 points. This high setting ensures that a smooth arc connects the two shorter sides of the rectangle and that the longer sides remain flat. Note that if you draw four sides of equal length using this high corner-radius setting, you'll wind up with something more like a circle than a square.
|