Adjusting Sound-Layer Height

I l @ ve RuBoard

As a default, Flash displays layers at 100 percent, but you can bump the layer display up to 200 or 300 percent. It can be helpful to make the sound layers larger so that you can see the waveform (a graphic image of the sound) for that layer better. You change layer size in the Layer Properties dialog box.

To adjust the layer height for sound:

  1. In the Timeline, select the sound layer that you want to enlarge.

  2. To access the Layer Properties dialog box, do one of the following:

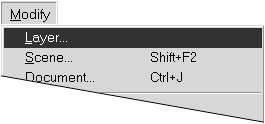
    • From the Modify menu, choose Layer (Figure 14.8).

      Figure 14.8. Choose Modify > Layer to access the Layer Properties dialog box, where you can change a layer's height.

      graphics/14fig08.gif

    • Double-click the layer icon of the selected layer.

      The Layer Properties dialog box appears.

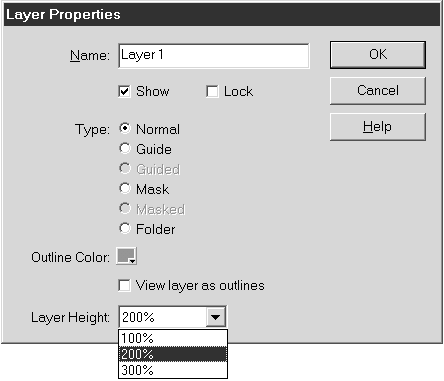
  3. From the Layer Height pop-up menu, choose the desired percentage (Figure 14.9).

    Figure 14.9. In the Layer Properties dialog box, choose 200% or 300% from the Layer Height pop-up menu to enlarge the layer view in the Timeline and make any sound wave attached to the layer easier to view.

    graphics/14fig09.gif

    Choose 200% or 300% to make the layer taller.

  4. Click OK.

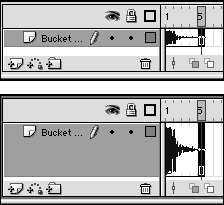
    Flash returns you to the Timeline. The selected layer is taller, and the waveform in it is larger and shows a bit more detail (Figure 14.10).

    Figure 14.10. Compare a five-frame sound wave at normal layer height (top) with the same sound wave in a 300 percent layer (bottom).

    graphics/14fig10.gif

I l @ ve RuBoard


Macromedia Flash MX for Windows and Macintosh. Visual QuickStart Guide
Macromedia Flash MX 2004 for Windows and Macintosh (Visual QuickStart Guides)
ISBN: 0582851165
EAN: 2147483647
Year: 2002
Pages: 243

flylib.com © 2008-2017.
If you may any questions please contact us: flylib@qtcs.net