| As you learned in Chapter 9, Flash can motion-tween only one item per layer. You can tween multiple items simultaneously ; you just have to put each one on a separate layer. You can use Onion Skin and Edit Multiple Frame modes to make sure that all the elements line up in the right place at the right time. To get a feel for tweening multiple items, try combining three simple motion tweens to create a game of Ping-Pong. One layer contains the ball; the other layers each contain a paddle. To set up the three graphics in separate layers: -
Open a new Flash document, and add two new layers. -
Rename the layers. Name the top layer Ball, the next layer 1st Paddle, and the bottom layer 2nd Paddle. Naming the layers helps you keep track of the elements and their locations. -
Create the graphics. On the Stage, in the Ball layer, use the oval tool to create a ball; in the layer named 1st Paddle, use the rectangle tool to create a paddle; and then copy the paddle and paste the copy into the layer named 2nd Paddle. Give each shape a different color . Your file should look something like Figure 11.11. Figure 11.11. To have several graphics motion-tween simultaneously, you must place each one on a separate layer. Here, each item is on a separate layer. The descriptive layer names help you keep track of what goes where. 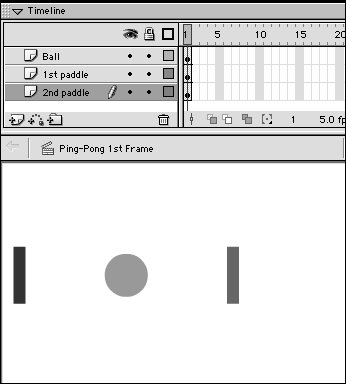 To set up the tween in all layers with one command: -
Using the document that you created in the preceding task, in the Timeline, select Frame 1 in all three layers. -
From the Insert menu, choose Create Motion Tween. Flash turns each shape into a symbol (naming the symbols Tween 1, Tween 2, and Tween 3) and gives all the frames the motion-tween property (Figure 11.12). Figure 11.12. By using the Create Motion Tween command with frames selected on all three layers, you create three motion tweens with one command. The Frame Property Inspector reveals their status as motion tweens (bottom). 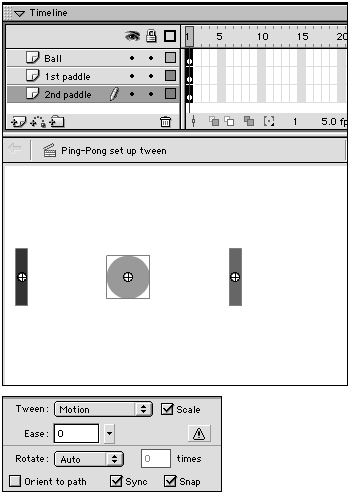 -
In the Timeline, select Frame 20 in all three layers. -
From the Insert menu, choose Frame. Flash extends the motion tween through Frame 20 on all three layers, placing a dotted line across the frames to indicate that they are part of an incomplete motion tween. You need to reposition the symbols and create keyframes to complete the tweens. To adjust the positions of the tweened items: -
Using the document that you created in the preceding task, in the Timeline, position the playhead in Frame 5. -
On the Stage, drag the ball to the approximate location where it should connect with one of the paddles for the first hit. Flash makes Ball the active layer and creates a keyframe (in Frame 5) for the ball in its new location (Figure 11.13). Flash completes the motion tween between Frame 1 and Frame 5 of the Ball layer and leaves the broken-tween line in all the other frames. Figure 11.13. Moving a graphic in a frame that's defined as part of a motion tween causes Flash to make the layer containing the graphic the active layer (top). Flash creates a keyframe in that layer for the graphic's new position, completing one tween sequence (bottom). 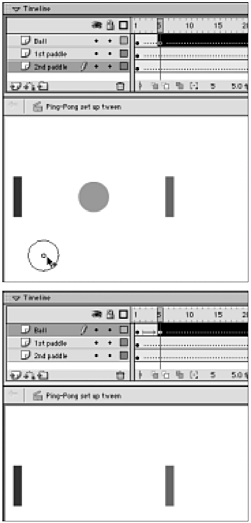 -
On the Stage, reposition the first paddle graphic so that the paddle connects with the ball for the first hit. Flash makes 1st Paddle the active layer and creates a keyframe (in Frame 5) for the paddle in its new location (Figure 11.14). Figure 11.14. As you reposition the paddle (top), Flash appears to be selecting the wrong set of frames, but when you release the mouse button, Flash correctly tweens frames 1 through 4 (bottom). 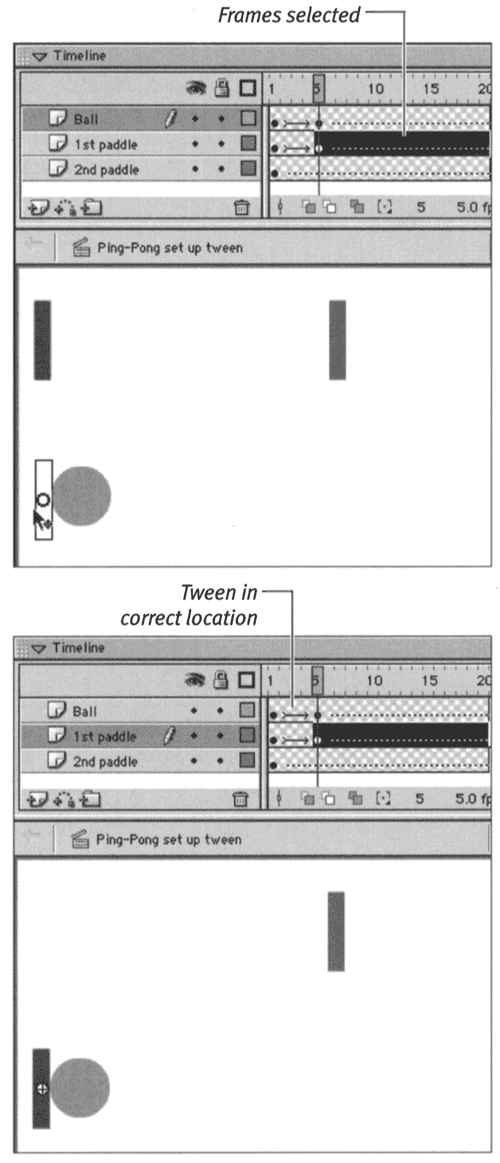 -
In the Timeline, position the playhead in Frame 10. -
On the Stage, drag the ball to the approximate location where you want it to connect with a paddle for the second hit. Flash makes Ball the active layer and creates a keyframe (in Frame 10) for the ball in its new location. Flash completes the motion tween between Frame 5 and Frame 10 of the Ball layer. -
On the Stage, reposition the second paddle so that it connects with the ball for the second hit. Flash makes 2nd Paddle the active layer and creates a keyframe (in Frame 10) for the paddle in its new location (Figure 11.15). Figure 11.15. Moving an element in another frame creates another tween. Here, the paddle on the right side appears to move more slowly than the paddle on the left side, because Flash is creating a 10-frame tween for the right paddle, while the left paddle tweens in 5 frames. 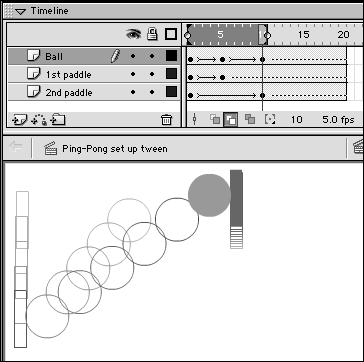 -
Repeat steps 1 through 6, using keyframes 15 and 20, to make the ball connect with each paddle one more time. -
Play the movie to see the animation in action. -
Select Onion Skin Outlines and Edit Multiple Frames, and reposition objects as neces ary to fine-tune the motion (Figure 11.16). Figure 11.16. Selecting Onion Skin Outlines and Edit Multiple Frames makes fine-tuning the location of objects easier. Here, the paddle on the right doesn't move in a straight line. If you want it to do so, reposition the paddle graphics in the first and final frames so that one lies directly above the other; then reposition the ball so that it comes into contact with both paddles. 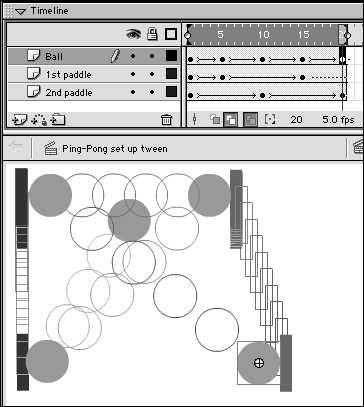  Tips Tips -
After you define a set of frames as tweens, any slight change you make to an object causes Flash to create a new keyframe. Even simply double-clicking an object causes Flash to insert a keyframe. So that you don't change objects' positions or create new keyframes accidentally , lock or hide the layers that you're not working on. -
To position items on the Stage with greater precision than dragging allows, select an item and use the Property Inspector or the Info panel to set the item's x and y coordinates.
Motion-Tweening Text You can use the multiple-motion tween idea to animate individual characters within a piece of text. After you create the text that you want to animate, select it and choose Modify > Break Apart. That command places each character in its own text box. Next, with each character of the text selected, choose Modify > Distribute to Layers. Each character winds up on its own layer. Now use any of the animating techniques you learned in chapters 9 and 10, or in earlier exercises in this chapter, to animate the individual text characters (Figure 11.17). Figure 11.17. Using Flash's Modify > Break Apart command in conjunction with the Modify >Distribute to Layers command, you can set up tweens quickly to animate individual text characters. Each letter in this animated text is a motion tween. 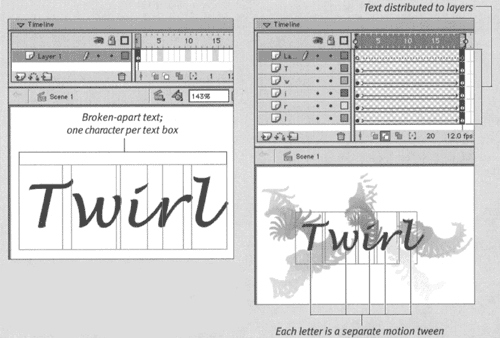 If you want to transform the shapes of the letters, you'll need to use shape tweening. That means converting the letters from editable text elements to editable graphics. Select one or more text boxes containing individual letters and choose Modify > Break Apart. The letter-forms will look the same, but now they are raw shapes that you can modify with the drawing tools and use in shape tweens. |  |