| Flash offers three tools for creating freeform shapes: the pencil, pen, and brush. The pencil and pen tools create stroke outlines, and the brush tool creates fills without strokes. The pencil tool creates only outlines, even if you draw a closed shape. The pen tool automatically fills a closed shape with the current fill color. Once you've created a shape, you can always modify itsay, to fill an empty outline or add an outline to a plain fill shape. The pencil tool lets you draw lines (strokes) naturally (as you would with a real-world pencil, but using the mouse or a graphics tablet and pen). Flash hides information about the anchor points and curves of a stroke drawn with the pencil. With the pen tool, you place anchor points and adjust Bézier curves to create strokes. For the tasks below, make sure the grid is visible (see Chapter 1) and set drawing preferences as follows: choose Edit > Preferences (Windows) or Flash > Preferences (Mac) to open the Preferences dialog; select Drawing from the Category list, and select the Show Pen Preview and Show Solid Points check boxes; leave the other items at their default settings. About Drawing Assistance Flash's pencil tool offers two assisted line-drawing modes: Straighten and Smooth. For total freedom in drawing, the pencil's Ink mode leaves shapes exactly as you create them. Straighten mode refines any blips and tremors in a rough hand-drawn line into straight-line segments and regular arcs. This mode also carries out what Flash calls shape recognition. Flash evaluates each rough shape you draw, and if the shape comes close enough to Flash's definition of an oval or rectangle, Flash turns your rough approximation into a shape neat enough to please your high-school geometry teacher. Smooth mode transforms your rough drawing into one composed of smooth, curved line segments. Note that Smooth mode doesn't recognize shapes; it simply smoothes out the curves you draw. Smoothing reduces the number of points in a shape, resulting in smaller files which in turn improves the performance of your final, published work. Tolerance settings are all-important, especially for Straighten mode. You can set Flash to change almost anything ovoid into a circle and anything slightly more oblong into a rectangle. You set the degree of drawing assistance in the Preferences dialog. Choose Flash > Preferences (Mac) or Edit > Preferences (Windows); in the Preferences dialog that opens, choose Drawing from the Category list, and then choose tolerance levels from the Connect Lines, Smooth Curves, Recognize Lines, and Recognize Shapes menus. Click OK to close the dialog. |
To draw freeform strokes with the pencil tool 1. | In the Tools panel, select the pencil tool, or press Y.
| 2. | In the Options section, from the Pencil Mode menu (Figure 2.31), choose one of the following assistance modes:
Straighten resolves minor variations into straight-line segments.
Smooth resolves minor variations into smooth curves.
Ink provides very little assistance, leaving minor variations.
Figure 2.31. When the pencil tool is selected, the Tools panel displays a pop-up menu of pencil modes. 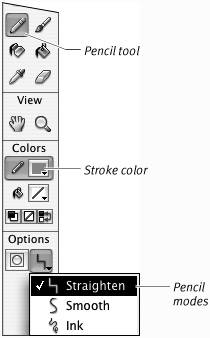
| 3. | Move the pointer over the Stage.
The pointer turns into the pencil tool.
| 4. | Click, and draw a squiggle (Figure 2.32).
Figure 2.32. With the pencil in Straighten mode, when you draw a squiggle, Flash previews it for you. When you release the mouse button, Flash applies straightening, turning your rough squiggle (top) into a set of straight-line segments and smooth curves (bottom). 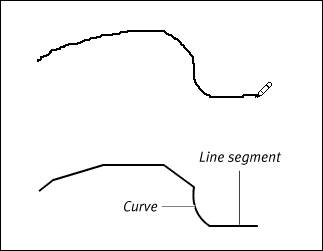
Flash previews your rough line.
| 5. | Release the mouse button.
Flash recasts the line you've drawn according to the assistance mode you chose in step 2, creating a set of straight-line segments and regular curves.
|
 Tip Tip
To draw freeform strokes with the pen tool 1. | In the Tools panel, select the pen tool, or press P (Figure 2.33).
Figure 2.33. Select the pen tool to create paths. 
| 2. | Set the stroke attributes for your path.
| 3. | Move the pointer over the Stage.
The pen tool appears with a small x next to it (Figure 2.34). The x indicates that you're ready to place the first point of a path.
Figure 2.34. The x next to the pen tool indicates that you're about to start a new path. Click to place the first anchor point. 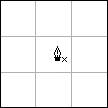
| 4. | Click where you want your line segment to begin.
The pointer changes to a hollow arrowhead; a small circle indicates the location of the anchor point on the Stage.
| 5. | Reposition the pen tool where you want your line segment to end.
Flash extends a preview of the line segment from the first point to the tip of the pen as you move around the Stage.
| 6. | Click.
Flash completes the line segment using the selected stroke attributes. The anchor points appear as solid squares (Figure 2.35).
Figure 2.35. Flash previews points as you place them (top), and it adds a stroke to the path as soon as you complete a segment (bottom). 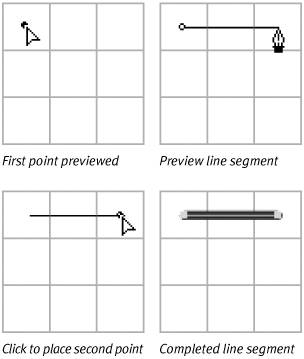
| 7. | To add a straight segment to your line, click the Stage where you want the segment to end, and release the mouse button (Figure 2.36).
Figure 2.36. Continue clicking to add segments to your freeform shape. A quick click (top) adds a straight line segment (bottom). 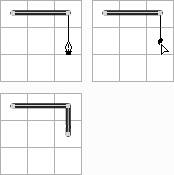
| 8. | To add a curve segment, click the Stage where you want the curve segment to end, and then drag the pointer.
Flash places a preview point on the Stage, the pointer changes to a hollow arrowhead, and Bézier handles appear (Figure 2.37).
Figure 2.37. Click and drag to create a curve point; as you drag, the point's Bézier handles activate. The bulge of the curve grows away from the direction of your drag. To make the curve bulge upward, drag downward. 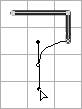
| 9. | Drag the pointer in the opposite direction from which you want your curve to bulge.
The Bézier handles extend from the anchor point, growing in opposite directions as you drag. Flash previews the curve you're drawing (Figure 2.38).
Figure 2.38. To make the curve bulge downward, drag upward. Dragging the handles out further deepens the curve. 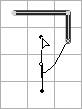
| 10. | Still keeping the mouse button down, drag the pointer to reposition the Bézier handle.
Dragging the handle clockwise or counterclockwise around its anchor point controls the direction of the bulge; dragging the handle further from the anchor point deepens the curve (Figure 2.39).
Figure 2.39. Move the handles clockwise or counterclockwise around the point to modify the curve shape. Drag the handles in or out to make the curve deeper or shallower. 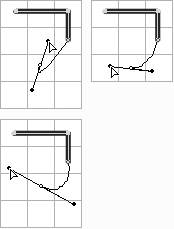
| 11. | When the curve preview looks the way you want, release the mouse button.
Flash completes your curve segment with a stroke (Figure 2.40).
Figure 2.40. When you finish positioning handles for a segment and release the mouse button, Flash adds a stroke to the segment. 
| 12. | To create an open path,  -click (Mac) or Ctrl-click (Windows) the Stage. -click (Mac) or Ctrl-click (Windows) the Stage.
or
To create a closed shape, do the following:
- Position the pointer over your first anchor point.
Flash previews the closing segment of your shape. A small hollow circle appears next to the pen tool (Figure 2.41).
Figure 2.41. To create a closed shape, position the pointer over the first anchor point you placed. When you see the hollow circle icon, click that first point. Flash adds the finishing segment and fills the shape with the current fill color. 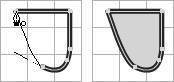
- Click the first anchor point.
Flash closes the shape, adding a stroke to the path and filling the shape with the currently selected fill color.
Once the path is complete, the pen tool pointer displays a small x, indicating that the tool is ready to place the first anchor point of a new path.
|
Tips There are other ways to end open paths. Choose Edit > Deselect All, or press -Shift-A (Mac) or Ctrl-Shift-A (Windows). In the Tools panel, click the pen tool (or any other tool). You can also double-click the last point you placed. This technique works best when the path ends with a straight-line segment that doesn't involve Bézier handles. You don't have to close a path at the beginning point. The hollow circle appears next to the pen pointer when you position the pointer anywhere over a stroke. Clicking any anchor point in the path you're currently drawing closes off a shape at that point; the shape fills automatically with the current fill color. Clicking between anchor points creates an outline shape (to force that shape to fill, double-click just inside of the stroke). If you click a path that's separate from the one you're creating, Flash joins the two paths.
About Path Math in Flash A patha series of points and connecting linesis the skeleton of your graphic-object. With most Flash tools, the math that goes into creating a path takes place behind the scenes. You draw a complete line or a shape; Flash places points (without showing them), connects them, and adds a stroke. With the pen tool, you place the defining points (called anchor points) and adjust the curve segments that connect them (using controllers called Bézier handles). When you've finished placing points with the pen tool, Flash fleshes out the path by applying a stroke to it. |
To create freeform solid fills with the brush tool 1. | In the Tools panel, select the brush tool or press B (Figure 2.42).
Figure 2.42. The brush tool and its modifiers. 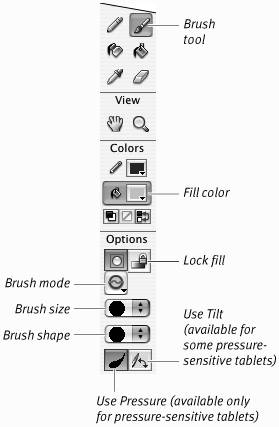
| 2. | To optimize the brush for particular painting tasks, in the Options section of the Tools panel, do any of the following,
- From the Brush Size pop-up menu, choose a size for the brush tip.
- From the Brush Shape pop-up menu, choose a shape for the brush tip.
About the Brush Tool Flash's brush tool offers a way to create free-flowing swashes of color. These shapes are actually freeform fills drawn without a stroke. The brush tool lets you simulate artwork you'd create in the real world with a paintbrush or marking pen. A variety of brush sizes and tip shapes helps you create a painterly look in your drawings. If you have a pressure-sensitive drawing tablet, the brush can interact with it to create lines of varying thickness, imitating the thick and thin lines of real-world brushwork. The more pressure you apply, the thicker the brushstroke (Figure 2.43). Figure 2.43. Selecting the brush tool's Use Pressure modifier activates the pressure-sensitive capabilities of a connected pressure-sensitive pen and graphics tablet. To produce lively lines of varying thickness, apply more or less pressure as you draw. Flash created all the lines in this cat with a single brush size and shape. 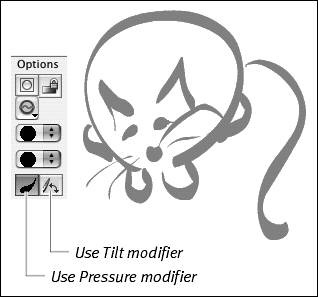
|
- From the Brush Mode pop-up menu, choose a painting mode; for this exercise, choose Paint Normal (Figure 2.44). The brush tool always creates merge-shape fills. The painting modes allow you to control how brush stroke fills act when you use the brush tool to paint over other shapes.
Figure 2.44. The Brush Mode options give you control over how fills created with the brush tool interact with other shapes on the same layer. Choosing Paint Normal lets you paint merge-shape fills that act like any other fills when they overlap other shapes. 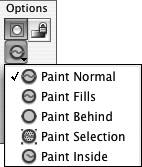
Overlapping shapes interact in different ways depending on whether they are merge-shapes or drawing-objects. (You'll learn about how overlapping shapes interact in Chapter 5.)
- To paint brushstroke fills that can vary in thickness, choose Use Pressure (this option appears only when a graphics tablet is connected to your computer).
| 3. | Select or define a solid fill color using any of the techniques outlined earlier in this chapter.
| 4. | Move the pointer over the Stage.
The pointer changes to reflect the current brush size and shape.
| 5. | Click and draw on the Stage.
Flash previews your brushwork (Figure 2.45).
Figure 2.45. Drawing with the brush creates a preview of your shape (top); Flash recasts the shape as a vector graphic with the currently selected fill color. 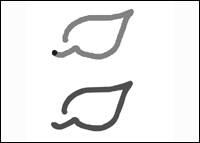
| 6. | When you complete your shape, release the mouse button.
Flash creates the final shape in the currently selected fill.
|
Tip You can change the size of your brushstroke by changing the magnification at which you view the Stage. To create a fat stroke without changing your brush-tip settings, set the Stage view to a small percentage. To switch to a thin stroke, zoom out to a higher percentage (Figure 2.46). Be sure to check your work in 100% view. Figure 2.46. Flash created these three brushstrokes with exactly the same brush sizeonly the magnification level of the Stage changed for each stroke. 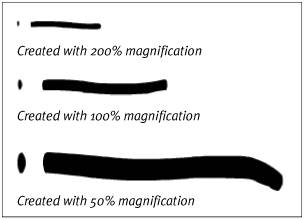
To paint with gradients 1. | Follow steps 1 and 2 in the preceding task.
| 2. | Using one of the methods described earlier in this chapter, select (or define) a linear or radial gradient fill.
| 3. | To lock or unlock the gradient, in the Options section of the Tools panel, do either of the following,
- To paint shapes that contain the full gradient spectrum, deselect Lock Fill (Figure 2.47).
Figure 2.47. Deselect the Lock Fill modifier to paint with an unlocked gradient. 
- To paint shapes that reveal just a portion of the gradient, select Lock Fill.
| 4. | Paint with the brush as described in steps 46 in the preceding task.
Flash can't preview the shape you paint with a gradient fill. The preview shape has a black-and-white pattern.
Flash redraws the painted shape, using the current lock-fill and fill-color setting (see the sidebar "The Mystery of Gradients and Flash's Drawing Models").
For unlocked fills, the full gradient is visible in the shape (Figure 2.48).
Figure 2.48. A brushstroke shape painted with an unlocked linear-gradient fill (top) and one painted with radial-gradient fill (bottom). 
For locked fills, just a portion of the gradient is visible in the shape (Figure 2.49).
Figure 2.49. With the brush tool's Lock Fill modifier deselected, each brushstroke fill you paint contains the full range of the current gradient (top); with Lock Fill selected, each brushstroke fill appears to reveal a section of a gradient that runs the width of the Stage and Pasteboard (bottom). 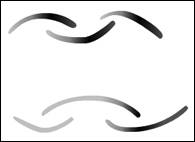
|
Tips Try painting a variety of brushstrokes in both drawing modes; use locked and unlocked gradients; use different areas of the Stage; and make the shapes different lengths. Notice the way each shape displays the gradient. To predetermine the location of the center of a locked gradient, first paint a brushstroke shape with an unlocked gradient. When you switch to painting with Lock Fill active, the virtual underlying gradient aligns with the last unlocked gradient you painted. You can then delete the unneeded unlocked gradient or use the paint-bucket tool to change it to a locked gradient (see Chapter 4). After you've created a shape with a gradient fill, you can adjust the location of the center of the gradient by using the gradient transform tool (see Chapter 4).
The Mystery of Gradients and Flash's Drawing Models When you use the brush tool to paint a shape with a gradient fill and the Lock Fill modifier is deselected, it makes no difference if you're painting in Merge Drawing mode or Object Drawing mode. Flash centers the gradient in the shape's bounding box (an invisible rectangle that's just the right size to enclose the shape); the full gradient is visible in the shape. When you paint the same kind of shape and Lock Fill is selected, however, shapes created in the two drawing modes behave differently. For locked fills, Flash creates a virtual gradient that underlies the Stage and Pasteboard. Each shape you create with a locked fill reveals just the portion of the gradient that corresponds to that area of the Stage. If you paint multiple merge-shapes with a locked gradient, the same virtual gradient underlies each shape; you can use the gradient-transform tool to shift the gradient within all the shapes. Multiple drawing-objects each have their own personal virtual gradient. These virtual gradients are all centered in the same way, so initially it looks like it works the same way as for merge-shapes. But the gradient transform tool shifts the gradient in each drawing-object separately. You'll learn more about working with multiple shapes and using the gradient-transform tool in Chapter 4. |
The Mystery of Brush Smoothness Settings Flash 8 gives you control over how your brushstrokes translate into vector shapes. To access this control, in the Properties tab of the Property inspector for the brush tool, enter a value in the Smoothing field. The stroke-smoothness setting determines how closely Flash re-creates each movement of the brush as a separate vector segment; the setting ranges from 0 to 100, and the default is 50. The lower the setting, the more faithfully Flash reproduces the shapes you draw. (It does this by using more vectors, which has an impact on the size and animation performance of your final file.) With a higher setting, Flash re-creates your flourishes more roughly, using fewer vectors. To see the difference most clearly, select the brush tool, assign a smoothing value of 1, and use the mouse (not a graphics pen) to draw a curvy line on the Stage. Now change the smoothing setting to 10. Draw a second curvy line. Using the subselection tool (you'll learn about using this tool in Chapter 4), select each shape. The line drawn with smoothing set to 1 displays many more pointsthat is, it contains many more vector segments. |
|