| Setting all the various publishing options can be tedious. If you use particular groups of settings repeatedly, you can save them as a publishing profile. To save settings under a new profile name 1. | From an open Flash document, choose File > Publish Settings.
| 2. | In the Publish Settings dialog, click the Create New Profile buttonthe plus sign to the right of the Current Profile menu (Figure 16.53).
Figure 16.53. Click the Create New Profile button to begin the process of adding a new publishing profile to the current document. 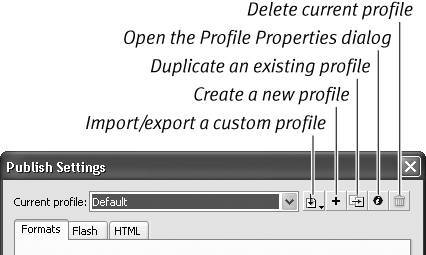
The Create New Profile dialog appears (Figure 16.54).
Figure 16.54. Name your profile in the Create New Profile dialog. 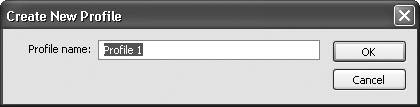
| 3. | Type a name for your profile in the Profile Name field; for example, MyPubSettings.
| 4. | Click OK to accept the name in the Create New Profile dialog.
You return to the Publish Settings dialog, with your new profile selected in the Current Profile menu.
| 5. | Set your desired publishing options using any techniques learned earlier in this chapter.
| 6. | Click Publish or OK.
Flash updates the current profile in the open document and publishes and/or closes the dialog. Flash incorporates the settings you made in step 5 into the profile named MyPubSettings and stores them with the current document. If you open a new document, that profile isn't available. To make the profile available to other documents, you must export it.
|
 Tips Tips
To make small adjustments to an existing profile and save it as a new profile, start by duplicating the basic profile. Select the basic profile from the Current profile menu, and then click the Duplicate Profile button. The Duplicate Profile dialog appears for naming the new profile. Now follow steps 36 in the preceding task. To delete a profile from the current Flash document, select the profile from the Current Profile menu and click the Delete Profile button (the Trash can icon). A warning dialog appears, asking you to verify the deletion. Click OK. To rename a profile in the current Flash document, select the profile from the Current Profile menu and click the Rename Profile button (the i icon). The Profile Properties dialog appears. Type the profile's new name in the Profile Name field. Click OK.
More about Publishing Profiles Publishing profile information is stored with each document. Unlike the case with HTML templates, no master menu of profiles is available each time you call up the Publish Settings dialog. You can, however, import and export profiles to make them available to other documents. Another important difference between publishing profiles and HTML templates is that a publishing profile isn't an immutable set of options that's the same each time you choose it. When you click OK or Publish in the Publish Settings dialog, all the current publishing options are incorporated into the profile that's selected in the Current Profile pop-up menu. Next time you open the Publish Settings dialog for that document, either in this work session or a later one, choosing a profile calls up the last settings you made with that profile selected in that document. |
To export a profile 1. | Follow steps 15 in the preceding task.
| 2. | From the Import/Export pop-up menu to the right of the Current Profile field, select Export (Figure 16.55).
Figure 16.55. You can export publishing profiles to make use of them in other documents. 
The Export Profile dialog appears (Figure 16.56). This is basically a Save As dialog, with a different name. By default, Profile (.xml) is selected in the Format (Mac) or Save as Type (Windows) menu.
Figure 16.56. Store exported profiles in the Publishing Profiles folder in the Configuration folder, or store them with your Flash documents. 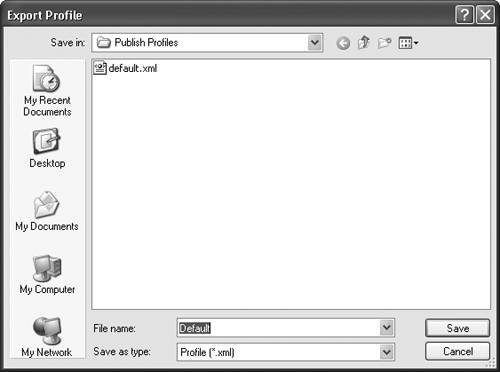
| 3. | Navigate to the location where you want to save the profile file.
| 4. | Enter a name for the file.
| 5. | Click Save.
Flash saves the profile as an XML file in the specified location.
|
Tip The default location for storing profiles is a folder named Publish Profiles in the Configuration folder (see "The Mystery of the Configuration Folder," in Chapter 1). However, because the profiles aren't pulled into new Flash documents automatically, there is no reason you must store them there.
To import a profile 1. | In a Flash document in which you want to use the saved profile, choose File > Publish Settings.
| 2. | From the Import/Export pop-up menu, select Import (Figure 16.57).
Figure 16.57. To use a saved profile in a different document, you must import it. Select Import from the Import/Export Profile menu in the Publish Settings dialog. 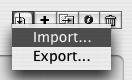
The Import Profile dialog appears. This is basically a normal file-import dialog (Figure 16.58). By default, Profile (.xml) is selected in the Enable (Mac) or Files of Type (Windows) menu.
Figure 16.58. Navigate to the saved profile via the Import Profile dialog, and click Open to make the profile available from the Current Profile menu in the Publish Settings dialog. 
| 3. | Navigate to the saved the profile.
| 4. | Click Open.
The profile becomes available from the Current Profile menu in the Publish Settings dialog of the active Flash document.
|
|