| As I have mentioned, this database will store user feedback in a table for future viewing. It's a simple but relevant use of a database. In the last section you created the table which consists of five columns : id, FirstName, LastName, EmailAddress, and Comments. The process of adding information to a table is similar to creating the table itself in terms of which functions you use, but the SQL query will be different. $Query = "INSERT into $TableName values ('value1', 'value2', 'value3', etc.)"; mysql_db_query ("DatabaseName", $Query, $Link); The query begins with INSERT into $TableName values. Then, within the parentheses, the value for each column should be put within single quotation marks with each value separated by a comma. There must be exactly as many values listed as there are columns in the table or else the query will not work! Then the query is submitted to the MySQL using mysql_db_query(). To demonstrate this, you'll use an HTML form that takes the user's first name, last name , E-mail address, and comments. The PHP script that handles this form will put the submitted information into the database. Script 11.3. You've seen variants of this form in earlier chapters. As with all HTML forms the most important thing to remember is your INPUT field names so that you can refer back to them in your PHP. 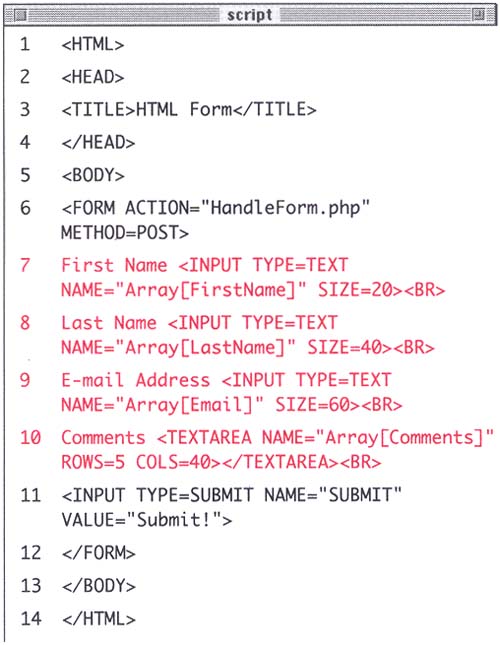 To enter data into a database from an HTML form: -
Create a new HTML document in your text editor that will create the HTML form. -
Code the standard HTML header (Script 11.3): <HTML><HEAD><TITLE>HTML Form </TITLE><BODY> -
Create a form. <FORM ACTION="HandleForm.php" METHOD=POST> -
Code for four text inputs. First Name <INPUT TYPE=TEXT NAME="Array[FirstName]" SIZE=20><BR> Last Name <INPUT TYPE=TEXT NAME="Array[LastName]" SIZE=40><BR> E-mail Address <INPUT TYPE=TEXT NAME="Array[Email]" SIZE=60><BR> Comments <TEXTAREA NAME="Array[Comments]" ROWS=5 COLS=40></TEXTAREA><BR> You can make your form more attractive than this one but be sure to make note of your input variable names, which you'll need in the HandleForm.php page. -
Add the submit button, close the form, and close the HTML page. <INPUT TYPE=SUBMIT NAME="SUBMIT" VALUE="Submit!" </FORM> </BODY> </HTML> -
Save the page as form.html and upload it to the server. Now you will write the HandleForm.php page, which takes the data generated by the form and puts it into the database. -
Create a new PHP document in your text editor. -
Begin with the standard HTML header (Script 11.4). Script 11.4. The query statement for adding information to a database is straightforward enough, but be sure to match the number of values in parentheses to the number of columns in the database table. 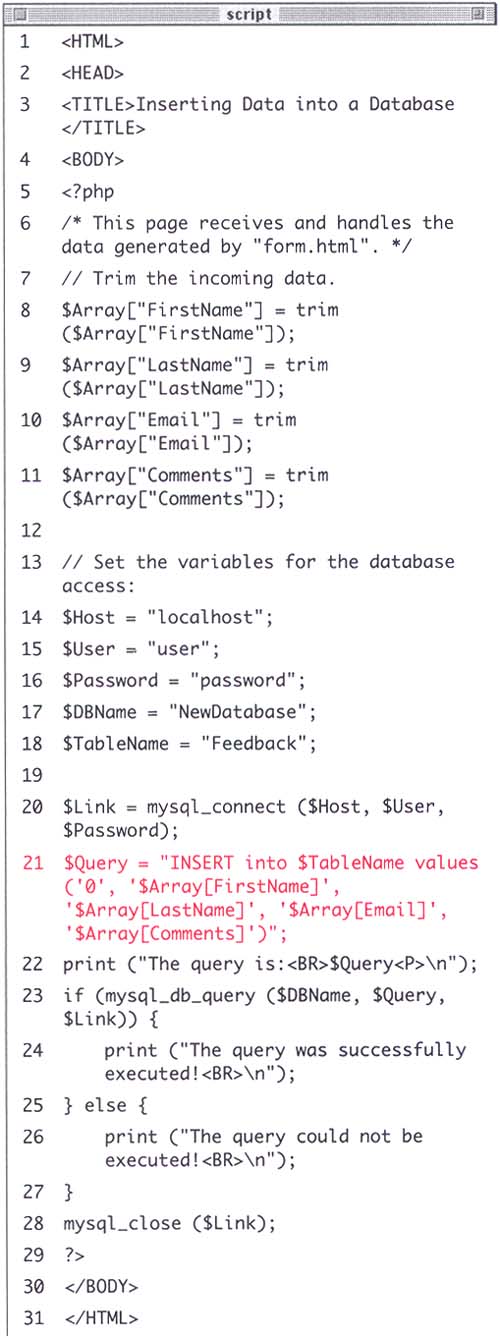 <HTML><HEAD><TITLE>Inserting Data into a Database</TITLE><BODY> -
Start the PHP section of the page and trim all of the incoming data to rid it of extraneous spaces. <?php $Array["FirstName"] = trim ($Array["FirstName"]); $Array["LastName"] = trim ($Array["LastName"]); $Array["Email"] = trim ($Array["Email"]); $Array["Comments"] = trim ($Array["Comments"]); -
Set the variables for the database access. $Host = "localhost"; $User = "user"; $Password = "password"; $DBName = "NewDatabase"; $TableName = "Feedback"; -
Connect to MySQL, then write the query. $Link = mysql_connect ($Host, $User, $Password); $Query = "INSERT into $TableName values ('0', '$Array[FirstName]', '$Array[LastName]', '$Array[Email]', '$Array[Comments]')"; The query begins with the necessary INSERT into $TableName values code, followed by five values (one for each column in order), within single quotation marks and separated by commas. Because the id column has been set to AUTO_INCREMENT, you can use 0 as the value and MySQL will automatically make that id the next logical value. -
Just for the sake of error checking, print out the query to the browser. print ("The query is:<BR>$Query<P>\n"); Whenever you are having difficulties with a database interaction, first check your query to make sure it is logical and valid. Although you wouldn't want the user to see the query, you can use this technique here while practicing or debugging (see the Tip below). -
Create a conditional based upon the result of querying the database. if (mysql_db_query ($DBName, $Query, $Link)) { print ("The query was successfully executed!<BR>\n"); }else{ print ("The query could not be executed!<BR>\n"); } -
Close the MySQL link, then close the PHP section, and the HTML. mysql_close ($Link); ?></BODY></HTML> -
Save your script as HandleForm.php, upload it to the server in the same directory as form.html, and test both pages in your Web browser (Figures 11.2 and 11.3). Tip If you want to be able to check your SQL statements, without making them obviously viewable to the user, add this line of code to your script: print ( " <!The query is $Query>\n " );. Now the PHP will write the query as an HTML comment, making it viewable by looking at the page source (Figures 11.4 and 11.5).
 |