| Once the initial database has been created, you can start to create individual tables within it. Remember that a database can consist of multiple tables, each of which has columns and rows. For this simple example you will create one table in which data will be stored. To create a table within the database, you'll use SQLthe language that databases understand. The process of querying a database involves writing the SQL query and then querying the database using: mysql_db_query (): $Query = "text for the query goes here in SQL format"; mysql_db_query ("DatabaseName", $Query, $Link); Because SQL is a lot like spoken English, the proper query to create a new table reads like so: $Query = "CREATE table TABLENAME (column1, column2, etc.)"; For each column, separated out by commas, you first indicate the column name and then the column type. Common types are TEXT and INT (integer). Because it is highly recommend to create a first column which acts as the primary key (a column used to refer to each row), a simple query could be: $Query = "CREATE table NewTable (id INT PRIMARY KEY, information TEXT)"; A table's primary key is a special column of unique values that is used to refer to the table's rows. The database makes an index of this column in order to more quickly navigate through the table. A table can have only one primary key which I normally set up as an automatically incremented column of integers. The first row will have a key of 1, the second will have a key of 2, and so forth. Referring back to the key will always retrieve the values for that row. You can visit the MySQL Web site (Figure 11.1) for more information on SQL. By following my directions, though, you should be able to accomplish some basic database tasks . For this example, you'll create a table that stores information submitted via an HTML form. In the next section of the chapter, you'll write the script that inserts the submitted data into the table created here. To create a new table: -
Create a new PHP document in your text editor. -
Code the standard HTML header Script 11.2 <HTML><HEAD><TITLE>Creating a Table</TITLE><BODY> Script 11.2. Creating a table, and most other database requests , are handled by writing the appropriate query and then using the mysql_db_query() function. 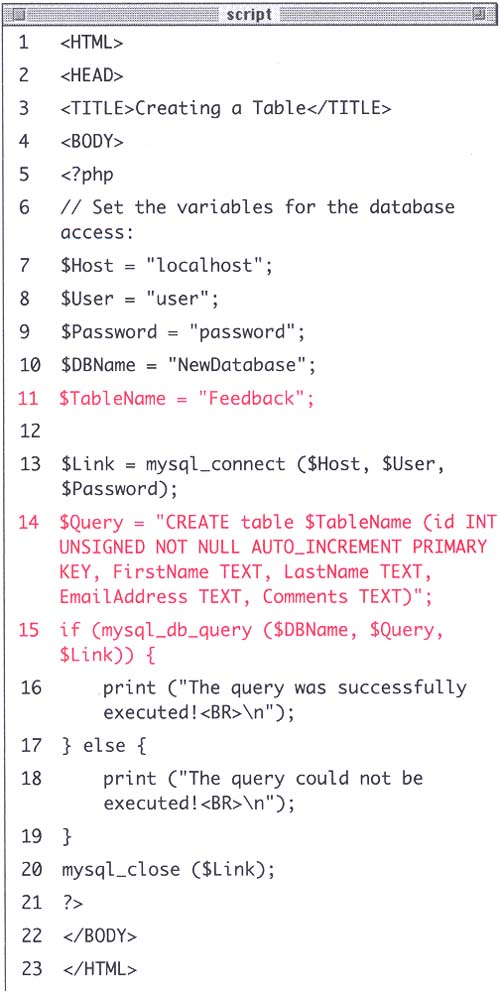 -
Open the PHP section of the script and set your database variables . <?php $Host = "localhost"; $User = "user"; $Password = "password"; $DBName = "NewDatabase"; $TableName = "Feedback"; Note that I've added one more variable to the existing list from Script 11.1$TableName. It helps to create relevant table names , so this table, intended to store user feedback, is called Feedback. Table names, as well as column names, in MySQL are case-sensitive. -
Establish a link to the MySQL server. $Link = mysql_connect ($Host, $User, $Password); -
Write your query. $Query = "CREATE table $TableName (id INT UNSIGNED NOT NULL AUTO_INCREMENT PRIMARY KEY, FirstName TEXT, LastName TEXT, EmailAddress TEXT, Comments TEXT)"; I'll break down the query to more recognizable parts . First, to create a new table, you write CREATE table $TableName (the $TableName variable name will be replaced by the value of $TableName upon execution). Then, within parentheses, you list every column you want with each column separated by a comma. The first column in the table is called id and it will be an unsigned integer ( INT UNSIGNED which means that it can only be a positive integer). By including the words NOT NULL, you indicate that this column must have a value for each row. The values will automatically increase by one for each row ( AUTO INCREMENT ) and will stand as the primary key. The next four columns will consist of TEXT, one called FirstName, the second LastName, the third EmailAddress, and the fourth Comments. -
Query the database and print a message indicating the success of the query. if (mysql_db_query ($DBName, $Query, $Link)) { print ("The query was successfully executed!<BR>\n"; }else{ print ("The query could not be executed!<BR>\n"); } If the query is successfully created (hence, the conditional is TRUE), you will see only the "successfully executed" message (Figure 11.4). If the table was not created due to an SQL error, the result will be like that in Figure 11.5. However, if the table could not be created because of a database permission problem, you will see an error like those in Figure 11.3. Figure 11.4. This page, while designed with the user in mind, will not help you as you develop your site. However, by viewing the page source you can see what the exact SQL query was (Figure 11.5). 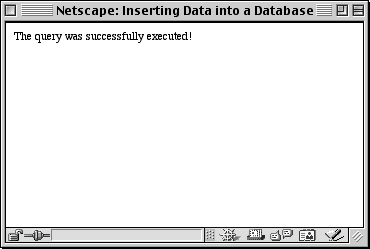 Figure 11.5. During development of a Web site you can print your SQL queries as an HTML comment in order to double check exactly what the code is doing. 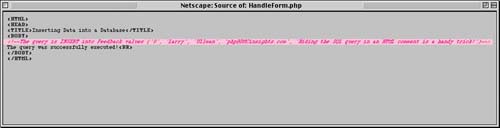 -
Close the MySQL link, then close the PHP section, and the HTML. mysql_close ($Link); ?></BODY></HTML> -
Save your script as CreateTable.php, upload it to the server, and test it in your Web browser. Tip It is not necessary to write your SQL queries partially in all capital letters like I have here, but doing so does help to distinguish your SQL from the table and column names. The table and column names are case sensitive, whereas SQL in general is not.
 |