Managing Dimension Tables Part 1
Earlier in this chapter, you learned about dimension tables within star schema database models. Dimension tables represent distinct lists of members identified by unique primary keys. You also learned in Chapter 12 that surrogate keys are system-generated, redundant, unique keys (redundant because many data source systems include their own keys, often different in value and format). Surrogate keys are used as primary keys for dimension tables. Surrogate keys are important because they address technical issues encountered with implementing data warehouses, especially when these warehouses are created from multiple sources and can have dimensional member changes over time.
One best practice in designing a data warehouse model is to use surrogate keys to define dimension member rows uniquely. Surrogate keys help establish and preserve the relationships within the data in the fact table to all the dimension tables. There are several reasons you want to do this:
-
Source data keys are subject to change in the OLTP applications. A surrogate key in the data warehouse would not need to be changed as a result.
-
Some data sources might require long compound keys, and surrogate keys are usually in integer format, which reduces database table space and improves table join performance.
-
Multisource systems can result in duplicate source keys (SSN, Code_Nbr, and so on).
-
Source data changes (for example, Customer location change) can be managed with new surrogate keys, preserving original historic associations.
Surrogate keys are used in a data warehouse to accommodate the technical issues that result from consolidating data from multiple data sources and changes over time. Surrogate keys prevent duplicate-key problems from arising if you combine data from multiple sources. For changing dimensions, you can keep historical information by using surrogate keys, so you can track the same customer at two different addresses at different points in time. Finally, if a key changes in the source application system, the use of a surrogate key in the data warehouse saves you the effort of rebuilding your database to accommodate the source system changes.
Usually, you do not have to deal with surrogate key creation and maintenance for dimension tables within your SSIS design. Surrogate keys are most often defined at the database level and will be generated automatically for each newly inserted dimension member row. You can easily implement surrogate keys by creating an identity column in each of your SQL Server dimension tables.
| Note | A common star schema model design includes adding a dummy record member in each dimension. The dummy member is usually the first record whose surrogate key value is zero, called zero key. The source application system business key and other attributes are defaulted to NULL or to a default value such as "Not Available." The fact table can contain the transactions from the source application system for dimension members not yet loaded to the database. In such a case, a default key is assumed from dimension (because dimension is not yet populated with the required key) having zero value. This method allows your fact table data to be loaded into the data warehouse, but it doesn't fully solve identifying the fact correctly to the dimension. |
When designing SSIS packages used to build and maintain data warehouses or other application databases that require accurate referential integrity, the sequencing of the control flow of the package is critical. Dimension data processing should always be performed before fact table data, as a rule. When maintaining data for fact tables and dimension tables, the order is important because you most often don't want to load fact data that has dimension relationships with members that might not already exist in the dimension tables. In the next demonstration, you will use data staging and learn two ways to manage dimension tables with SSIS.
Loading Dimension Tables by Using a Left Outer Join
Staging tables are often used to collect new data temporarily for data warehouses (DWs). Both fact and dimension tables need to reflect the incoming data accurately. Oftentimes, you might need to configure how to detect new data from existing data already stored in the dimension tables. The following procedures show two procedures you can use when designing SSIS packages for managing dimension table loading. In Part 1 of this procedure, you will learn how to set up a left outer join merge task to detect new data for a dimension update.
Create a New Project for Dimension Table Load Packages
-
Open Business Intelligence Development Studio (BIDS). On the File menu, select New, and then select Project. Select the Integration Services Project template.
-
Type Chap13 for the project name. Change the project location to C:\Documents and Settings\<username>\My Documents\Microsoft Press\is2005sbs\Chap13 and confirm that the Create Directory For Solution check box is selected.
-
Click OK to create a new project within BIDS.
-
Right-click
 Package.dtsx in Solution Explorer and rename it
  DW_DimMgmt_1.dtsx.
 -
Drag a data flow task from the Toolbox window onto the Control Flow workspace.
-
Right-click and rename the task Find New Members Process 1.
-
Double-click the new data flow task to activate the Data Flow tab.
-
From the Data Flow Sources group in the Toolbox, drag two OLE DB Source objects onto the designer.
-
Right-click and rename the first data source Stage Customer Table.
-
Right-click and rename the second data source Dim Customer Table.
-
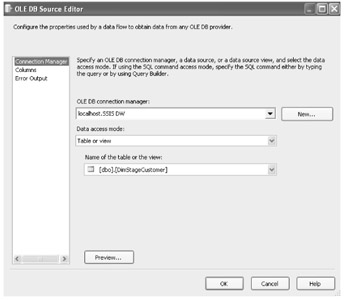
Double-click the OLE DB source named Stage Customer Table. In the OLE DB Source Editor, click New for the OLE DB Connection Manager.
-
If localhost.SSIS DW is in the Data Connections list, select it, and then click OK.
| Note | If localhost.SSIS DW is not available in the Data Connections list, click New, enter localhost for the Server Name, and select SSIS DW in the Select Or Enter A Database Name drop-down list. Click OK, and then OK again. |
Add Tables to Find New Dimension Members
-
Select [dbo].[DimStageCustomer] from the drop-down list of the Name Of The Table Or The View item and click OK.
-
Double-click the OLE DB source named Dim Customer Table. In the OLE DB Source Editor, verify that localhost.SSIS DW is selected from the OLE DB Connection Manager drop-down list.
-
Select [dbo].[DimCustomer] from the Name Of The Table Or The View drop-down list and click OK.
Your screen should look like this:
-
Drag two Sort objects from the Data Flow Transformations group in the Toolbox onto the Data Flow designer.
-
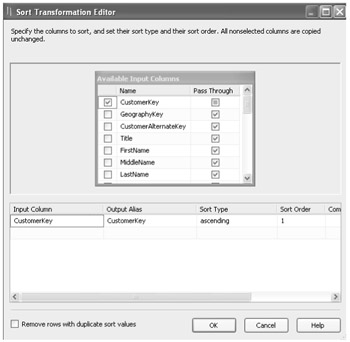
Connect Stage Customer Table Data Source to the first Sort task with the green arrow. Double-click Sort Task and select the CustomerKey check box from Available Input Columns.
Your screen should look like this:
-
Click OK.
-
Right-click and rename the task Stage Customer Key Sort.
-
Connect the Dim Customer Table data source to the second Sort task with the green arrow. Double-click the Sort task and select the CustomerKey check box from the Available Input Columns. Click OK. Right-click and rename the task Dim Customer Key Sort.
Configure a Left Outer Join Merge Join Task
-
Drag a Merge Join transformation to the Data Flow designer. Right-click and rename it Left Outer Join On Customer Key.
-
Connect Stage Customer Key Sort and Dim Customer Key Sort outputs to Merge Join.
-
In the Input Output Selection dialog box, select Merge Join Left Input from the Input drop-down list.
-
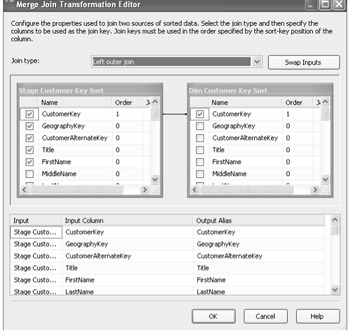
Double-click the Left Outer Join On Customer Key task and change the Join Type to Left Outer Join.
-
Select all the check boxes for the Stage Customer Key Sort columns.
-
Select the CustomerKey check box for the Dim Customer Key Sort column. Scroll to the bottom of the Output Alias list and change the output alias for this column to DimCustomer_CustomerKey.
Your screen should look like this:
-
Click OK.
Add a Conditional Split to Find New Customers
-
Drag a Conditional Split transformation from the Toolbox to the Data Flow designer and attach it to Left Outer Join On Customer Key with the green arrow.
-
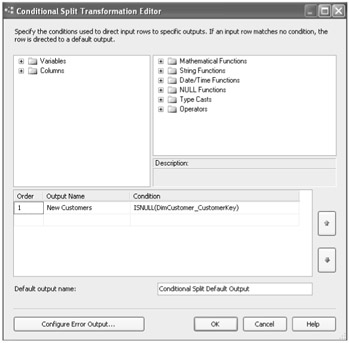
Double-click the new Conditional Split and create a new conditional split by typing New Customers in the Output Name column. Type into the condition field:
ISNULL(DimCustomer_CustomerKey)
Your screen should look like this:
-
Click OK.
Add a Flat File Destination
-
From the Data Flow Destinations group in the Toolbox, drag a Flat File Destination onto the designer and connect it to Conditional Split, using the green arrow.
-
In the Input Output Selection dialog box, select New Customers as the output and click OK.
-
Double-click the destination task to configure it. Click New to create a flat file connection.
-
Select Delimited for Flat File Format, and then click OK.
-
In the Flat File Connection Manager Name box, type New Found Customers 1.
-
Click Browse and navigate to C:\Documents and Settings\<username>\My Documents\Microsoft Press\is2005sbs\Chap13\Data\NewDimCustomers1.txt.
-
Select the Column Names In The First Data Row check box, and then click OK.
-
Check Overwrite Data In File and click the Mappings in the pane on the left.
-
Click OK.
-
Click File, and then click Save All.
-
Right-click the package in Solution Explorer and select Execute the Package.
Your screen should look like this:
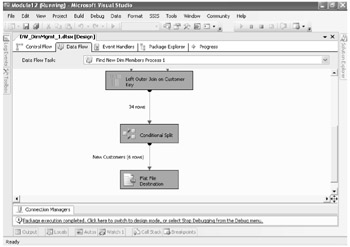
Note Six new customer rows should have been written to the destination file.
-
Click Stop Debugging from the Debug menu.
-
Double-click Flat File Destination and select Preview to view the data.
EAN: 2147483647
Pages: 152