| In this exercise, you will install OpenSLP on the Linux server you installed and configured in earlier chapters of this book. You will then modify the slp.conf file to create a DA. Warning A word of warning before beginning: This exercise requires you to access a website on the Internet and download a file. In previous chapters, we practiced configuring network interfaces on your SLES 8 server. If your system is connected to a company network that has Internet access, this shouldn't present a problem . If your company network doesn't provide access to the Internet or if you've set up your system at home and you only have dial-up access, this may cause difficulties. Configuring a modem on a Linux server is outside the scope of the CLE certification and this book. If you need to do this, visit the Linux Documentation project at http://www.tldp.org, where you will find several how-to's that explain how to configure a modem in your system and create a PPP connection . Another issue to be aware of is the fact that you'll be directed to download a package from the Internet. The URLS and links specified in this exercise were correct at the time this was written .
Complete the following: -
Boot your Linux server and authenticate as your student user with a password of novell .
-
Open a browser window and navigate to http://www.openslp.org.
-
Scroll down to the Downloads section, shown in Figure 5.11, and click the Take me to the download page link. Figure 5.11. The OpenSLP download page. 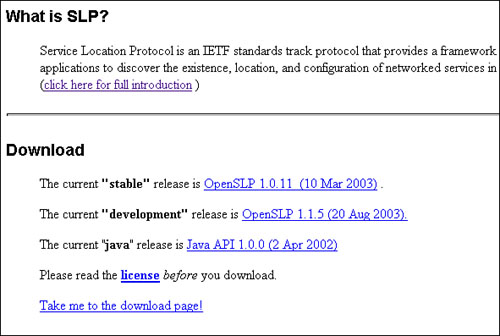 -
Under the latest stable release heading, select the latest OpenSLP binary package file, and download it to /tmp on your server. Note At the time this book was written, the latest stable release was 1.0.10 . -
Open a terminal session.
-
At the shell prompt, change to the root user account by entering su - and supplying a password of novell .
-
At the shell prompt, change to the /tmp directory by entering cd/tmp .
-
Install the OpenSLP package by entering rpm -i ./OpenSLP_file_name . For example, at the time this book was written, the current stable release is 1.0.10. The command to install this package would be rpm -i ./ openslp-1.0.11-1.i386.rpm .
-
Wait while the package is installed.
-
When the installation is complete, you're ready to configure the slp.conf file to create a DA. At your shell prompt, enter vi/etc/slp.conf .
-
Press Ins to enter Insert mode.
-
Scroll down to and locate the net.slp.useScopes line.
-
Remove the comment character (;) from the beginning of the line.
-
Delete the text string that reads myScope1, myScope2, myScope3 from the end of the line. -
After net.slp.useScopes = text , enter CLEScope . When you're done, the line should appear as follows : net.slp.useScopes = CLEScope This configures your DA to service a scope named CLEScope. -
Scroll down to and locate the line net.slp.isDA .
-
Remove the comment character (;) from the beginning of the line. The line should now read as follows: net.slp.isDA = TRUE This enables the local DA on your server. Remember that the SA and UA are run automatically when the service is started. -
Scroll to the net.slp.DAAddresses line. Remove the comment character ( ; ) from the beginning of the line and set the value of this parameter to your server's IP address.
-
The remaining parameters' functions can remain at their default values for your implementation. Press Esc to enter Command mode.
-
Save the changes to the file and exit vi by entering :exit .
-
Start the slpd daemon by entering /etc/init.d/slpd start at the shell prompt.
-
At the shell prompt, enter chkconfig ”list slpd . Verify that the slpd daemon is configured to automatically start at runlevels 3, 4, and 5. If it's not, enter chkconfig slpd 345 .
-
Verify that SLP has been configured correctly using the slptool utility. At the shell prompt, enter slptool findscopes . The slptool utility should find the CLEScope you configured your DA to service, as shown in Figure 5.12. Figure 5.12. Checking your SLP configuration with slptool. 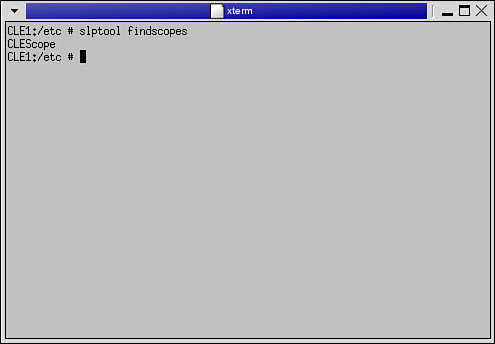 If slptool located the CLEScope, your SLP implementation is configured properly, and you're ready to continue preparing your system for an installation of NNLS. Configuring the hosts File The next task you need to complete is configuring your system's hosts file. Depending on the distribution and version, sometimes the hosts file is written during installation of the operating system in such a way that NNLS is unable to resolve the hostname correctly. Basically what happens is that an alias for the server hostname is added to the loopback address. For example, it may read something to the effect of
127.0.0.1 CLE-1 localhost.localdomain localhost
or
127.0.0.1 localhost.localdomain localhost CLE-1
Check your hosts file, located in /etc , and verify that the hostname of the server doesn't appear in the loopback address line. If you identify this problem in your hosts file, use vi to edit out the server hostname in the loopback address line. When you're done, it should read as follows:
127.0.0.1 locahost.localdomain localhost
You should also make sure there is a record in your hosts file that reads as follows:
Server_IP_Address Server_DNS_Name Server_Hostname (alias)
Here's an example:
192.168.1.35 CLE1.CLE.com CLE1
When you're done, you hosts file should appear similar to that shown in Figure 5.13. Figure 5.13. Checking your hosts file. 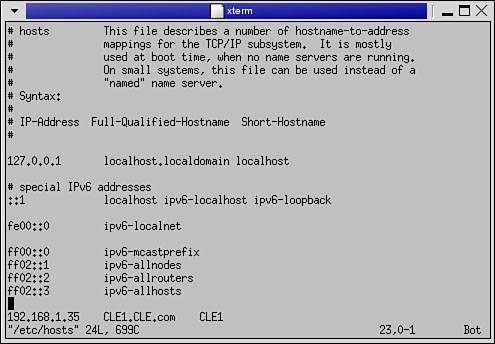
Once this is done, the next thing you need to do is establish a connection to the Internet. Establishing an Active Internet Connection To install NNLS, you need to have an active Internet connection established prior to starting the installation process. NNLS includes a component called Red Carpet that automatically updates NNLS products (we'll talk a little more about Red Carpet later in this chapter). The Red Carpet daemon must detect an active Internet connection during installation in order for it to configure its network settings. If you don't have an active connection, Red Carpet will still install, but its configuration will not be accurate. Unfortunately, you can't manually edit the configuration. If you install without an active Internet connection, you'll have to uninstall and then reinstall the Red Carpet component of NNLS at a later time when an Internet connection is available. Once your Internet connection is established, the next thing you need to do is gather information required for installing NNLS. Gathering Data Required for Installation During the installation of NNLS, you will be prompted to provide many pieces of data that will be used to configure the NNLS components ; these include usernames and passwords, IP addresses, and various other configuration parameters. Before you start the installation process, it is wise to gather all this information beforehand. If you do not do this, your installation may have to wait patiently for you while you search for the value of a requested parameter. You should prepare the information shown in Table 5.1. Table 5.1. NNLS Installation Data | NNLS COMPONENT | DATA REQUIRED | DESCRIPTION | | eDirectory | NICI file location and filename | This is the path and filename of the NICI file you downloaded. You should insert the floppy disk containing this file in your server's floppy drive and mount it to the /media/floppy directory before beginning installation. The NNLS installation script is coded to look in this directory for the file. | | | Install a new tree or into an existing tree? | You must specify whether you are installing a new eDirectory tree or into an existing tree. | | | Tree name | The data you provide here is dependent on whether you are installing a new tree or into an existing tree. If you're installing a new eDirectory tree, you must determine a unique name. If you're installing into an existing tree, you must supply its name at this prompt. | | | Existing server IP address | If you're installing into an existing tree, you need to know the IP address of the server (NetWare, Linux, or Windows) that already resides in the tree. If you're installing into a new tree, you won't be prompted to provide this information. | | | Admin name with context | Again, the value you supply here is dependent on whether you are installing into a new or an existing eDirectory tree. If you're installing into an existing eDirectory tree, you must provide the typeful name of the tree's admin user (for example, cn=admin.o=CLE ). If you're installing a new tree, you must also provide this information. This information will be used to create the tree's admin user account. | | | Admin password | This is the password for your admin user. If you are installing into a new tree, the value you provide will be assigned as the admin's password. If you're installing into an existing tree, you must provide the pass word of the existing admin user. | | | Server context | This parameter specifies where you want your server to reside in the eDirectory tree. If you're installing into a new tree, the context will be automatically created for you. If you're installing into an existing tree, you should use iManager from another server to create the context beforehand. The installation script won't create the context in the tree for you. | | | LDAP port | This parameter represents the TCP/IP port your LDAP server will use. The default value is 389 . Unless you have a conflict, you should stick with the default. | | | Secure LDAP port | This parameter represents the secure port the LDAP server will use. The default value is 636 . Again, you should stick with the default value. | | | HTTP port | This parameter represents the port used by iMonitor. The default is 81 . | | | Secure HTTP port | This parameter represents the secure port used by iMonitor. The default is 444 . | | Linux User Management | LDAP server IP address | This is the IP address of the eDirectory server running LDAP that LUM will use to authenticate. This could be any server in your tree. In this book, we're going to use the LDAP service on the same server where LUM and eDirectory will be installed. | | | Admin name and context | This parameter is the admin user for your tree. It's the same user as you specified during the eDirectory portion of the installation. You must provide the typeful name of your admin user (for example, cn=admin.o=CLE ). | | | Admin password | This parameter is the password assigned to your admin user object. | | | LDAP port | This parameter specifies which TCP/IP port will be used by LUM to communicate with the LDAP server. The default value is 389 . If you configured your LDAP server to use a different port number, be sure you enter it here. | | | Secure LDAP port | This parameter specifies the secure TCP/IP port to be used to communicate with the LDAP server in your eDirectory tree. The default value is 636 . If you've configured your LDAP server to use a different secure port number, be sure you enter it here. | | | Partition root | This parameter specifies the top most context where the LDAP server will begin searching for eDirectory objects. You must supply the typeful name of the container, such as o=CLE . | | | Workstation context | During the installation of LUM, a LUM Workstation object will be created in your tree. This parameter specifies where you want this object created. You must use a typeful name, such as o=CLE . This context must be the same as or within the partition root context you specified previously. | | | PAM services that will use eDirectory | You must decide which services you want to use eDirectory for authentication. You can choose from ftp, su, sshd, rsh, login, rlogin, and passwd. | | DirXML | Tree name | This parameter specifies the name of the tree where DirXML will be installed. In this book, we will use the eDirectory tree we specified previously. | | | Admin name and context | This parameter specifies the admin user for the tree specified earlier. You must use a typeful name such as cn=admin.o=CLE . | | | Admin password | This parameter is the password for the admin user object you specified earlier. | | eGuide | LDAP server IP address | This parameter is the IP address of the LDAP server that will be used to authenticate users to eDirectory. | | | LDAP port | This parameter specifies which TCP/IP port will be used by eGuide to communicate with the LDAP server. The default value is 389 . If you configured your LDAP server to use a different port number, be sure you enter it here. | | | Secure LDAP port | This parameter specifies the secure TCP/IP port to be used by eGuide to communicate with the LDAP server in your eDirectory tree. The default value is 636 . If you've configured your LDAP server to use a different secure port number, be sure you enter it here. | | | Admin name and context | This parameter specifies the admin user for the tree. You must use a typeful name such as cn=admin.o=CLE . | | Samba | eDirectory server IP address | For this parameter, you need to provide the IP address of a server in the eDirectory tree. This server must host a Master or a Read/Write replica of at least one eDirectory partition. | | | Admin name and context | This parameter specifies the admin user for the eDirectory tree. You must use a typeful name such as cn=admin.o=CLE . | | | Admin password | This parameter is the password for the admin user object you specified earlier. | | | LDAP server IP address | This parameter is the IP address of the LDAP server that will be used to authenticate users to eDirectory. | | | Samba Proxy user | eDirectory uses a proxy user account to assign rights to the Samba service. This allows the service to perform certain actions in the eDirectory tree. During installation, this user is automatically created and assigned the appropriate rights. At this prompt, you specify the name you want used for the proxy user. You can use any valid user name as long as it hasn't already been used in the tree. | | | Samba Proxy user password | This parameter is used to create a password for the Samba Proxy user. You can use any valid password. | | | LDAP port | This parameter specifies which TCP/IP port will be used by Samba to communicate with the LDAP server. The default value is 389 . If you configured your LDAP server to use a different port number, be sure you enter it here. | | | Secure LDAP port | This parameter specifies the secure TCP/IP port to be used by Samba to communicate with the LDAP server in your eDirectory tree. The default value is 636 . If you've configured your LDAP server to use a different secure port number, be sure you enter it here. | | iFolder | LDAP server IP address | This parameter is the IP address of the LDAP server that will be used to authenticate users to eDirectory. | | | LDAP port | This parameter specifies which TCP/IP port will be used by iFolder to communicate with the LDAP server. The default value is 389 . If you configured your LDAP server to use a different port number, be sure you enter it here. | | | LDAP admin name and context | For this parameter, you should use the admin user for the eDirectory tree. You must use a typeful name such as cn=admin.o=CLE . | | | Admin password | This parameter is the password for the admin user object you specified earlier. | | | iFolder server IP address | This parameter specifies the IP address of the server you want to install iFolder on. | | | iFolder admin username | This parameter allows you to delegate iFolder administrative tasks . You can specify names of users who you want to grant iFolder administrative access. The users must reside in the same eDirectory context as the admin username you specified earlier. The usernames must be separated with a semicolon. | | | iFolder user data path | This parameter specifies where you want user files stored in the Linux server's file system. The default path is /var/opt/novell/ifolderdata . | | NetMail | Admin name and context | This parameter specifies the admin user for the eDirectory tree. You must use a typeful name such as cn=admin.o=CLE . | | | Admin password | This parameter is the password for the admin user object you specified earlier. | | | NetMail primary DNS server | This parameter specifies the IP address of your organization's DNS server. | | | NetMail secondary DNS server | This parameter specifies the IP address of your organization's secondary DNS server. This parameter is optional. | | | Domain name for NetMail server | This parameter specifies your organization's domain name. | | | NetMail WebAccess HTTP port | This parameter specifies the TCP/IP port that will provide insecure access to the WebAccess email interface. The default is port 52080 . Unless you have a port or firewall filtering conflict, you should use the default value. | | | NetMail WebAccess secure HTTP port | This parameter specifies the TCP/IP port that will provide secure access to the WebAccess email interface. The default is port 52443 . Unless you have a port or firewall filtering conflict, you should use the default value. | | | NetMail LDAP port | This parameter specifies the port that will be used to populate the NetMail address book. The default port is 52389 . Unless you have a port or firewall filtering conflict, you should use the default value. | | iManager | iManager server IP address | This parameter specifies the IP address of the server where iManager is to be installed. In this book, we will install iManager on the same server where eDirectory is installed. | | | Admin name and context | This parameter specifies the admin user for the eDirectory tree. You must use a typeful name such as cn=admin.o=CLE . | | | Admin password | This parameter is the password for the admin user object you specified earlier. | | | iManager PCO password | This parameter specifies the password iManager uses to authenticate to eDirectory via LDAP as the Portal Container Object (PCO). If you install iManager on other servers in the tree, each instance must use the same PCO password. | | | LDAP server IP address | This parameter specifies the IP address of the LDAP server that will be used to authenticate to eDirectory. | | | LDAP port | This parameter specifies which TCP/IP port will be used by iManager to communicate with the LDAP server. The default value is 389 . If you configured your LDAP server to use a different port number, be sure you enter it here. | | | Secure LDAP port | This parameter specifies the secure TCP/IP port to be used by iManager to communicate with the LDAP server in your eDirectory tree. The default value is 636 . If you've configured your LDAP server to use a different secure port number, be sure you enter it here. | | | WebAdmin HTTP port | This parameter specifies the insecure HTTP port WebAdmin will run on. The default value is 8018 . Unless you have port conflict or firewall filter issues, you should stick with the default value. | | | WebAdmin HTTP Port | This parameter specifies the secure HTTP port WebAdmin will run on. The default value is 8020 . Unless you have a port conflict or firewall filter issues, you should stick with the default value. | | iPrint | Admin name and context | This parameter specifies the admin user for the eDirectory tree. You must use a typeful name such as cn=admin.o=CLE . | | | Admin password | This parameter is the password for the admin user object you specified earlier. | | | iPrint server IP address or hostname | This parameter specifies the IP address of the server where iPrint will be installed. The server must be in the eDirectory tree and must host a Master or a Read/Write replica of a partition. | | Virtual Office | eDirectory server IP address or hostname | This parameter specifies the IP address of the server where Virtual Office is to be installed. The server must be in the eDirectory tree and must host a Master or a Read/Write replica of a partition. | | | Admin name and context | This parameter specifies the admin user for the eDirectory tree. You must use a typeful name such as cn=admin.o=CLE . | | | Admin password | This parameter is the password for the admin user object you specified earlier. | | | NetStorage authentication server | This parameter specifies the IP address of the server that will be used to authenticate NetStorage users. This server must reside in the eDirectory tree and have LDAP installed. | | | NetStorage proxy user | At this prompt, you must supply the name of a user in the eDirectory tree that will be used to provide proxy access to the NetStorage service. In this book, we will simply use the tree admin. You must use a typeful name. | | | NetStorage proxy user password | This parameter supplies the password for the user specified earlier. | | | NetStorage users context | This parameter specifies the topmost context in the eDirectory tree that will be searched for NetStorage users. All contexts below this specified context will be included in search operations. | | | iFolder server IP address or hostname | As you'll learn later in this book, NetStorage and iFolder are tied closely together. This optional parameter specifies the IP address of the iFolder server you want to use as a NetStorage storage location. | | Red Carpet Client | Admin email address | This optional parameter specifies the email address that you want NNLS update messages sent to. | | | Proxy server | If you want the Red Carpet Client to connect to the Internet though a proxy server, select yes . Otherwise , select no . | | | Proxy server contact URL | If you selected yes for the preceding parameter, you need to use this parameter to specify the URL of the proxy server. | | | Proxy username | If you selected yes for the proxy server parameter earlier, you need to use this parameter to supply a username for the proxy server. | | | Proxy user password | If you selected yes for the proxy server parameter earlier, you need to use this parameter to supply the password for your proxy server username. |
As you can see, this is an extensive list of information you need to gather. Before beginning the NNLS installation, you should create a list of the required information and keep it handy as you proceed. With this information in hand, you're almost ready to start installing NNLS. However, you need to be aware of some important issues you may encounter during the installation process. Gotchas to Avoid During Installation There are several idiosyncrasies with the NNLS installation routine that can cause you a great deal of anguish. If you're aware of them, however, they are pretty easy to deal with. In this section, we'll cover the issues other administrators have discovered (so you don't have to!). When installing NNLS, keep the following points in mind: -
Don't include your server's domain when prompted for a hostname. Many administrators have mistakenly thought the installation script was asking for the server's hostname and domain name (such as CLE1.CLE.com). If you include the domain name with the hostname, eDirectory won't install correctly and you will be left scratching your head wondering why all your NNLS components don't work. -
Watch out for port conflicts, especially with Apache Web Server. NNLS automatically installs a new version of Apache on your server. If Apache is already running on your system, the NNLS installation routine will shut it down and change its runlevel configuration to not automatically start. The new Apache Server's configuration files are located in /etc/opt/novell/httpd and the default document root directory is set to /var/opt/novell/httpd/htdocs . The important point to remember is that both the old and the new versions of Apache are configured to run on ports 80 and 443. Table 5.2 lists all the default port assignments used by the various NNLS components. Note that, if two ports are listed, the first port is the insecure port and the second port listed is the secure port. Table 5.2. Default NNLS Ports | NNLS COMPONENT | DEFAULT PORTS | | Apache Web Server | 80, 443 | | eDirectory | 524 | | iMonitor | 8008, 8010 | | iPrint | 631, 443 | | LDAP | 389, 636 | | Tomcat | 8080 | | Samba | 137, 138, 139 | | NetMail WebAdmin | 8018, 8020 | | NetMail LDAP | 52389 | | NetMail WebAccess | 52080, 52443 | | NetMail Calendar Access Protocol | 1026 | | NetMail SMTP Agent | 25 | | NetMail POP Agent | 110, 995 | | NetMail IMAP Agent | 143, 993 | | NetMail NMAP Agent | 689 |
-
During installation, NNLS places some of its man pages in the /opt/novell/man directory, which is not in the MANPATH variable. To add this path to the MANPATH variable, open a terminal session when the NNLS installation is complete. At the shell prompt, enter MANPATH=$MANPATH:/opt/novell/man . This command adds the new path to the existing directories already in the MANPATH variable. Warning Be sure to remember to include $ in front of MANPATH, as shown the example. This designates the text that follows as a variable. If you forget $, MANPATH will be treated as a literal text string, overwriting the directories currently stored in the MANPATH variable. Although your NNLS man pages will work, all your system man pages won't .
Then enter export MANPATH at the shell prompt. At this point, your system man pages and your NNLS man pages will be available. -
Make sure your system DNS server is up and running. The NetMail installation process will attempt to contact it to verify domain and host information. If it can't contact the server, the NetMail product won't work properly. -
If you interrupt the installation script after it has started installing packages, you must uninstall eDirectory before attempting to reinstall NNLS. To do this, open a terminal session and enter /usr/bin/nds-uninstall at the shell prompt. -
Sometimes the new NNLS Apache Web Server won't start up after installation. This presents a serious problem because most of your NNLS administration utilities are dependent on it. Essentially what happens is, the process ID (PID) file for the new Apache Server doesn't get updated with the correct status of the service. It specifies that the service is already running. When the novell-httpd daemon tries to start, it checks its associated PID file. When it reads that the process is supposedly already running, it automatically shuts down. If you suspect this is happening, check your /var/log/boot.log file for a message to this effect. If you find it, simply delete the /var/opt/novell/httpd/run/httpd.pid file and then start the novell-httpd daemon. Believe it or not, it is actually time to start installing NNLS on your system! Let's take a look at how this is done. Installing NNLS With your downloaded ISO image mounted (or burned on a CD and mounted), time synchronization established, OpenSLP configured, and your pre-installation data gathered, you're finally ready to start the installation process. To do this, open a terminal session on your server and switch to the directory where your ISO file or CD is mounted. Start the installation by entering ./install.sh . One of the first decisions you will have to make is whether you want to perform an express or a custom installation. Let's review how each of these options work. Express NNLS Installation As the name suggests, an express installation is designed to require the administrator to supply only minimal input. To perform an express installation, you need to supply only the following data: -
The path to the NICI file you downloaded -
The name for the new eDirectory tree -
The context and password for the tree admin user object This option sounds very easy. Be aware, however, that it is not for everyone. To make it easy, the express installation option makes many assumptions for you without your input. For example, this option assumes you want to install a new eDirectory tree. If you want to install your NNLS server into an existing eDirectory tree, you must use the custom option. In addition, the express option installs all the NNLS components on the same server. For a small organization or for lab testing, this scenario may be quite appropriate. If you are deploying NNLS in a production environment for a large organization, however, putting all the components on the same server may not yield the level of performance you need. If you need to distribute the NNLS components among several servers (to provide a degree of load balancing), you need to use the custom option. The express option also assigns services to use the default NNLS TCP/IP ports mentioned earlier. If this will create port conflict issues on your server, you need to use the custom installation to customize the port number assignments. Be aware, as well, that the express option also uses the context you specify for the admin user as the context for all other components. If you need to customize your tree, then, likewise, you need to use the custom installation option. If, however, the constraints of the express option match your requirements, by all means use it. I've installed and configured many times and the express option really is a lot easier on the administrator. You start it up, provide the few parameters it needs, and then you can leave while it completes the installation. One other key benefit to the express option that I have observed is the fact that it tends to produce more successful installations of NNLS. This has less to do with the way the script is written as it does with the fact that there is less input required from the administrator and, hence, there are fewer opportunities for mistakes. The custom installation option requires so much information that it's easy for the administrator to enter typos, provide wrong information, or misunderstand what information is being requested. The express option also provides you with the ability to use a response file to automate the installation process. Essentially, what you do is download the response file from Novell's website, edit the text of the file for your organization and network, and then point the installation script to this file. When you do this, the install script reads the data it needs from the file instead of displaying prompts on the screen for you to respond to. The user input portion of the express installation response file is shown in Figure 5.14. Figure 5.14. Express installation response file. 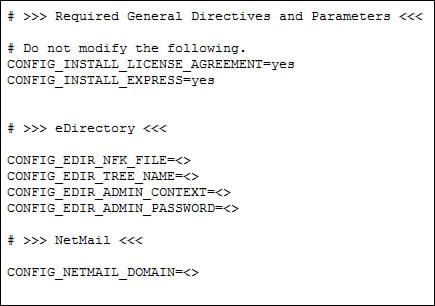
Notice in Figure 5.14 that you simply enter the information you would have been prompted for onscreen in the appropriate fields. Using a response file isn't of much benefit if you're only installing one or two NNLS servers. If you're installing many servers, however, it can be a real timesaver. The express installation response file can be downloaded from http://www.novell.com/documentation/lg/nnls/answers/express.txt. Warning I strongly recommend that you use KWrite, vi, or another Linux text editor to edit this file. Some Windows text editors mess up the CRLF characters in Linux text files. If this happens, the file won't work with the NNLS install script .
Once you've edited the file, create a directory named /etc/opt/novell on your server and save the response file there as nterprise_linux_services_install.conf . Then, run the install script with the -s option (for example, ./install.sh -s ). If you need more flexibility in your installation than the express option has to offer, you should use the custom installation option. Custom NNLS Installation The custom installation option takes a lot longer to complete and increases the risk of administrator error, but it also provides you with a high degree of flexibility. With a custom installation, you can do the following: -
Distribute NNLS components among several different servers. As stated earlier, this is strongly recommended for large organizations. The horsepower required from your server to run all the NNLS components on the same system is considerable. If you have thousands of users requesting services at the same time, the system could slow to a crawl. The custom option allows you to specify which server each component is to be placed on. By dividing the load among servers, NNLS can provide stellar high-load performance. A nice feature of NNLS is the fact that it will check each server you select for the appropriate dependencies and install missing packages for you (if it has them). -
Install into an existing eDirectory tree or create a new one. -
Customize where various objects used by NNLS components are stored in the tree. Because of the sheer amount of data you must provide, it's a good idea to fill out Table 5.1 from earlier in this section. As with the express option, you can automate the installation process using a response file. Because the custom installation requires a lot more information from the administrator, you must use a different response file. The file for a custom installation is available for download from http://www.novell.com/documentation/lg/nnls/answers/custom.txt. As with the express response file, you must edit the file with a Linux text editor to provide the requested information. Then you must save the file as /etc/opt/novell/nterprise_linux_services_install.conf and run the install script with the -s option. Once you have selected the type of install you want to use, you're ready to begin! In the next lab exercise, we will perform a complete custom installation using detailed steps. At a high-level, the steps you need to follow to install NNLS are as follows: -
Mount your NNLS 1.0 CD or ISO image on your Linux server.
-
Mount the floppy disk containing your NICI file on your Linux server.
-
Open a terminal session and change to the root user account by entering su - and supplying your root user password.
-
Change to the directory where the NNLS 1.0 CD or ISO image is mounted.
-
Start the installation by entering ./install.sh .
-
When prompted, specify that you want to install NNLS by entering i .
-
At this point, you must decide whether you want to perform an express or a custom install. If you want to do an express installation, enter y when prompted; otherwise, use the default value of [ no ] by pressing Enter .
-
Identify the NNLS components you want to install.
-
When prompted, accept the license agreement.
-
When prompted for the location of the NICI Foundation Key file, enter the path and filename of the NICI file.
-
Enter the parameters requested at each prompt (see Table 5.1 for details).
-
When prompted, view the installation summary by entering y .
-
If you need to change any parameter, enter y and follow the instructions present on the screen.
-
When you are satisfied with the configuration, begin the installation by entering f .
-
Wait while all the packages are installed and the services are configured.
-
When prompted, view the readme file by entering y .
-
Save the installation settings in a log file by entering y . This log file can be used as a response file. By editing this file, you can use it to perform automated installations of subsequent NNLS servers.
-
Unmount your CD or ISO image and floppy disk.
That's all there is to it! Let's do it for real in Lab Exercise 5.2. |